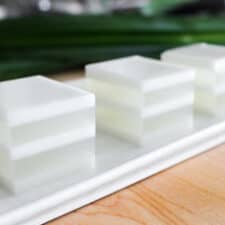
Coconut Jelly Duo วุ้นกะทิ
Your folders
Your folders
Servings: 6
Cost: $0.67 /serving
Author : Pailin Chongchitnant
Ingredients
Export 4 ingredients for grocery delivery
Instructions
Step 1
Coconut Milk Layer: Add coconut water to a small pot, then sprinkle on agar agar powder and stir to mix. Add coconut milk, sugar, salt, and pandan leaf. Bring to a boil, stirring frequently. Once it comes to a full boil, the agar powder should be completely dissolved, but you can double check by spooning some liquid into a metal spoon, then pour it off, and if there are no tiny grains still stuck to the spoon, then you’re good to go. If you want to add coconut meat to this layer, you can add it at this point and bring the mixture to a boil one more time.
Step 2
Lower the heat to the lowest setting and keep the pot covered while you make the other layer. Make sure it’s just barely simmering and not boiling away! If you have a strong gas stove you might have a hard time getting the heat to stay very low, in that case you can keep it off heat and covered, and reheat it to boiling right before you use it.
Step 3
Coconut Water Layer: In another small pot, add coconut water and agar agar powder and stir to break up the powder. Add sugar and pandan leaf, then bring to a boil, stirring frequently. Once it boils, check to see that there aren’t any tiny little grains of agar powder still floating around. Keep the mixture hot and covered just like the coconut milk layer.
Step 4
Assembly: You can divide up the layers however you wish, but in the video I had 3 layers of white (⅔ cup each) and 2 layers of clear (1 cup each). Pour the first layer into your dish, spoon off any bubbles, then refrigerate just until the top has set (about 5 minutes if you’re using the same measurements as me). You can test this by gently tapping the layer with your finger, and if it’s no longer liquid and doesn’t stick to your finger, it’s ready to go.
Step 5
Making sure the second layer is steaming hot, pour it over the back of a spoon, letting it drip gently onto the edges of the first layer. If you pour too quickly or too aggressively, it’ll break the first layer. Refrigerate again just until the top is set (about 7 minutes if you’re using my measurements).
Step 6
Repeat with the remaining agar mixture, making sure that you keep both mixtures hot and covered while you wait for it to set. If for whatever reason it has gone cold, you can simply reheat it when you are ready to pour.
Step 7
Once you’re finished, let the jelly refrigerate for at least 4 hours so it is nice and cold when you serve it. Enjoy!
Step 8
Join us on Patreon for bonus content and rewards!