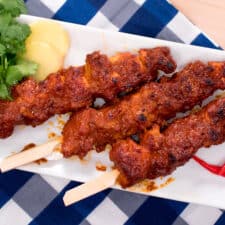
Coconut Milk BBQ Chicken (Gai Golae) ไก่กอและ
5.0
(1)
Your folders
Your folders
Servings: 8
Author : Pailin Chongchitnant

Ingredients
Export 13 ingredients for grocery delivery
Instructions
Step 1
Remove seeds from dried chilies and grind into a powder in a coffee grinder with coriander, cumin and cinnamon.
Step 2
If using a mortar and pestle: Chop your garlic and shallots first, then add to the mortar and pestle and pound until fine, adding the dry spices as needed to help absorb moisture and add friction. Once it is a fine paste, add shrimp paste and pound to mix.
Step 3
If using an immersion blender: blend shallots and garlic until smooth, adding as little of the water as needed to help it blend. Add shrimp paste and dry spices and blend until smooth.
Step 4
In a heavy-bottomed pot over medium heat, add a little vegetable or coconut oil to coat the bottom of the pot, and add the curry paste. Saute the paste for 2-3 minutes until it is very thick and aromatic, adding a little coconut milk to deglaze if it sticks to the pot.
Step 5
Then add the remaining coconut milk, water, palm sugar, ½ tsp of the salt and tamarind juice. Simmer genty for 15-20 minutes, stirring occasionally, until the sauce has thickened, but is still easily pourable.
Step 6
Separate out ⅓ cup of sauce to use as chicken marinade, and add ¼ tsp salt to it. Let the marinade cool completely before tossing with the chicken.
Step 7
Let the chicken marinate overnight or at least 30 mins. Keep the rest of the sauce covered and chilled in the fridge until ready to use.
Step 8
Preheat the broiler on high. Set the rack so the the chicken will be 4-5 inches away from the element. Alternatively, you can use the outside grill preheated and oiled to medium heat. NOTE: If using an outdoor grill, make sure your grill grates are super clean and well-oiled to prevent sticking. You don't want the thick sticky glaze to pick up old charred krut from the grates!
Step 9
Skewer the chicken, making sure to push the chicken pieces right up against each other, and make sure the tips are not exposed. The handle ends should be wrapped in foil.
Step 10
Place the skewers on a rack set on top of a roasting pan lined with foil. Add a thin layer of water to the pan to prevent drippings from burning and smoking.
Step 11
Grill the chicken for about 4 mins per side or just until the chicken is cooked through. Bring chicken out and let cool to room temp, or at the most lukewarm if you're in a rush; put a fan to them for faster cooling!
Step 12
While the chicken is cooling, check the consistency of the glaze: If it's fridge cold it will be too stiff, so microwave it briefly to bring it to room temperature. If it's at room temp and is still really thick and gloppy, add a little bit of water (just a smidge at a time) until it pours freely and smoothly, but is still thick enough to coat the chicken well. Note: An idea just occurred to me that you can divide the glaze into 2 even batches to make sure you don't run out for the second round! Shoulda thought of that earlier!
Step 13
Once chicken is cooled, spoon the glaze over the chicken to coat it entirely, and shake off as much of the excess as you can so it's not dripping while sitting on the grill. Place the skewers on the rack and broil them again, about 2-3 minutes on each side or until the marinade is bubbly and dried on to the chicken, with a few charred spots. If your broiler has hot spots, move the chicken around to get a more even cooking.
Step 14
Let the chicken cool, and repeat the glazing and grilling one more time. With this recipe you should have just the perfect amount of glaze for 2 bastings, if you didn't pre-divide the glaze and find that you're running low for the second round, just add a little water to stretch it, but you should use it all up to maximize flavour. For the last grililng, since this is your "presentation round" make sure you've got some nice charred spots on them!
Step 15
Let cool slightly and serve either on its own or with some jasmine rice. Enjoy!