Grill Roasted Leg of Lamb Recipe
4.4
(95)
Your folders
Your folders
Prep Time: 45 minutes
Cook Time: 120 minutes
Servings: 8
Ingredients
Export 3 ingredients for grocery delivery
Instructions
Step 1
Prep. Start the day before if you can by removing as much of the thick fat cap on the surface as possible and all the silverskin underneath. Remove the bones, or not. Your choice.
Step 2
Now gash the surface by stabbing it repeatedly about 1/2" (13mm) deep and 1" (2.5cm) apart or run a sharp blade across the surface in a checkerboard pattern making squares 1 to 2" (2.5 to 5cm) wide. Click here to read more about the technique of gashing. Sprinkle the salt all over the meat going lighter in the thinner areas. This is called dry brining. Click here to learn more about the concept. Now use butcher string and tie the whole floppy mess into as much of a log shape as possible so it will cook evenly. Your string and knots are going to look sloppy, and you may have problems with loose flaps of meat on the ends, but get them tucked in. I've been known to use toothpicks, and even turkey lacers (shown here). Put it in a pan, and leave it in the fridge overnight.
Step 3
Make the Dolly's Lamb Rub And Paste and swab the paste all over the meat and deep into the gashes.
Step 4
Fire up. Preheat the cooker in a 2-zone setup so the indirect side is about 225°F (107°C). I know a lot of recipes call for higher temps, but I'm here to tell you, this cut performs much better at low temps so the tough connective tissues and copious fat can liquefy (read more about this concept in my article about meat science). If you have a digital thermometer with a probe that can be left in, insert it now. If you are cooking bone-in, make sure your thermometer probe is about 1" away from the bone in the thickest piece of the meat. If you wish to add some smoke flavor, add a small amount of dry wood now, perhaps a handful, depending on your cooker. The more ventilation the more wood.
Step 5
Cook. Place the leg of lamb on the indirect side and cook with the lid down until the meat hits about 110°F (43°C). Then move the whole clod of meat over to the direct heat side and sear it until it is dark on all four sides or until the meat is 130 to 135°F (54 to 57°C) max. In the photo above you can see how I used a pair of bricks wrapped in foil to hold the roast on edge and get an all-over sear.
Step 6
Prep again. While the meat is cooking, prepare a board sauce, heavy on rosemary and/or mint. You can make it in a bowl or cup.
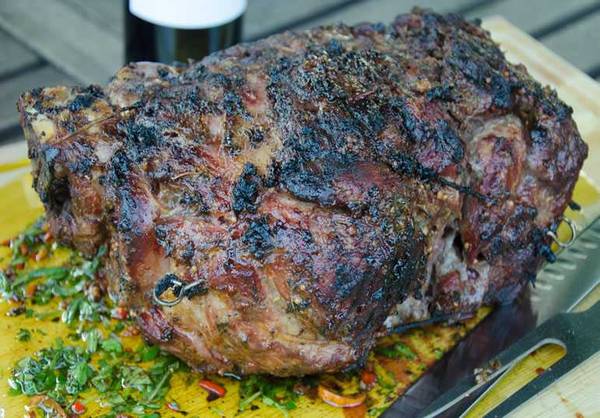
Step 7
Pour the board sauce on the board, plop the meat on top of it and start carving. You want the juices to mingle with the sauce.
Step 8
Serve. Carve the meat across the grain into 1/4" (6mm) slices as needed and let the meat get plenty of sauce on it just before serving.