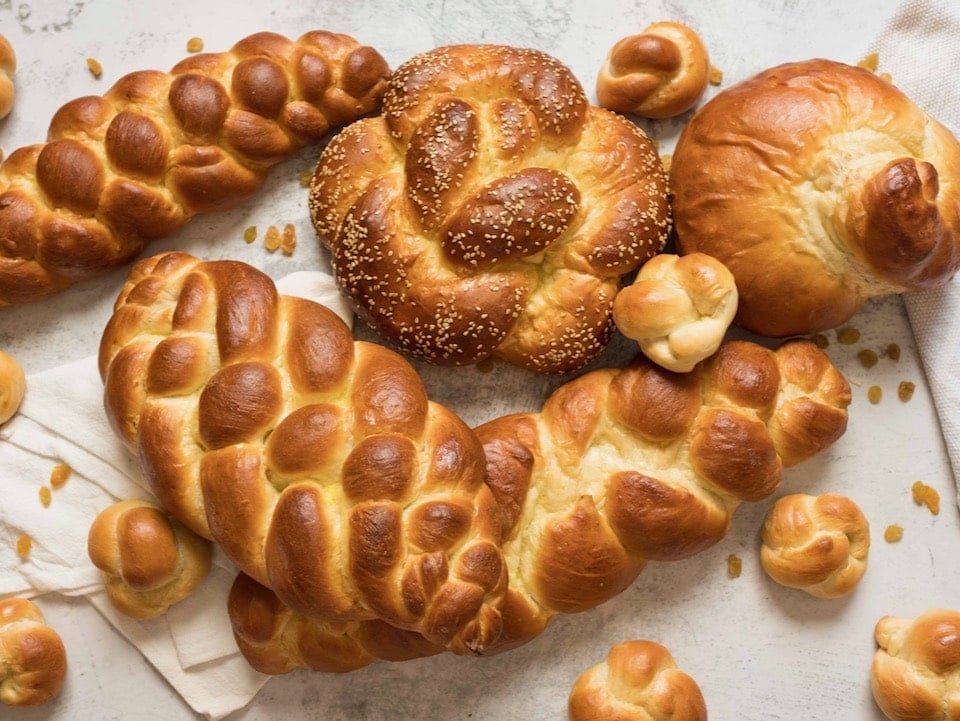
How To Braid Challah
5.0
(10)
Your folders
Your folders
Prep Time: 240 minutes
Cook Time: 45 minutes
Total: 285 minutes
Servings: 1
Author : Tori Avey
Ingredients
Export 2 ingredients for grocery delivery
Instructions
Step 1
Divide your dough into the number of strands you’ll need, making sure each portion is equal in volume. For example, if you’re making a three strand challah, divide your dough into three equal portions.Take one of the portions and roll it out with a rolling pin until it is flat and about 1/4 inch thick. Don’t worry about the shape of the dough, it doesn’t matter. Put the smaller part of the dough towards the top of your rolling surface, with the widest part towards the bottom.
Step 2
Begin rolling the dough into a strand. Start by rolling it back with your fingers from the top downward.
Step 3
Using both hands, put pressure on the rolling surface and pull the dough back towards you, rolling it back into a strand shape. Keep even pressure on the dough as you roll so that no air pockets collect in the strand.
Step 4
Once your strand shape is created, roll it back and forth with both hands to erase the seams and smooth out the strand. As you roll, angle your hands outward and apply gentle pressure to taper the dough on the outer edges. By doing this, your strand should end up slightly thicker in the middle and thinner on the ends. This will help make your braided challah tapered at the ends, which creates a beautiful shape.
Step 5
Further taper the strand by grasping one end between your two palms and gently rolling the dough back and forth. Repeat for the other end of the strand.
Step 6
That’s how you make a strand, which is the foundation of any challah braid! Simple, right? Now, before we start braiding, I want to share a few tips with you that I’ve learned from trial and error over the years.
Step 7
This is the easiest way to braid a challah. For those of you who know how to braid hair, this should come naturally to you. I like to start the braid in the middle of the strands instead of the top because it gives the challah a more even, balanced shape. The important thing to remember when braiding a Three-Strand Challah is to be aware of your middle strand. Each strand of dough will take a turn being the middle strand; keeping your eye on the middle strand will help you stay on track as you braid.Create three equal-size strands. Lay the three strands side-by-side.
Step 8
Grab the center of the right strand and cross it over the middle strand, drop it in the center. The right strand is now your middle strand.
Step 9
Grab your left strand and cross it over the middle strand. The left strand becomes your middle strand.
Step 10
Repeat steps 2 and 3 (right strand to middle, left strand to middle) until you have braided your challah to the very end.
Step 11
Pinch the three strands together at the end.
Step 12
Grab the challah in the center…
Step 13
and flip it towards you so the challah is now upside down and the unbraided strands are facing downward.
Step 14
Continue braiding. The left strand will either need to cross over or under the middle strand, depending on how your braid turned out. The left strand becomes your middle strand. Same with the right strand – it will either need to cross over or under the middle strand, depending on how your braid turned out. Either way, the same pattern applies – left strand to middle, right strand to middle.
Step 15
Repeat steps 6 and 7 (left strand to middle, right strand to middle) until your challah is fully braided. Pinch the ends of the loose strands together and tuck both the top and bottom tips of the challah under to create a nice rounded shape.
Step 16
Brush with egg wash, top if desired, then allow challah to rise. Bake according to your challah recipe’s instructions.
Step 17
The Four-Strand Challah is my favorite braid. I love the design it creates. When braiding a Four-Strand Challah it’s important to remember that you always start with the strand that is furthest to the right. Memorize the “over, under, over” pattern and say it out loud as you braid to keep you on track.Create four equal-size strands. Lay the four strands side-by-side, then pinch them together so they are connected at the top.
Step 18
Take the strand furthest to the right and weave it towards the left through the other strands using this pattern: over, under, over.
Step 19
Take the strand furthest to the right and repeat the weaving pattern again: over, under, over. Repeat this pattern, always starting with the strand furthest to the right, until the whole loaf is braided.
Step 20
Pinch the ends of the loose strands together and tuck them under on both ends of the challah loaf to create a nice shape.
Step 21
Brush with egg wash, top if desired, then allow challah to rise. Bake according to your challah recipe’s instructions.
Step 22
A Six-Strand Challah is somewhat more complex than the Three- and Four-Strand braids, but once you get the hang of it it’s actually pretty simple. This braid creates a thick, wide challah with a pretty design.Create six equal-size strands. Lay the six strands side-by-side, then pinch them together so they are connected at the top.
Step 23
When braiding a Six-Strand Challah, like with the Four-Strand, it’s important to remember that you always start with the strand that is furthest to the right. Memorize the “over 2, under 1, over 2” pattern and say it out loud as you braid to keep you on track.Take the strand furthest to the right and weave it towards the left through the other strands using this pattern: over 2 strands, under 1 strand, over 2 strands.
Step 24
Take the strand furthest to the right and repeat the weaving pattern again: over 2 strands, under 1 strand, over 2 strands. Repeat this pattern, always starting with the strand furthest to the right, until the whole loaf is braided.
Step 25
Pinch the ends of the loose strands together and tuck them under on both ends of the challah loaf to create a nice shape.
Step 26
Brush with egg wash, top if desired, then allow challah to rise. Bake according to your challah recipe’s instructions.
Step 27
For the Rosh Hashanah holiday, challah is baked into a round or spiral shape. The spiral (or snail-shaped) challah is sometimes called a “Turban Challah.” The shape symbolizes the cycle of a year coming to a close, and a new cycle beginning. This type of challah is usually baked with raisins in the dough to signify a “sweet” new year. Concealing the raisins inside the dough creates a prettier, more uniform challah.Knead and roll to flatten the dough into a rough rectangular shape, about a 1/2 inch thick.
Step 28
If adding raisins, sprinkle them evenly across the center of the rectangle. Use either black or golden raisins, whichever you prefer.
Step 29
Use your hands to rolls the dough from the bottom upward into one large, even strand, making sure to roll tightly to avoid air pockets. The raisins will be concealed inside the dough.
Step 30
Roll the dough using both hands to smooth seams and create one large strand.
Step 31
Taper the strand at the ends by rolling the dough between your palms.
Step 32
Roll one end of the strand inward to create a spiral snail-shell shape.
Step 33
Continue rolling the strand in the same direction until the spiral is complete. Tuck the loose end of the spiral underneath the challah and pinch it tightly into the bottom, securing it.
Step 34
Brush with egg wash and top, if desired. Allow challah to rise for at least 45 minutes until you can press your finger into the dough and it doesn’t bounce back. The last rise is very important with this challah shape, since it is prone to splitting. Bake according to your challah recipe’s instructions. Note that this shape may require more baking time than a normal challah due to its bulk.
Step 35
This is an alternate way to make a round challah for Rosh Hashanah, or any time. The chain shape represents unity, strength, and togetherness. While the pattern looks intricate, it’s actually quite simple to make.Divide the dough into five thick equal-size strands. Don’t taper the strands as you would for a normal challah braid.
Step 36
Form one strand into a circle, pinching the ends together to create a ring of dough.
Step 37
Take another strand and connect it to the first circle as in a chain. Pinch the ends together to form a second circle.
Step 38
Repeat the process until all the strands form a complete chain. The final circle links to the first one to create a round challah shape.
Step 39
Brush with egg wash, top if desired, and allow challah to rise. Bake according to your challah recipe’s instructions. Note that this shape may require more baking time than a normal challah due to its bulk. You may want to tent it with foil to keep it from burning on the outside as it cooks through. Use a thermometer to test for doneness in the center.
Step 40
Use your challah dough to make some pretty and delicious challah dinner rolls! They are so simple to make, and they’re sure to impress your dinner guests. To save time, I sometimes make these early in the morning and shape them into rolls, then cover the cookie sheet with plastic and place it in the refrigerator. I take it out of the refrigerator about 30 minutes before baking so the dough can return to room temperature.Roll your dough into several small equal-sized strands that are about 9 inches long. For each strand, start by tying a knot in the dough.
Step 41
Pinch the two loose ends together to create a roll shape.
Step 42
Place the seam side down on a greased cookie sheet. Brush with egg wash, top if desired, and allow to rise. Bake at the same temperature as you would a traditional challah braid. They will cook faster than a braid, so keep an eye on them towards the end of the baking process.