How to Make a Gingerbread House
5.0
(1)
Your folders
Your folders
Prep Time: 15 minutes
Cook Time: 30 minutes
Servings: 1
Author : Melissa Griffiths - Bless this Mess
Ingredients
Export 11 ingredients for grocery delivery
Instructions
Step 1
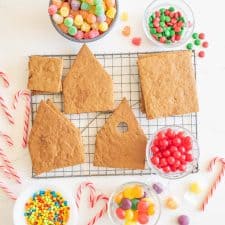
Get our gingerbread house pattern downloaded it (small house here) (large house here). Get it printed and cut the house shapes out.
Step 2
To make the large gingerbread house you'll need 3 batches of this dough recipe and for the smaller house you'll need a single batch of this recipe (the recipe as written).
Step 3
Preheat the oven to 360 degrees F (a little hotter than 350 degrees F helps the gingerbread to be crisper and sturdier).
Step 4
In a large bowl beat together the butter and brown sugar until light and fluffy, about 2 minutes.
Step 5
Add the egg and molasses and beat to combine.
Step 6
Add the flour, ginger, baking soda, cinnamon, nutmeg, allspice, and salt and mix until well incorporated. The mixture will be crumbly.
Step 7
Dump the crumbly dough into the center of a 15 by 11 inch piece of parchment paper.
Step 8
Use your hands and a rolling pin to press and roll the dough into a 13.5 by 10 inch rectangle. I normally start by pressing the dough with my hands, then rolling it out with a rolling pin. I'll use a flat edge spatula or a bench scraper to cut extra long edges into more of a rectangle and I'll press the pieces that I cut into spaces that need more dough. Once you do it a time or two you get the hang of it! Take your time here to get a nice rectangle, it's ok to cut and patch the rectangle together, just roll it smooth.
Step 9
Gently lift opposite edges of the parchment paper and set it on a rimmed baking sheet.
Step 10
Bake the slab of gingerbread for 20 minutes.
Step 11
Remove from the oven and let cool 3-4 minutes.
Step 12
While still warm cut, place your paper pattern on top of the warm cookies slab and cut out the desired shapes using a small paring knife.
Step 13
Carefully remove the extra "scraps" of gingerbread around the pieces you just cut (save them to eat them, they are delicious!). If any of your house pieces need a little more trimming so they have straight edges, so that now.
Step 14
Return the gingerbread house pieces to the oven and bake for an additional 10 minutes.
Step 15
Remove from the oven and allow to cool fully before assembling.
Step 16
While your gingerbread house pieces are cooling, make your royal icing.
Step 17
Add your powdered sugar and meringue powder to a large mixing bowl. Add 10 tablespoons of water to the bowl.
Step 18
Use a stand mixer or a hand mixer to beat until well incorporated. If the icing is very crumbly, add more water, 1 tablespoon at a time until it creates a thick but smooth icing. I normally end up adding 4 more tablespoons of water and sometimes the full 5, it'll depend on how you measured your powdered sugar though.
Step 19
Beat until the icing is shiny, about 6-8 minutes with a stand mixer and 8-10 minutes with with a hand mixture.
Step 20
The icing should be thick but not so thick you can't stir it with a spoon. Adjust the constancy as needed.
Step 21
When you aren't working with your royal icing place a clean wet dish towel over the top of the icing so that it doesn't start to harden. You can also press a piece of plastic wrap against the top of the icing.
Step 22
To put your house together get a flat surface like a cake board, cutting board, or cookie sheet. Put about 2 cups of your royal icing in a piping bag or a good quality freezer zipper-topped plastic bag. Use a frosting tip that is about ½ inch wide circle or cut about ½ inch off the tip of one corner of your baggie. Take the end of a gingerbread house (one of the pointed end pieces) and pipe a thick line of icing along the bottom.
Step 23
Set it on your board where you want it to be and use tin cans to help support it.
Step 24
Pipe a thick line of icing on three sides (two short and one long side) of a side wall piece of the house.
Step 25
Place that piece on the inside of one side of the end house piece (take a look at where it hits the house, it's on the inside of the end piece and you don't see the edge of the wall, this is the easiest way to make the house stable.
Step 26
Pipe a thick layer of icing on the bottom of the other end other house and place it against the wall you just sat down.
Step 27
Pipe a thick layer of icing on three sides of the second wall piece and put it in between the front and back of the house, opposite of the other wall. Use cans to help support the structure as needed and let this much of the assembled house sit for 15 minutes to allow the icing time to harden.
Step 28
After your 15 minutes of waiting, pipe a thick layer of royal icing along the top of the walls and the angles of the roof.
Step 29
Add a thick layer of icing to one edge of one piece of roof (the wide edge), this will be where the roof comes to a point and touches the other piece of roof at the top ridge line of the roof. Place both pieces of the roof on top where they go and gently press into place. Use cans to support the roof as needed. Let the house dry for at least 30 minutes before decorating.
Step 30
I like to move to a smaller icing tip or place more icing in another baggie and cut a smaller tip in the bag. You don't need as much icing to decorate.
Step 31
You can use just icing to decorate, or you can use candies. This is the fun part! Place your candies out in little bowls (or in the sections of a muffin tin) and place things where you would like. You can use things like pretzels, gum, cereal, and more too. The sky is the limit when it comes to decorating your house. Enjoy the process and be creative!
Step 32
One you have added your candy, let the house dry another 30 or so minutes and it's done! You can eat it within a few days (or even weeks, the cookie just gets hard), or you can keep it all season and enjoy the beauty.