HOW TO MAKE SUBLIMATION FLIP FLOPSHOW TO MAKE SUBLIMATION FLIP FLOPS
Your folders
Your folders
Ingredients
Export 3 ingredients for grocery delivery
Instructions
Step 1
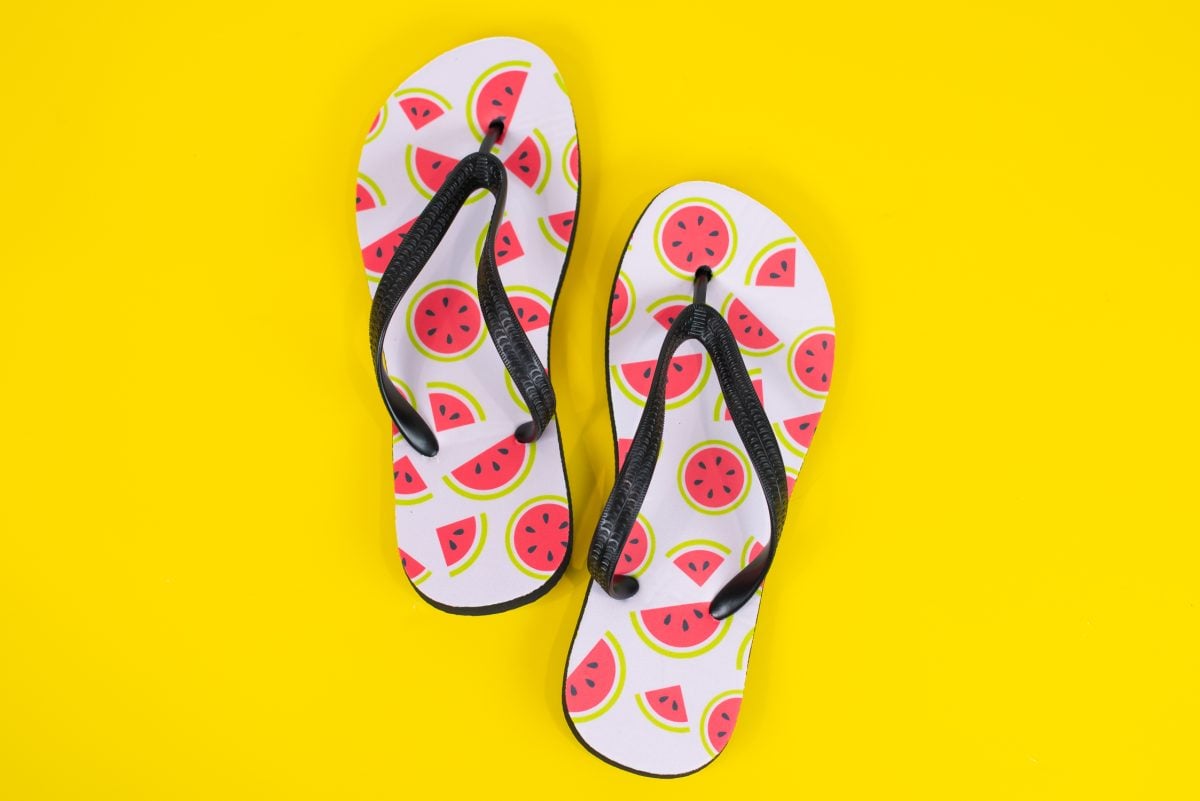
Flip Flops ordered from Heat Transfer Warehouse for this project.Printing Your Flip Flop Sublimation DesignUnless you are only making small flip flops, you may need to use paper larger than 8.5" x 11" in your sublimation printer if you want a full coverage design. If you have a Sawgrass printer, you can easily adjust your paper size.Depending on the design, you can also to use regular 8.5" x 11" paper if you place the flip flop at an angle on the paper. It definitely works with patterns like the ones here, but not as well for words or other designs. You'll need to print out two prints of the design and trim around the edges of each design in a flip flop shape so they don't overlap when pressing. This design was printed out in Sawgrass Print Manager, but there are so many different software programs you can use. No matter what sublimation software program you are using, you'll need to upload, resize, mirror, and print your flip flop design.Because the larger SG1000 was used for this project, the design was printed on an 11" x 17" paper making this project extra easy!
Step 2
Adding the Transfer to Your Flip FlopsStart by lint rolling your flip flop blanks to remove any debris.Several pairs of flip flops were made in this quest to get it right, and found that a combination of spray adhesive and tape worked the best to keep the image from shifting on my blank. If you only have tape, that's fine too, but definitely don't do only spray adhesive—it didn't stick worth a darn once heated and my paper shifted and my image ghosted.
Step 3
So for this project, some spray adhesive was used and added some tape around the edges of the transfer. You want to make sure that the entire footbed is covered or you'll have white lines at the edges of your flip flops.
Step 4
Sublimating Flip FlopsImportant: Always check the product page where you purchased your flip flops for the manufacturer's recommended time, temperature, and pressure settings for your sublimation blanks. This varies from manufacturer to manufacturer and you always want to start with their recommendations and then test more if needed.These flip flops were pressed within the form because it felt like the the most even pressure. You may want to test pressing one at a time depending on the size of your transfer or press. Your sublimation sandwich will look like this, top to bottom:Butcher paperTransfer taped face down on your flip flopsFlip flops face up in the formHeat press base mat
Step 5
Sublimation Settings:Time: 55 secTemp: 400°Pressure: Medium – FirmAllow your flip flops to cool before removing the butcher paper and transfer sheet to reveal your final flip flops!
Step 6
Assembling Your Flip FlopsNow comes the fun part. You'll need to add the straps to your flip flops. There is a left and right strap and it's important that you get the right one or you'll have to do this "fun" process more than once. Line up the straps on the sandal with the two bottom holes. If the toe strap is pointed toward the top hole, you're good.
Step 7
If it doesn't, you have them backward.
Step 8
A flip flop assembly tool should make it much easier. Problem is, the flip flop tool used for this project didn't work. The part that opens to hold the round piece at the bottom of each strap wasn't big enough.So hands and a small pair of pliers were used to force the straps into the holes. It was difficult but possible.
Step 9
Sublimating Flip Flops: Pros and ConsThese flip flops would make a great personalized gift item for special events like weddings or bridal showers. However, they are not something that would be comfortable to wear daily. They should definitely not be worn to walk miles! They're a bit stiff and heavy and wouldn't be comfortable to wear long term. To be honest as possible with you, will both what is liked and disliked about these sublimation flip flops!Pros:A simple, easy project that has a big impact! There's definitely a WOW factor with these.Make an inexpensive gift or party favor item.They sublimate beautifully! Cons:They are one of the most stinky sublimation projects ever done. That rubber creates quite the smell when heated.They create a lot of waste. The "form" they come in is just wasted rubber and there doesn't need to be that much extra around each flip flop.They aren't very comfortable for longer wear.They can be tricky to assemble. Overall, this is a pretty cool project! But wouldn't recommend the flip flops as a closet staple, They'd make a great gift or to have in a wedding reception basket for those tired feet! Just don't expect to wear them for a long day at Disney!
Step 10
Flip Flops ordered from Heat Transfer Warehouse for this project.Printing Your Flip Flop Sublimation DesignUnless you are only making small flip flops, you may need to use paper larger than 8.5" x 11" in your sublimation printer if you want a full coverage design. If you have a Sawgrass printer, you can easily adjust your paper size.Depending on the design, you can also to use regular 8.5" x 11" paper if you place the flip flop at an angle on the paper. It definitely works with patterns like the ones here, but not as well for words or other designs. You'll need to print out two prints of the design and trim around the edges of each design in a flip flop shape so they don't overlap when pressing. This design was printed out in Sawgrass Print Manager, but there are so many different software programs you can use. No matter what sublimation software program you are using, you'll need to upload, resize, mirror, and print your flip flop design.Because the larger SG1000 was used for this project, the design was printed on an 11" x 17" paper making this project extra easy!
Step 11
Adding the Transfer to Your Flip FlopsStart by lint rolling your flip flop blanks to remove any debris.Several pairs of flip flops were made in this quest to get it right, and found that a combination of spray adhesive and tape worked the best to keep the image from shifting on my blank. If you only have tape, that's fine too, but definitely don't do only spray adhesive—it didn't stick worth a darn once heated and my paper shifted and my image ghosted.
Step 12
So for this project, some spray adhesive was used and added some tape around the edges of the transfer. You want to make sure that the entire footbed is covered or you'll have white lines at the edges of your flip flops.
Step 13
Sublimating Flip FlopsImportant: Always check the product page where you purchased your flip flops for the manufacturer's recommended time, temperature, and pressure settings for your sublimation blanks. This varies from manufacturer to manufacturer and you always want to start with their recommendations and then test more if needed.These flip flops were pressed within the form because it felt like the the most even pressure. You may want to test pressing one at a time depending on the size of your transfer or press. Your sublimation sandwich will look like this, top to bottom:Butcher paperTransfer taped face down on your flip flopsFlip flops face up in the formHeat press base mat
Step 14
Sublimation Settings:Time: 55 secTemp: 400°Pressure: Medium – FirmAllow your flip flops to cool before removing the butcher paper and transfer sheet to reveal your final flip flops!
Step 15
Assembling Your Flip FlopsNow comes the fun part. You'll need to add the straps to your flip flops. There is a left and right strap and it's important that you get the right one or you'll have to do this "fun" process more than once. Line up the straps on the sandal with the two bottom holes. If the toe strap is pointed toward the top hole, you're good.
Step 16
If it doesn't, you have them backward.
Step 17
A flip flop assembly tool should make it much easier. Problem is, the flip flop tool used for this project didn't work. The part that opens to hold the round piece at the bottom of each strap wasn't big enough.So hands and a small pair of pliers were used to force the straps into the holes. It was difficult but possible.
Step 18
Sublimating Flip Flops: Pros and ConsThese flip flops would make a great personalized gift item for special events like weddings or bridal showers. However, they are not something that would be comfortable to wear daily. They should definitely not be worn to walk miles! They're a bit stiff and heavy and wouldn't be comfortable to wear long term. To be honest as possible with you, will both what is liked and disliked about these sublimation flip flops!Pros:A simple, easy project that has a big impact! There's definitely a WOW factor with these.Make an inexpensive gift or party favor item.They sublimate beautifully! Cons:They are one of the most stinky sublimation projects ever done. That rubber creates quite the smell when heated.They create a lot of waste. The "form" they come in is just wasted rubber and there doesn't need to be that much extra around each flip flop.They aren't very comfortable for longer wear.They can be tricky to assemble. Overall, this is a pretty cool project! But wouldn't recommend the flip flops as a closet staple, They'd make a great gift or to have in a wedding reception basket for those tired feet! Just don't expect to wear them for a long day at Disney!