How to Marble a Cake
4.8
(21)
Your folders
Your folders
Prep Time: 5 minutes
Total: 5 minutes
Servings: 1
Author : Tori Avey
Ingredients
Export 2 ingredients for grocery delivery
Instructions
Step 1
Place your colored cake batters near your baking pan. Take 1/3 of the first colored batter and scoop it with a large spoon into your pan in a down-up-down pattern. If you're using a small loaf pan (as shown here), use three large dollops of batter. If you're using a round tube or bundt pan, drop dollops of batter in the same pattern--down, up, down-- all the way around the pan.
Step 2
Take 1/3 of your second colored batter. Scoop a dollop of the batter into each of the empty spaces to create a rough checkerboard pattern on the base of the pan. 1/3 of your total batter should be used at this point.
Step 3
With the second 1/3 of the batter, create a second checkerboard pattern on top of the first. Alternate colors-- meaning, if a light colored square is on the bottom, put a dark colored square on top.
Step 4
Repeat the pattern for a third and final layer with all the remaining batter. You should have three checkerboard layers in your baking pan now.
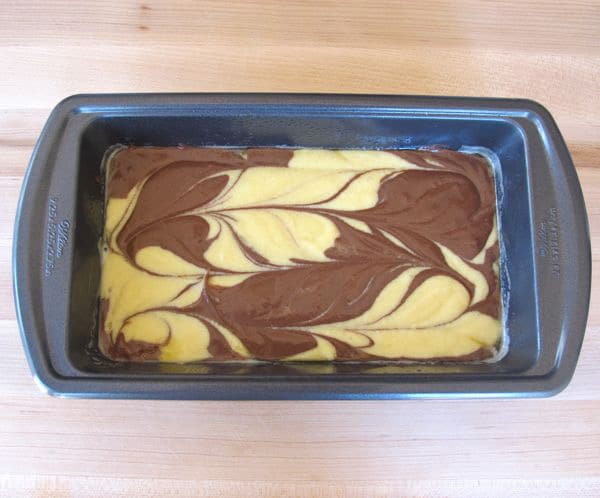
Step 5
Take your butter knife and swirl it through the batter, making rounded vertical zig-zags from one side of the pan to the other.
Step 6
Wipe the excess batter from the knife. Repeat the swirling pattern in the opposite direction. If you're using a loaf pan, make long horizontal swirls. If you're using a round tube or bundt pan, swirl opposing zig-zags all the way around the pan to create a chain shaped swirl.Resist the urge to make lots and lots of swirls-- the more you swirl, the less the cake will look marbled, and the more it will look like a mish-mosh when you slice it.
Step 7
Now your cake is marbled and ready to bake! When it's baked, cooled, and sliced, you'll see nice, evenly marbled patterns. Your cake will have its own unique variations. That's what make marble cake fun... you never know exactly what it will look like inside! :) For my marble cake recipe, click here.