Japanese Sweet Rolled Omelet (Tamagoyaki)
4.1
(116)
Your folders
Your folders
Prep Time: 10 minutes
Cook Time: 15 minutes
Total: 30 minutes
Servings: 3
Author : Namiko Chen
Ingredients
Export 5 ingredients for grocery delivery
Instructions
Step 1
Gather all the ingredients for Sweet Dashi and rolled omelet.
Step 2
In a small saucepan, combine dashi and sugar.
Step 3
Add soy sauce and salt. Turn the heat to medium heat and mix well together.
Step 4
When the sugar is completely dissolved, turn off the heat and transfer it to a mason jar. Let cool completely before closing the lid. Store it in the refrigerator for up to a week. To keep it for a long time, you can freeze it in batches. For example, my tamagoyaki pan requires 4 eggs and 4 Tbsp sweet dashi, so I'd freeze bags/jars of 4 Tbsp sweet dashi. You can also use an ice cube tray to freeze sweet dashi.
Step 5
In a bowl (I like to use a liquid measuring cup with a handle so it’s easy to pour the mixture), combine 4 eggs and 4 Tbsp sweet dashi. The ratio of egg to dashi is 1:1, so you will need 1 Tbsp of sweet dashi for 1 large egg. Depending on the size of your tamagoyaki pan (or frying pan), adjust the number of eggs.
Step 6
Using chopsticks, break the egg yolks and whisk to combine with the whites, but try not to overbeat. The mixture should have a thick and elastic consistency.
Step 7
Please remember the following: The pan must be hot when you add the egg mixture. Otherwise, the bottom layer will stick to the pan, Adjust the heat by lifting the pan, keeping away from or close to the heat, Use arms and shoulders to roll the egg in a circular motion toward you instead of just your wrist. It gives you better control and momentum, Only the final layer matters for the look. Don’t worry about small tears and holes until you get to the final layer. Make sure the shape is good as you can’t cover up the irregular shapes with the final layer, and Make 4-6 layers for a tamagoyaki pan and 2-3 layers for a round pan.
Step 8
Heat the tamagoyaki pan over medium heat. Grease the bottom and sides of the pan with a paper towel soaked in oil. Make sure to wipe off excess oil. Dip chopsticks in the egg mixture and touch the frying pan. If it makes a sizzling sound, the pan is hot and ready to cook. Note: I’ve tried using a silicone brush instead of a paper towel once, but excess oil left on the pan would create an unpleasant look on the omelet with lots of small holes/bubbles.).
Step 9
The 1st layer: Pour the egg mixture just enough to fill up the bottom of the pan. Pop the air bubbles with chopsticks and tilt the pan so they will be filled with excess egg mixture.
Step 10
When the egg mixture is just set (the mixture is not runny but not cooked through), run the chopstick around the edges of the egg to detach it from the pan. Start rolling the egg toward you from the far edge. When you roll the egg with chopsticks, lift the frying pan toward you in a circular motion. You can use a spatula to do this process, but you may need to occasionally remove the pan from the heat so the bottom of the pan doesn’t get too hot.
Step 11
Once the rolled omelet is at the edge closest to you, grease the uncovered bottom and sides of the pan with a paper towel soaked in oil.
Step 12
Move the omelet to the far edge and grease the uncovered bottom and sides of the pan. Again, dip the chopsticks in the egg mixture and touch the bottom of the pan to see if it sizzles.
Step 13
The 2nd layer: Pour the egg mixture just enough to fill up the bottom of the pan. Lift the rolled omelet so the egg mixture goes under the omelet.
Step 14
Pop the air bubbles with chopsticks and tilt the pan to fill up the holes with excess egg mixture. When the egg is just set, run the chopstick around the edges of the egg to detach from the pan.
Step 15
Start rolling the egg toward you with chopsticks (or spatula). Once the rolled omelet is closer to your side, grease the uncovered bottom and sides of the pan with a paper towel soaked in oil.
Step 16
The 3rd layer: Move the omelet toward the far edge and grease the uncovered bottom and sides of the pan. Dip the chopsticks in the egg mixture and touch the bottom of the pan. When it makes a sizzling sound, pour the egg mixture just enough to fill up the bottom of the pan.
Step 17
Lift the rolled omelet to distribute the egg mixture under the omelet. Pop the air bubbles with chopsticks and tilt the pan to fill up the holes with excess egg mixture. When the egg mixture is just set, run the chopstick around the edges of the egg to detach it from the pan.
Step 18
Start rolling from the far edge toward you. Use the momentum as the rolled egg starts to get heavy.
Step 19
Grease the uncovered bottom and sides of the pan with a paper towel soaked in oil. Keep the rolled omelet at the far edge.
Step 20
The 4th layer: When the pan is hot, pour the egg mixture, lift up the rolled omelet, pop the air bubbles, and start rolling.
Step 21
The 5th/final layer: Grease the uncovered bottom and sides of the pan with a paper towel soaked in oil. Add the remaining egg mixture, lift up the rolled omelet, and pop the air bubbles. Carefully roll the final layer of the egg mixture. This will be the outer layer so make sure not to break.
Step 22
Shape the rolled egg pushing against the edges and corner of the tamagoyaki pan.
Step 23
Wrap the rolled omelet in a bamboo sushi mat for 5 minutes.
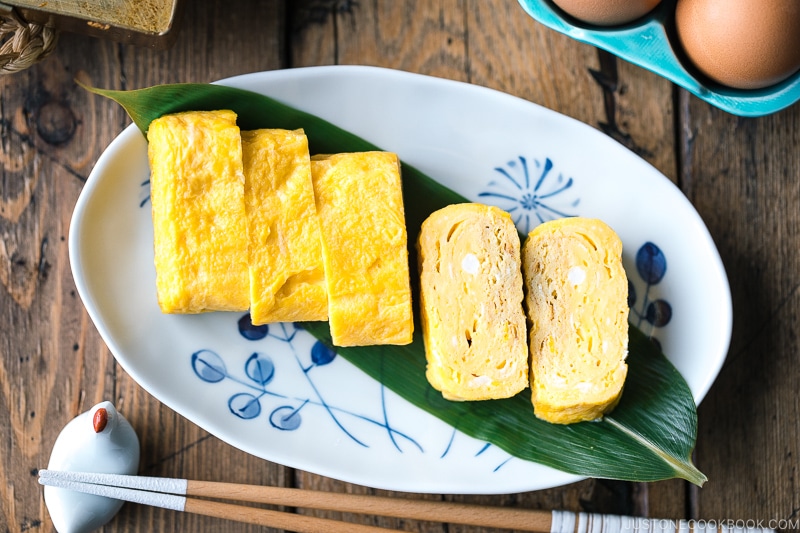
Step 24
Open the sushi mat and cut the rolled omelet in half.
Step 25
Then cut each half into 3 equal pieces. Serve immediately or at room temperature. Optionally, you can serve with grated daikon drizzled with soy sauce.
Step 26
You can keep the leftovers in an airtight container and store them in the refrigerator for up to 2-3 days and in the freezer for 2 weeks.