My Mother’s Peasant Bread: The Best Easiest Bread You Will Ever Make
4.9
(437)
Your folders
Your folders
Prep Time: 5 minutes
Cook Time: 32 minutes
Total: 2 hours, 27 minutes
Servings: 2
Author : Alexandra Stafford
Ingredients
Export 3 ingredients for grocery delivery
Instructions
Step 1
In a large mixing bowl, whisk together the flour, salt, sugar, and instant yeast (I love SAF Instant Yeast). Add the water. Mix until the flour is absorbed. (If you are using active dry yeast, see notes below.)
Step 2
Cover bowl with a tea towel or plastic wrap and set aside in a warm spot to rise for at least an hour. (In the winter or if you are letting the bread rise in a cool place, it might take as long as two hours to rise.) This is how to create a slightly warm spot for your bread to rise in: Turn the oven on at any temperature (350ºF or so) for one minute, then turn it off. Note: Do not allow the oven to get up to 300ºF, for example, and then heat at that setting for 1 minute — this will be too hot. Just let the oven preheat for a total of 1 minute — it likely won’t get above 100ºF. The goal is to just create a slightly warm environment for the bread.
Step 3
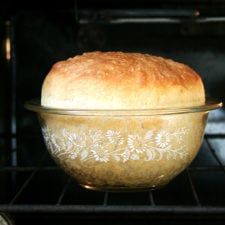
. Grease two 1-qt or 1.5-qt oven-safe bowls (see notes below) with about a tablespoon of butter each. Using two forks, punch down your dough, scraping it from the sides of the bowl, which it will be clinging to. As you scrape it down try to turn the dough up onto itself if that makes sense. You want to loosen the dough entirely from the sides of the bowl, and you want to make sure you’ve punched it down. Then, take your two forks and divide the dough into two equal portions — eye the center of the mass of dough, and starting from the center and working out, pull the dough apart with the two forks. Then scoop up each half and place into your prepared bowls. This part can be a little messy — the dough is very wet and will slip all over the place. Using small forks or forks with short tines makes this easier — my small salad forks work best; my dinner forks make it harder. It’s best to scoop it up fast and plop it in the bowl in one fell swoop.
Step 4
for about 20 to 30 minutes on the countertop near the oven (or near a warm spot) or until it has risen to just below or above (depending on what size bowl you are using) the top of the bowls. (Note: Do not do the warm-oven trick for the second rise, and do not cover your bowls for the second rise. Simply set your bowls on top of your oven, so that they are in a warm spot. Twenty minutes in this spot usually is enough for my loaves.)
Step 5
Bake for 15 minutes. Reduce the heat to 375º and bake for 15 to 17 minutes longer. Remove from the oven and turn the loaves onto cooling racks. If you’ve greased the bowls well, the loaves should fall right out onto the cooling racks. If the loaves look a little pale and soft when you’ve turned them out onto your cooling racks, place the loaves into the oven (outside of their bowls) and let them bake for about 5 minutes longer. Remove from oven and let cool for 10 minutes before cutting.