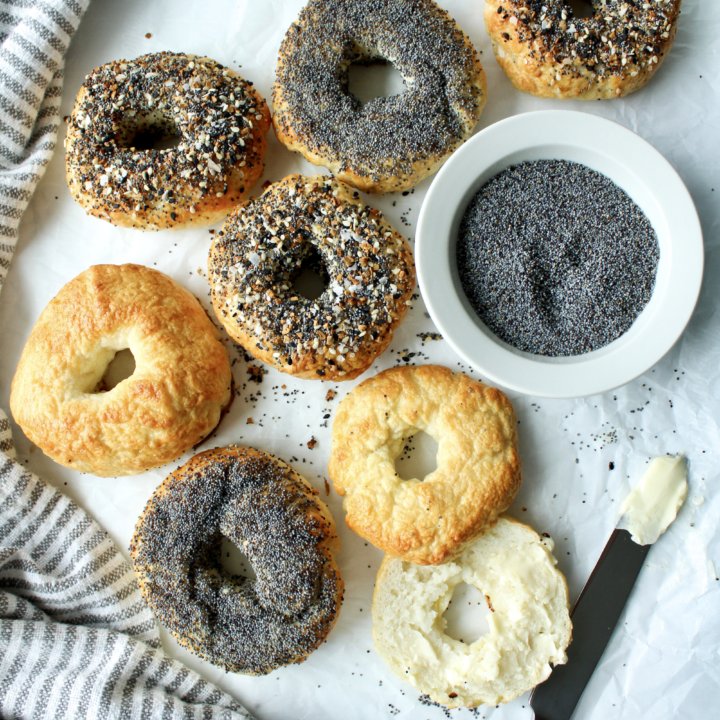
New York Style Gluten-Free Bagels
4.6
(83)
Your folders
Your folders
Prep Time: 10 minutes
Cook Time: 20 minutes
Total: 2 hours, 30 minutes
Servings: 8
Author : Jennifer Fitzpatrick

Ingredients
Export 3 ingredients for grocery delivery
Instructions
Step 1
First, activate the yeast. In a small bowl, pour the yeast and sugar, then add 1/2 cup of warm water. Do not mix, but leave it to sit for 5-7 minutes, then stir to combine. If the yeast is good, you should see it bubbling or foaming. If your yeast does not bubble up and foam, it is stale. Discard and do not use. Otherwise, your dough will not rise properly.
Step 3
In a large bowl, whisk together the gluten-free flour and salt. Create a well (a large hole) in the middle of the dough, and pour in the yeast mixture. Then, add the remaining 1/3 cup and 1/2 cup of warm water. Start mixing with a large spoon - it should still be a little dry/crumbly. Begin adding additional warm water, 1 tablespoon at a time, until the dough stays together well. For Cup4Cup, this is typically 2 Tablespoons. You want the dough to start forming together into a ball, moist, but not soaking wet, and also not dry.
Step 5
If you prefer, you can complete this step using a stand mixer with a dough hook attached, until the dough begins to form.
Step 7
When the dough begins to form in the bowl, transfer to a floured countertop and knead for 2-3 minutes. Extra kneading is not required because there is no gluten to build up and stretch! You're just combining everything together. The dough should not be sticky, but smooth. It should stay together in a ball and almost have a little shine to it.
Step 9
In a medium bowl, lightly brush with 1 teaspoon of olive oil on all sides, then add the dough ball. Cover with a damp cloth and leave it to rise in a warm spot for 1 hour. (I put mine on the countertop next to my warm oven).
Step 11
After the 1 hour rise, you will see evidence of the dough expanding in size thanks to the yeast - it should sit taller in the bowl and perhaps even puff up your towel a little bit. Remove the dough to a countertop (don't flour it though!), and cut it evenly into 8 equal pieces. Now you can really see the magic of the yeast inside!
Step 13
From here, roll each piece into a ball, shaping it into a circular shape until smooth on all sides. Repeat with the remaining 7 pieces of dough. Finally, to create the bagel shape, roll your index finger in your gluten-free flour, then pierce the dough right through the middle, creating a hole. Carefully, as to be sure to not break the dough (without the gluten, there isn't as much binding it together, so be gentle!) begin to expand the hole, making it bigger and shaping the circle into a bagel shape. I did this entirely by eye - we all know what bagels look like! Just do so gently, then place the bagels on a lightly oiled baking sheet. Repeat with the remaining 7 pieces of dough and leave to rest, covered with the same damp cloth, for 10 minutes.
Step 15
Preheat the oven to 425 degrees Fahrenheit, and bring a large pot of water to a boil. Add one teaspoon of baking soda and lower the heat to a constant simmer. Carefully, using a slotted spoon to transfer the bagels, add them to the pot, four at a time. They should float right on top! Allow them to boil for 1 minute on each side, then using the same slotted spoon, remove to a parchment-lined baking sheet. Repeat with all bagels.
Step 17
On the baking sheet, arrange the bagels leaving about 1 inch of space between them. Brush the bagels with the egg wash mixture, then add toppings of your choice! Our favorites are poppyseed, everything seasoning from Trader Joe's, or minced garlic & sea salt. If you are just making plain bagels, make sure you still brush them with the egg wash, which will give them a nice shine and golden brown goodness.
Step 19
Bake for 20-25 minutes which should make them perfectly golden brown. Remove from oven and leave on baking sheet for 5 minutes before removing to wire rack.
Step 21
Serve with butter, cream cheese, lox, or as an egg sandwich, Enjoy!