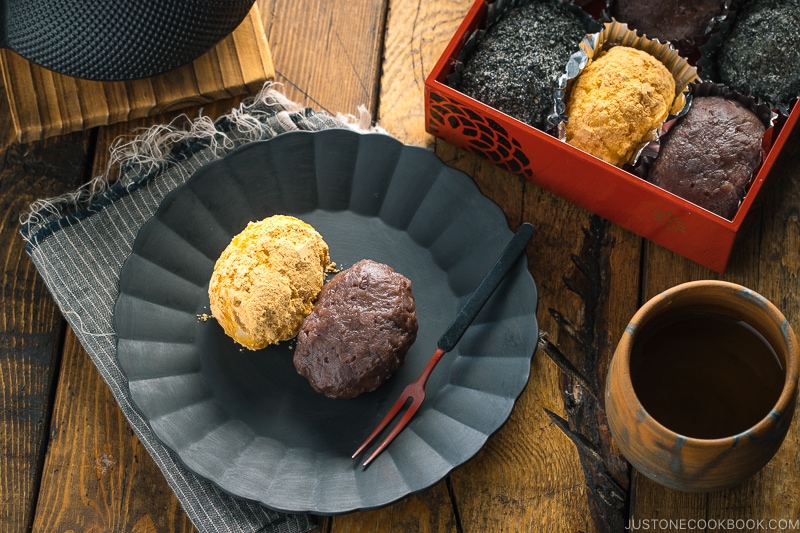
Ohagi (Botamochi)
4.9
(19)
Your folders
Your folders
Prep Time: 60 minutes
Cook Time: 60 minutes
Total: 120 minutes
Servings: 24
Cost: $0.44 /serving
Author : Namiko Chen
Ingredients
Export 5 ingredients for grocery delivery
Instructions
Step 1
Gather all the ingredients. For an easy transfer, I use aluminum cup liners to hold Ohagi (Botamochi). You can get it in the bento section at a Japanese grocery store.
Step 2
Combine the glutinous rice and rice together in a large bowl and rinse the rice a few times.
Step 3
Use your fingers to gently wash the rice in a circular motion for 10-15 seconds. Repeat this process 1-2 times. Add water and discard the water. Repeat this process 1-2 times. When the water is almost clear, drain well.
Step 4
Transfer the drained rice to the rice cooker. Add water (600 ml for my 3 rice cooker cups).
Step 5
Let soak for 20 minutes and press “start” to cook on regular rice cooking mode.
Step 6
While the rice is being cooked, prepare the toppings/fillings. Grind sesame seeds with a pestle in a Japanese mortar.
Step 7
Transfer to a medium bowl and add sugar. Mix well together.
Step 8
In another medium bowl, combine soybean flour and sugar and mix well together.
Step 9
Using a small cookie scoop, make red bean paste balls. Each scoop/ball should be 2 teaspoons (0.7 oz or 20 g) of red bean paste.
Step 10
When the rice is almost finished cooking, make saltwater by combining 1 cup water and 1 tsp salt. Mix well together. This is for soaking the wooden rolling pin or pestle before pounding the glutinous rice.
Step 11
Once the rice is cooked, remove the rice cooker bowl from the cooker. While it’s hot, start pounding with the wooden pestle or rolling pin.
Step 12
The wooden rolling pin gets sticky from the glutinous rice. Soak it every few poundings. Stop pounding when the glutinous rice is half mashed/pounded (This is up to your liking. The rice should be mostly mashed but you can still see some rice grains).
Step 13
Moisten your hands with the saltwater and grab a small amount of pounded glutinous rice (1.4 oz or 40 g). Fatten it to make a round shape.
Step 14
Once it’s about 2 ½ inch diameter, put one Anko ball in the middle.
Step 15
Carefully gather up the pounded glutinous rice around the Anko to enclose the filling.
Step 16
Pinch the seam and form the rice ball into a small oval-shaped ball.
Step 17
Moisten the plate or tray with saltwater and transfer the oval-shaped rice balls.
Step 18
To make the soybean flour-coated Ohagi (Botamochi), put the rice ball (with Anko filling) in the soybean flour mix. Rotate a few times to coat well with the mixture and transfer to an aluminum foil liner.
Step 19
To make the sesame-coated Ohagi (Botamochi), put the rice ball (with Anko filling) in the black sesame mix. Rotate a few times to coat well with the mixture and transfer to an aluminum liner.
Step 20
Make a small oval-shaped ball with the pounded glutinous rice (1.4 oz or 40 g).
Step 21
Using a small cookie scoop, spread 2 scoops of Anko (total of 4 teaspoons, 1.4 oz or 40 g) into a round, flat shape on a piece of plastic wrap.
Step 22
Put the rice ball on top and evenly coat the Anko around the rice ball.
Step 23
Pull the plastic wrap and spread the Anko evenly and transfer it to an aluminum liner.
Step 24
When you’re ready to serve Ohagi (Botamochi), reapply the black sesame and soybean flour mixture. Serve them with green tea.
Step 25
It’s best to keep them in a cool place and enjoy them as soon as possible (half-day to 12 hours). If it’s too warm to keep at room temperature, I recommend storing them in the refrigerator, but cover the container with a thick towel to protect from cold air. Ideally, they should be kept cool. You can also freeze Ohagi for up to 1 month. When you’re ready to eat, defrost overnight in the refrigerator. To bring back the ideal texture, Ohagi should be reheated gently in the microwave to warm or room temperature for you to enjoy.