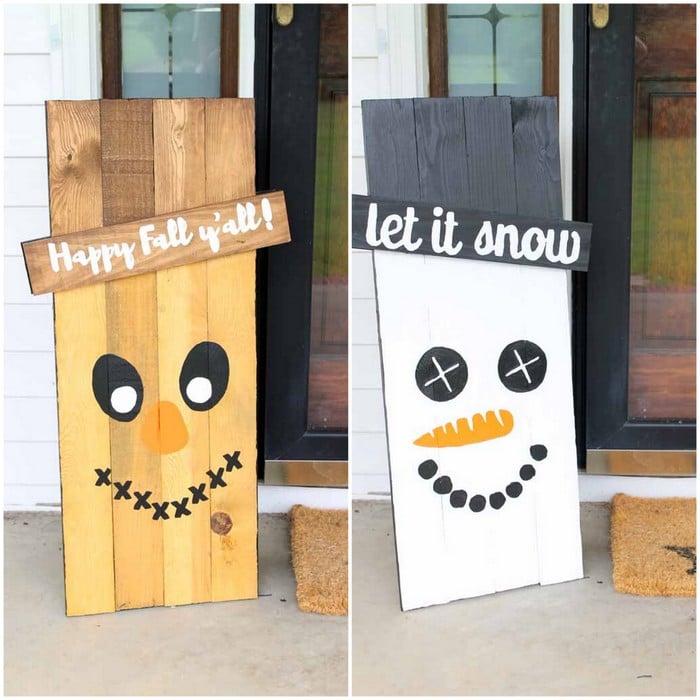
Reversible Snowman Scarecrow
Your folders
Your folders
Total: 180
Ingredients
Export 16 ingredients for grocery delivery
Instructions
Step 1
Cut four pieces from your 1 x 4 boards that are 3 foot long and two pieces that are 18 inches long.
Step 2
Then layout your boards as shown below. The shorter 18 inch boards go across. I placed mine approximately 6 inches from the top on one side and 9 inches on the other.
Step 3
Add wood glue between all of the joints then use screws from the backside to hold in place. NOTE: Screws should go through the first board and about half way through the second.
Step 4
Then add the second 18 inch piece on top of the screws and lining up with the first piece. Once again add glue in between the joints and this time use finishing nails to hold in place. NOTE: Once again fasteners should go all the way through the first board and about half way through the second.
Step 5
Wipe away all excess glue and allow everything to dry completely. NOTE: Adding a scrap board or two under the bottom portion as shown below will keep everything level while it dries.
Step 6
After everything has dried, you can start painting your project. For the scarecrow side, use dark wood stain for his hat and gold for his face. Brush on, allow to set a few minutes, then wipe away excess with a rag.
Step 7
Once your stain has dried, you can start adding the painted elements. Print out your template here. Cut out your pieces and tape together. Then tape in place on your sign. Add transfer paper glossy side down under the template. NOTE: Use black transfer paper over lighter paint and white over darker paint.
Step 8
Use a pen to trace around your template and then remove the paper. You will be left with lines as a guide for your paint.
Step 9
Start filling in those lines with the paint colors of your choice. NOTE: Each element will take 2 to 4 coats of paint and you need to be sure to allow each coat to dry before adding another layer.
Step 10
Then just keep repeating these steps for each element on the scarecrow side.
Step 11
Allow that side to dry completely before flipping over for the reversible snowman side.
Step 12
Repeat the same steps with the template pieces for your snowman.
Step 13
You will want all surfaces to be painted as you will probably be using your holiday signs outdoors. So be sure to paint the edges of your sign as well as the front and back. I used the black paint on the edges however you can use any color you choose.