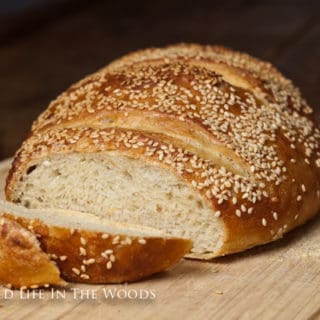
Semolina Sesame Artisan Bread
Your folders
Your folders
Author : Susan Williams
Ingredients
Export 8 ingredients for grocery delivery
Instructions
Step 1
Mix the yeast and salt with the lukewarm water in a large 5qt container. I use a large plastic tub with a lid, but I do NOT seal the lid to make it airtight.
Step 3
Mix in the flours using a large spoon. (I use a large wooden spoon. By the end of adding all the flour, I wet my hands to mix in the last bits of the flour into the dough. The dough is a fairly wet, sticky dough. You can certainly use a mixer if you'd like to, but I don't find that I need one.)
Step 5
Cover (not airtight...this needs to off gas a bit...but then...don't all God's creatures need to do that? Yeast is no exception.). Allow to rest at room temperature until the dough rises and collapses (or flattens on top) approximately 2 hours.
Step 7
The dough can be used at this point, or you can store it in your fridge for up to 14 days. As if you could wait that long!!!
Step 9
When You're Ready to Bake
Step 11
If you're going to bake one 2 lb. loaf, dust the surface of the refrigerated dough with flour and cut off about half of it. (About 2 lbs.) Return the other half of the dough, to the plastic container and store it in your refrigerator till you're ready to use it. Dust the dough you'll be baking with more flour and quickly shape it first into a ball, and then into an oval (ish) shape. Allow to rest for 40 minutes on a sheet of parchment paper that you have sprinkled with cornmeal. (If you HAVE a pizza peel, then use that to let it rest on, and to help you transfer it into the oven. I don't have a pizza peel, so I use parchment paper as my sling for transferring the bread dough loaf to the oven onto my baking stone. It can stay on the parchment paper for the baking: no problem. No need to transfer it off directly onto the stone.)
Step 13
Twenty Minutes Before Baking
Step 15
Preheat the oven to 450º, with a baking stone placed on the middle rack, and the bottom of a broiler pan on the shelf just below that.
Step 17
Time to use that mysterious cornstarch that’s in the ingredient list.
Step 19
You’re going to make a Cornstarch Wash to make the bread shiny, and help the sesame seeds to stick to the outside of the bread.
Step 21
Cornstarch Wash
Step 23
Blend the 1/2 t. of cornstarch with a bit of water to form a paste. Add 1/2 c. of water, and whisk with a fork. Microwave for 60 seconds, till mixture appears glassy. You can store the unused portion in the fridge, covered with plastic, for the next loaf.
Step 25
Just before baking, paint the surface of the loaf with the cornstarch wash, sprinkle with sesame seeds, and slash the surface of the bread (I usually make 3 diagonal slash marks) about 1/2″ deep, using a serrated knife.
Step 27
Gently place the loaf and the parchment paper onto the hot baking stone, using the parchment paper as a sling to carry the loaf to the baking stone. Pour 1 c. of hot tap water onto the broiler tray below it, and quickly close the oven door. Bake for around 30 minutes, until deeply browned and firm. Adjust baking time to the size of your loaf, and your own oven’s performance.
Step 29
Allow to cool before slicing and eating.
Top similar recipes
Curated for youYour folders

 70 views
Semolina-Sesame Cake
177milkstreet.com
Your folders
 352 views
Semolina Bread
baking-sense.com
4.3
(62)
45 minutes
Your folders

 532 views
Artisan Bread
jocooks.com
4.5
(591)
185 minutes
Your folders
 92 views
Artisan Bread
lifemadesimplebakes.com
Your folders

 280 views
Pane Siciliano (Semolina and Sesame...
theperfectloaf.com
1 hours
Your folders

 165 views
Pane Siciliano (Semolina and Sesame...
theperfectloaf.com
1 hours
Your folders
 121 views
Best Semolina Bread
vintagekitchennotes.com
5.0
(58)
40 minutes
Your folders

 391 views
Semolina Sandwich Bread
kingarthurbaking.com
4.0
(53)
40 minutes
Your folders
 343 views
Sourdough Semolina Bread
baking-sense.com
4.6
(41)
45 minutes
Your folders

 184 views
Semolina Bread Recipe
kickassbaker.com
4.8
(12)
25 minutes
Your folders
 414 views
Artisan Sourdough Bread
farmhouseonboone.com
4.5
(17)
40 minutes
Your folders
 812 views
Artisan Bread Recipe
kitchensanctuary.com
5.0
(3)
45 minutes
Your folders
 98 views
Artisan Sourdough Bread
fleischmannsyeast.com
Your folders

 305 views
Artisan Bread Recipe
tasteandtellblog.com
5.0
(4)
30 minutes
Your folders
 1041 views
Crusty Artisan Bread
onceuponachef.com
5.0
(213)
30 minutes
Your folders

 2094 views
Artisan Ciabatta Bread
merryboosters.com
5.0
(28)
25 minutes
Your folders

 389 views
Yeasted Artisan Bread
foodgeek.dk
5.0
(1)
90 minutes
Your folders
 493 views
Homemade Artisan Bread
askchefdennis.com
5.0
(28)
40 minutes
Your folders
 124 views
Artisan Ciabatta Bread
merryboosters.com