The Simple Blonder Brine (6.4%) Recipe
4.4
(61)
Your folders
Your folders
Prep Time: 10 minutes
Servings: 1

Ingredients
Export 0 ingredients for grocery delivery
Instructions
Step 1
Prep. Add one cup of hot water to a two cup (~500mL) measuring cup. Then pour in salt, any salt, until the water line reaches 1.5 cups. (355mL). The water will swallow up almost exactly 1/2 pound(226.8g) regardless of whether you use table salt, kosher salt, pickling salt, or sea salt.
Step 2
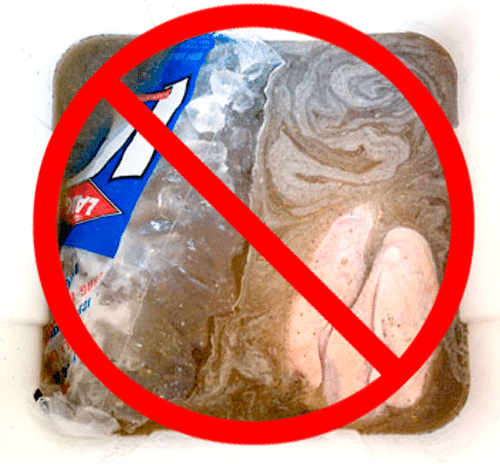
Pour the slurry into a very clean non-reactive container large enough to hold the meat and 1 gallon (3.8L) of water. Then add the sugar. Chose your container carefully. It needs to be food grade, large enough to hold the meat and the brine with the meat submerged, and it cannot be made of aluminum, copper, or cast iron, all of which can react with the salt. Do not use garbage bags or a garbage can or a bucket from Home Depot. They are not food grade. Do not use a styrofoam cooler. It might give the meat an off flavor and you'll never get the cooler clean when you're done.
Step 3
Zipper bags work fine. For large cuts get Reynolds Brining Bags, Ziploc XL, and XXL bags. If you brine in a zipper bag, periodically grab the bag and squish things around and flip the meat so the brine can get in from all sides. Place the bag in a roasting pan to catch leaks. You can also use bowls, pots, and Tupperware.
Step 4
A 5 gallon (19L) drink cooler will handle turkeys and whole raw hams. If the cooler is larger, you may need to scale up the brine recipe to make sure the meat is submerged.
Step 5
The beauty of using a cooler is that you don't need to put it in the fridge. To keep the brine and the meat safe, toss in a gallon zipper bag filled with ice. Or two. The bags should be tight so that when the ice melts it doesn't dilute the brine. Don't use bags of ice from the store because they often have holes and leak and they are dirty. People often walk on them in the factory and on the delivery truck (I know, I worked in and ice factory in college - best job in Gainesville, FL).
Step 6
Another option is to fill a quart (950mL) juice or soda bottle with water and freeze it. Then screw on the cap. Wait until after the bottle has frozen because water expands when it freezes and it can blow off the cap. Wash off the outside of the bottle thoroughly and toss it in the brine.
Step 7
Brining. Submerge the meat in the brine and refrigerate. Keep the brine under 40°F (4.4°C), adding more ice when necessary. If you can see unmelted ice, it is probably below 40°F (4.4°C). You may need to weight the meat down to submerge it. If you cannot submerge it, make sure you turn it periodically and extend it's time in the bath. All you need is 1 to 2 hours for meats 2" (5cm) thick or less. For a piece of meat 3". (7.5cm) thick or more, go 8 to 24 hours. Brine turkeys breast side down. Move the bird around and get the air bubble out of the cavity. Most of the brine will enter the meat through the cavity, since the skin is like a water-resistant jacket. But keep in mind, brines move very slowly at refrigerator temp. When you cook, they move fast if you cook low and slow.
Step 8
Prepare to cook. When it is time to cook, remove the meat, rinse with cold water to wash excess salt off the surface, and thoroughly pat dry with paper towels. Patting dry is important or the surface might steam and not brown properly.
Step 9
Shortcut: Use metrics to make brinesMaking brines is easiest using metrics and a scale.1 liter = 1000 gm = 1 kilogram6% brine: 1 liter water with 60 grams any salt (easy to scale up or down)4% brine: 1 liter water with 40 grams any salt (easy to scale up or down) Wet brine meat in a ratio of 2.5 parts brine to 1 part meat. So for a 3 pound chicken (about 1.4 kg) use 3.5 kg of a brine or: 1/2" (1.3cm) thick meat should be brined for about 1/2 hour in the refrigerator 1" (2.5cm) thick meat should be brined for about 1 hour in the refrigerator 2" (5cm) thick meat should be brined for about 4 hours in the refrigerator 3" (7.5cm) thick meat should be brined for about 12 hours in the refrigerator