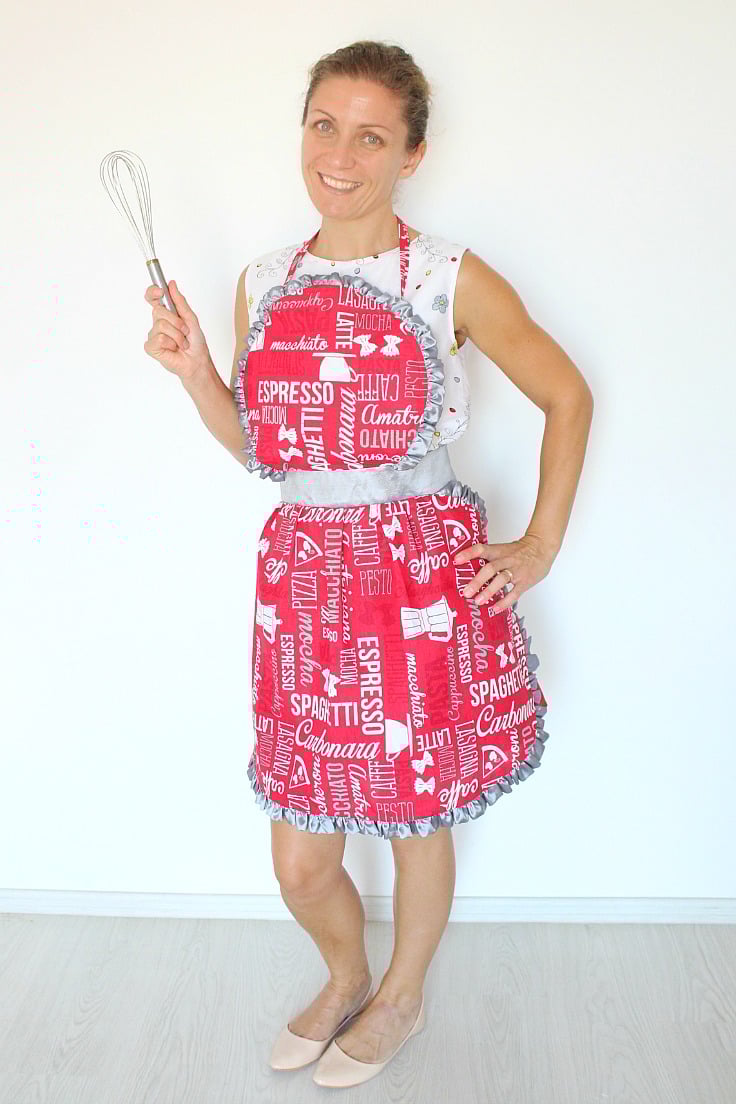
Apron pattern with rufflesApron pattern with ruffles
Your folders
Your folders
Total: 600
Servings: 11
Ingredients
Export 6 ingredients for grocery delivery
Instructions
Step 1
Start by washing, drying and ironing your fabric.
Step 2
Cut your fabric according to the pattern (you'll have 1 piece for the apron top, 1 for the apron bottom and 2 for belt)
Step 3
Cut the interfacing 1/8" narrower than the belt then fuse to the belt.
Step 4
Sew both strips of fabric for the belt, with the wrong side out, all the way around, except for about 6". Turn the belt right side out through the opening and gently push the corners out with a poking tool that's not too sharp. I admit this was a bit tricky and required some time for me to get it right. Close the opening with an edge stitch then steam iron the belt.
Step 5
Take a super long strip of fabric (about 20 feet long and 2 1/2" wide) and ruffle it using your machine settings to make ruffles. If you use a Singer 1507WC which is an awesome machine for beginners, use a stitch length 4 and a thread tension at 6. Or you can go the easy way and use a ruffling foot, which will get you beautiful, even ruffles in one go.
Step 6
The ruffled fabric should be enough to go around the top and the bottom piece of the apron, minus the part where these join the belt.
Step 7
Take your apron top piece, place it right side out and match with the ruffled fabric as below. Pin and sew. About 1/4" away from where you stopped sewing, cut the excess ruffled strip and use it for the bottom piece.
Step 8
Make the straps as wide and long as you want. I made mine about 1/4" wide and 10" long. I folded the fabric in half, then I folded each half, then folded again where I first started to fold, then sewing on the open side of the strap. Then I knotted one end.
Step 9
Decide where you want the attach the straps and make marks then attach the straps with a pin.
Step 10
Open the bias tape and place it on top of the ruffles, with one of the folds matching the stitch where you joined the apron piece and the ruffles.
Step 11
Pin in place and stitch all the way around that fold mark, making sure to remove the pin who keeps the strap attached.
Step 12
Then fold the bias tape over to the back of the apron piece (wrong side), pin and stitch with a 1/8" seam from the open edge of the bias tape.
Step 13
Do the above steps for the bottom piece of the apron (except for the straps part).
Step 14
Take the bottom piece and ruffle about 12" of its top edge.
Step 15
Join the bottom piece and the belt, right sides together, pin at the top and stitch; make sure to catch a bit of the ruffle.
Step 16
Fold the belt out, facing you with the right side. Place the top piece of the apron, wrong side out. Pin and stitch, making sure to catch a bit of the ruffle too.
Step 17
Finish the belt seams on the inside of the apron with bias tape as above. Or serge or do a zig zag stitch. If you use bias tape, make sure to fold the ends in.
Step 18
Start by washing, drying and ironing your fabric.
Step 19
Cut your fabric according to the pattern (you'll have 1 piece for the apron top, 1 for the apron bottom and 2 for belt)
Step 20
Cut the interfacing 1/8" narrower than the belt then fuse to the belt.
Step 21
Sew both strips of fabric for the belt, with the wrong side out, all the way around, except for about 6". Turn the belt right side out through the opening and gently push the corners out with a poking tool that's not too sharp. I admit this was a bit tricky and required some time for me to get it right. Close the opening with an edge stitch then steam iron the belt.
Step 22
Take a super long strip of fabric (about 20 feet long and 2 1/2" wide) and ruffle it using your machine settings to make ruffles. If you use a Singer 1507WC which is an awesome machine for beginners, use a stitch length 4 and a thread tension at 6. Or you can go the easy way and use a ruffling foot, which will get you beautiful, even ruffles in one go.
Step 23
The ruffled fabric should be enough to go around the top and the bottom piece of the apron, minus the part where these join the belt.
Step 24
Take your apron top piece, place it right side out and match with the ruffled fabric as below. Pin and sew. About 1/4" away from where you stopped sewing, cut the excess ruffled strip and use it for the bottom piece.
Step 25
Make the straps as wide and long as you want. I made mine about 1/4" wide and 10" long. I folded the fabric in half, then I folded each half, then folded again where I first started to fold, then sewing on the open side of the strap. Then I knotted one end.
Step 26
Decide where you want the attach the straps and make marks then attach the straps with a pin.
Step 27
Open the bias tape and place it on top of the ruffles, with one of the folds matching the stitch where you joined the apron piece and the ruffles.
Step 28
Pin in place and stitch all the way around that fold mark, making sure to remove the pin who keeps the strap attached.
Step 29
Then fold the bias tape over to the back of the apron piece (wrong side), pin and stitch with a 1/8" seam from the open edge of the bias tape.
Step 30
Do the above steps for the bottom piece of the apron (except for the straps part).
Step 31
Take the bottom piece and ruffle about 12" of its top edge.
Step 32
Join the bottom piece and the belt, right sides together, pin at the top and stitch; make sure to catch a bit of the ruffle.
Step 33
Fold the belt out, facing you with the right side. Place the top piece of the apron, wrong side out. Pin and stitch, making sure to catch a bit of the ruffle too.
Step 34
Finish the belt seams on the inside of the apron with bias tape as above. Or serge or do a zig zag stitch. If you use bias tape, make sure to fold the ends in.
Top similar recipes
Curated for youYour folders

 226 views
Half Apron Pattern
blog.treasurie.com
Your folders
 171 views
Childs Apron Pattern
polkadotchair.com
Your folders
153 viewsWomen’s Apron Sewing Pattern
polkadotchair.com
Your folders
251 viewsBench Pillow Pattern
polkadotchair.com
Your folders
 231 views
Laptop Bag Pattern
crazylittleprojects.com
Your folders
 242 views
Tote Bag Pattern
crazylittleprojects.com
Your folders
 223 views
Crochet Tulip Pattern
hookok.com
Your folders
 66 views
Crochet Crow Pattern
thecaffeinatedsnail.com
Your folders
 254 views
Crochet Crow Pattern
thecaffeinatedsnail.com
Your folders
 297 views
Mug Rug Pattern
blog.treasurie.com
Your folders
 249 views
Burp Cloth Pattern
blog.treasurie.com
Your folders
 90 views
Bowl Cozy Pattern
blog.treasurie.com
Your folders
 195 views
Broomstick Crochet Afghan Pattern w...
crochetncrafts.com
Your folders
 170 views
Crochet Granny Rectangle Pattern
blog.treasurie.com
Your folders
224 viewsPatchwork SLEEP Pillow Pattern
polkadotchair.com
Your folders
241 viewsJubilee Celebration Pillow Pattern
polkadotchair.com
Your folders
222 viewsPatchwork Heart Pillow Pattern
polkadotchair.com
Your folders
 237 views
Crochet Dish Cloth Pattern
crochetncrafts.com
Your folders
 274 views
Crochet Fern Leaf Pattern
hookok.com