Black Velvet Cake
5.0
(6)
Your folders
Your folders
Prep Time: 1 hours
Cook Time: 30 minutes
Servings: 10
Author : Jenna Barnard
Ingredients
Export 16 ingredients for grocery delivery
Instructions
Step 1
Preheat the oven to 350F and spray (6″ round cake pans with nonstick spray and line the bottoms with parchment paper. I also recommend using cake strips if you have them. See notes for different cake pan options.
Step 2
In a large bowl, whisk together the cocoa powder, flour, sugar, salt, and baking soda.
Step 3
In a separate bowl, whisk together the oil, buttermilk, vinegar, eggs, and vanilla.
Step 4
Slowly pour the wet ingredients into the dry ingredients as you whisk to combine. Switch to a rubber spatula about halfway through as the batter thickens. Fold the batter until smooth.
Step 5
Pour into your cake pans and bake for 35-40 minutes, or until a toothpick in the center comes out clean.
Step 6
Allow the cakes to cool in the pans for about 20 minutes. Then turn them out onto a cooling rack and peel off the parchment paper. If you plan on decorating the cakes the same day, place them into the refrigerator uncovered to chill for about 1 hour. If you will be decorating at a later day, allow the cakes to cool completely at room temperature, then wrap each in plastic wrap and chill for up to 2 days.
Step 7
In a large mixing bowl using a hand or stand mixer with the whisk attachment, cream together the butter and shortening until smooth and combined.
Step 8
Mix in the powdered sugar, 1 cup at a time, and then the black cocoa powder. Finally add in the vanilla.
Step 9
If the batter is still too thin, add another cup of powdered sugar.
Step 10
Once the cakes have completely cooled, level off the tops if needed.
Step 11
Spread an even layer of buttercream between each cake and then allow the cake to chill for about 20 minutes. Doing so locks the layers in place, so the cake doesn’t slide around when you frost the sides.
Step 12
Once set, use the remaining frosting to cover the entire cake. Place the cake back in the refrigerator once more to let the frosting set.
Step 13
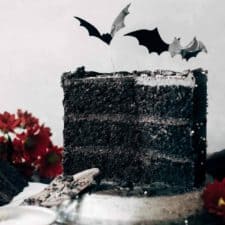
While it chills, prepare the decorations. For the splatters, combine 1 teaspoon of white food coloring with about 1/2 tsp of water in a small dish.
Step 14
For the bats, cut 6 pieces of wire about 6-7 inches long. Using the adhesive strips that came with the bats, stick them on to the ends of each wire.
Step 15
Now that the cake is chilled, begin by adding the white splatters. Lightly dip the tip of your brush into the white food coloring and place the brush about an inch away from the cake. Use your finger to run it across the tip of the brush, flicking the food coloring onto the cake. Repeat this process all around the cake.
Step 16
Next, toss little pinches of the white sprinkles against the sides of the cake. These can be a bit more random, but work with small pinches to prevent the sprinkles from rolling everywhere.
Step 17
Finally, stick the bats into the top of the cake. I find it’s best to make a small loop at the ends of each wire (kind of like you do with tree ornament hooks) and then slide it into the cake. This prevents the wires from tipping over. But if you plan on storing the cake and serving the next day, stick in the bats before serving as it’s more difficult to store the cake with the bats on top.
Step 18
Now slice and serve!