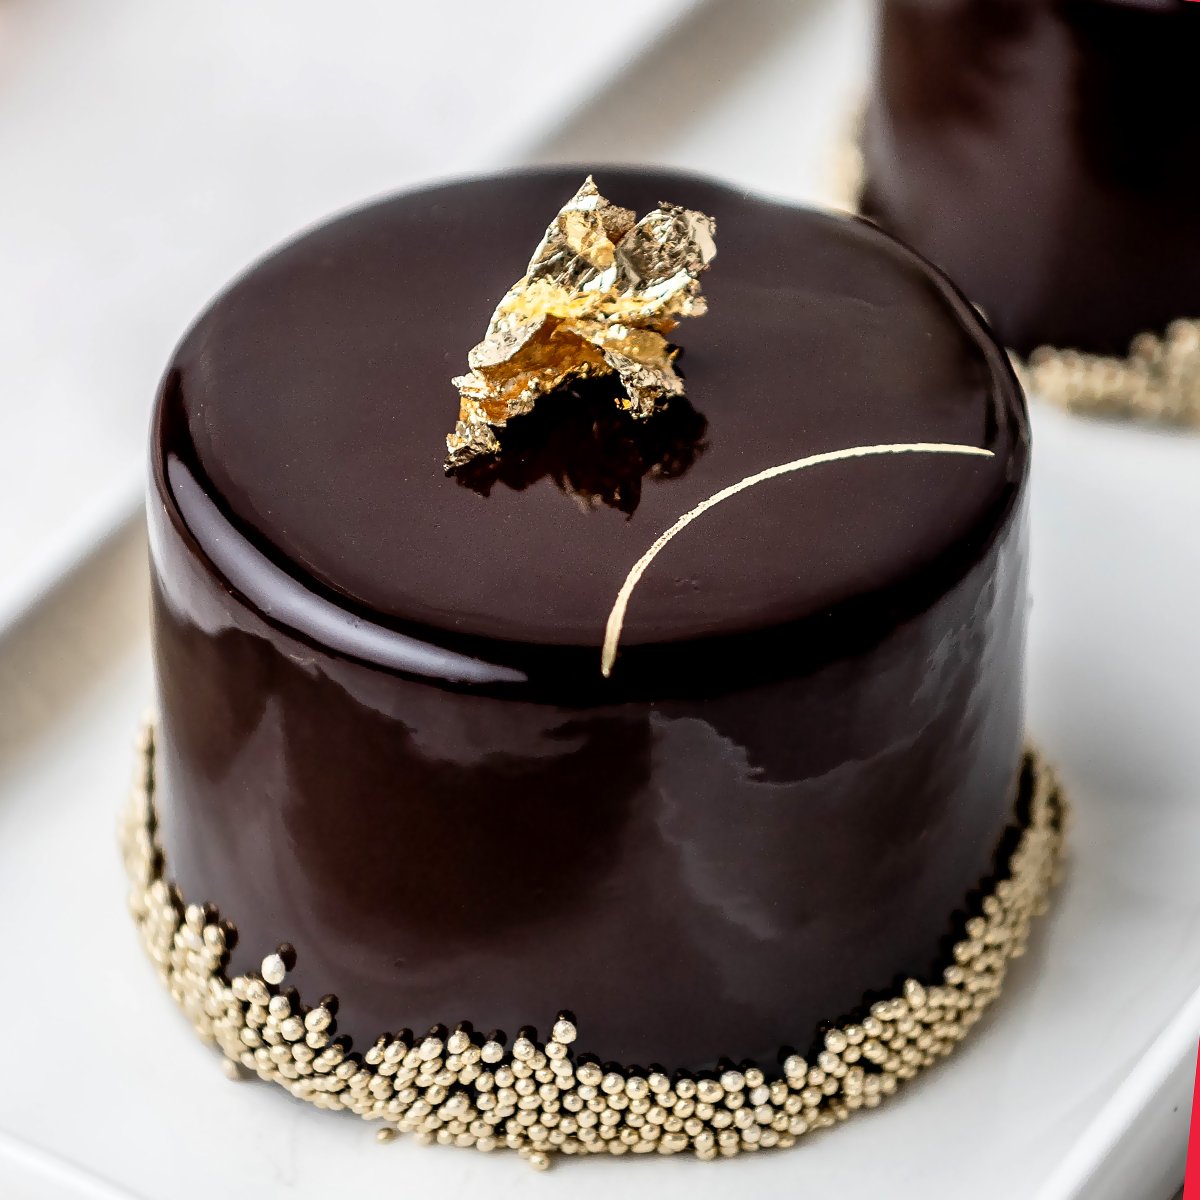
Chocolate Entremet Cake
4.8
(14)
Your folders
Your folders
Prep Time: 2880 minutes
Cook Time: 30 minutes
Total: 3270 minutes
Servings: 6
Author : Elizabeth Marek
Ingredients
Export 19 ingredients for grocery delivery
Instructions
Step 1
Prepare a ¼” sheet pan (9”x13”) with parchment paper and preheat your oven to 350ºF (180ºC).
Step 2
In the bowl of your stand mixer with the whisk attachment, combine the sugar, flour, cocoa powder, baking soda, baking powder, and salt. Stir to combine.
Step 3
Then, in a separate bowl, combine the eggs, mayonnaise, water, and vanilla and whisk them to combine.
Step 4
While the mixer is turning on low, gradually add the wet ingredients into the dry ingredients. Then, increase the mixer speed to 2 and continue to mix for about 1 minute or until the batter is fully combined and smooth. Remember to scrape the bowl to ensure all of the ingredients are incorporated.
Step 5
Next, spread the cake batter evenly on a parchment lined ¼ sheet baking pan. PRO TIP: I also use cake goop around the edges to make the cake release easier.
Step 6
Bake the cake at 350°F (182°C) for 15-20 minutes, or until the cake is finished baking and the center of the cake is set.
Step 7
Finally, after the cake has been removed from the oven and cooled for about 15 minutes, remove the cake from the pan and wrap it in plastic wrap. Then, place the wrapped cake in the freezer until you are ready to start assembling the entremet. Chef Christophe recommends freezing the cake for at least 2-3 hours.
Step 8
Combine your glucose, granulated sugar, and cream together and bring the pan to a boil in a medium sized saucepan.
Step 9
Then, in a heat-proof or glass bowl, pour in about 1/3 of your boiling mixture over your chocolate and mix them together until you reach a shiny and smooth consistency. Then, repeat this step in thirds until you’ve added all your cream. If you put all of your cream in at once, then your ganache may separate.
Step 10
Next, place your butter into a tall container, and then pour the melted chocolate into the pitcher over the butter.
Step 11
Then, using an immersion blender, mix the chocolate and the butter together until it is shiny. PRO TIP: Hold the mixer at a slight angle to prevent incorporating air into the ganache.
Step 12
Cover the ganache with plastic wrap. Do this by pressing the plastic wrap right up against the surface of the ganache. This step will prevent any water in the air from being added to the ganache.
Step 13
Finally, let the ganache set. Set it aside for at least 5-6 hours at room temperature (or you can put it in the refrigerator and cut the time in half). The texture is smoother if you leave it at room temperature.
Step 14
This chocolate mousse is made up of three components: pâte à bombe, ganache, and whipped cream. I will walk you through how to make each of them.
Step 15
First, in a large mixing bowl, prepare your whipped cream. Use a hand mixer to whip your heavy cream. You do not need stiff peaks, but the whipped cream should be stable. Once you have soft peaks, set it aside.
Step 16
Next, fill a heatproof bowl with your chocolate.
Step 17
Then, in a saucepan, bring your heavy cream to a boil in a saucepan and then pour about 1/3 of the boiling cream over your chocolate. Mix it until all of the chocolate is melted.
Step 18
Pour 1/3 more of the boiling cream into the chocolate and mix until it is combined. Repeat this process once more with the remaining 1/3 of the hot heavy cream and mix it into the chocolate ganache. Then, set it aside.
Step 19
Next, prepare the pâte à bombe. Start by filling a large saucepan with water and sugar mixed together. Then, place your egg yolks in a heatproof bowl.
Step 20
Heat the water and sugar in the stovetop pan to 244°F (118°C) using a thermometer.
Step 21
Once the pâte à bombe reaches 244°F (118°C), slowly pour it into the bowl with the egg yolks while whisking continuously (similar to how you would make an Italian meringue).
Step 22
Whip the egg yolks until they reach the ribbon stage (this is when the texture has thickened, the volume has doubled, and will be lighter in color/appear pale yellow). Once you’ve reached the ribbon stage, your pâte à bombe is ready.
Step 23
Now you will combine your three elements (pâte à bombe, chocolate ganache, and whipped cream) to make your mousse. Begin by transferring the whipped cream into the bowl of the chocolate ganache, and then mix to combine. The reason you will mix the whipped cream into the chocolate ganache first is to lighten up the ganache texture so that it is more airy and will mix easier with the pâte à bombe.
Step 24
Then, pour the pâte à bombe into the bowl of the mixed chocolate ganache and whipped cream, and fold it in until it is fully combined.
Step 25
First, remove the plastic wrap from the frozen cake.
Step 26
Next, use a 3” cake cutter to create small cake rounds. The height of the cake should be about 1/4 of the height of the cake ring/entremet mold you are using. Trim the cakes to 0.5” tall.
Step 27
Prepare a piping bag with a large round tip (an 8 or 9 tip) and fill it with your chocolate ganache.
Step 28
Then, pipe your chocolate ganache on top of the center of your cake rounds.
Step 29
Freeze the cake rounds with ganache on top for 1 hour or until they are set.
Step 30
While the cake rounds with ganache are in the freezer, prepare your 4” cake rings/entremet mold for assembly.
Step 31
You will start by coating the inside of the cake rings with cooking spray.
Step 32
Cut your acetate sheets to 2” x 9.25”, and cut out squares of acetate that will cover the entire bottom of the cake rings.
Step 33
Then, line the inside of your non-stick cake rings with acetate sheets. Next, place a square sheet of acetate on a baking sheet. Then, place your cake ring that is lined with acetate on top of the square.
Step 34
Once the cake rounds with ganache have set in the freezer for 1 hour, remove them from the freezer.
Step 35
Prepare a piping bag and fill it with your chocolate mousse.
Step 36
Now it is time to assemble the entremet. PRO TIP: Before you begin piping your mousse ensure that the acetate squares on the bottom are in place so none of the mousse will escape.
Step 37
Start by piping chocolate mousse into the acetate-lined cake rings about 3/4 of the way to the top of the cake rings.
Step 38
Next, hold the cake round topped with ganache and place it mousse side down into the center of the ganache (cake side should be on top). Gently press the cake round into the mousse until the mousse moves up to the top. You will see a ring of mousse form around the cake and that is when you know the mousse is filled on the sides.
Step 39
Then, flatten out the mousse and scrape off any excess from the cake ring so that it’s level.
Step 40
Freeze the entremets for a minimum of 3 hours. Chef Christophe recommends freezing them overnight. This will allow all of the layers to fully set in place.
Step 41
First, fill a bowl with cold water and place your gelatin sheets in the bowl one at a time to prevent clumping. This will allow your gelatin sheets to bloom and absorb the water. Set aside for about 5 minutes.
Step 42
In a large saucepan, combine the water, sugar, and a few drops of red or orange food coloring. Adding the food coloring is entirely optional. This is a professional pastry chef. PRO TIP: When you add red food coloring, it will intensify the color and shine of your finished chocolate glaze.
Step 43
Then, stir to combine everything and bring the mixture to 222°F (106°C).
Step 44
Next in a separate container, mix your glucose with your cream. Then, warm it up in the microwave for 1 minute and whisk to mix them together.
Step 45
Slowly pour the warmed glucose and cream mixture into the large saucepan of your sugar and water while whisking continuously to combine.
Step 46
Then, bring the mixture to a boil.
Step 47
Add the cocoa powder. Turn off the heat and continue to mix until combined.
Step 48
Next, squeeze out the excess water from your bloomed gelatin sheets and then add the gelatin to a pitcher (or large measuring cup).
Step 49
Pour the cocoa mixture on top of the gelatin, and mix the glaze using an immersion blender. Mix until all of the bubbles are gone. PRO TIP: Hold the immersion blender at a slight angle to avoid adding any air bubbles into the glaze. The smoother and bubble free the glaze is, the better the shine.
Step 50
Finally, place your pitcher (or large measuring cup) filled with your glaze into an ice bath and cool it 104°F (40°C). Then, set it aside until you are ready to pour the glaze over your entremet.
Step 51
First, you will unmold the frozen entremets. Heat up the side of the frozen cake ring using a heat gun (or if you don’t have a heat gun you could use a hair dryer). Gently use your finger to push the entremet out of the cake ring.
Step 52
Then, peel off the acetate sheet.
Step 53
Next, place your entremets on a cooling rack. Chef Christophe prepared a baking sheet with plastic wrap and topped it with a cooling rack. Why? Because the plastic wrap will catch any leftover glaze so that you can reuse it!
Step 54
Your glaze should be 104°F (40°C).
Step 55
Pour your chocolate glaze over your entremets so that it covers it all along the top and the sides.
Step 56
Using a flat spatula to gently scrape across the top of the entremets so that they are level and doing so will remove any excess glaze. PRO TIP: Chef Christophe recommends glazing your entremets in 2 layers. Start by pouring the glaze over the entremet and then put it in the freezer for 1 hour to allow it to set. After 1 hour has passed, pour a 2nd layer of glaze on top of your entremets. Ultimately, the first layer will cover any air bubbles and the 2nd layer will be shiny.
Step 57
Then, prepare your decorations for your entremet! Chef Christophe mixed small white nonpareil sprinkles with some gold powder in a bowl. If you don’t want to use sprinkles you could use streusel, nuts, toasted coconut flakes, chocolate cookie crumbs, or anything you desire! The possibilities are endless!
Step 58
Next, pick up and transfer the chocolate entremets by sticking a skewer into the center to gently lift it up off the cooling rack.
Step 59
(Optional) Now it's time to decorate! While lifting it up by the skewer, carefully roll the entremet into the sprinkles so they stick along the bottom of the entremet.
Step 60
Transfer the entremet to your plate.
Step 61
Remove the toothpick by twisting it and pulling it out at the same time.
Step 62
Finally, place gold leaf in the center to cover the hole. Mix a little gold dust with grand marnier and decorate the top of the entremet.