DIY Garden Suncatcher Wind Chime a Summer Kids Craft
Your folders
Your folders
Total: 90
Servings: 1
Ingredients
Export 8 ingredients for grocery delivery
Instructions
Step 1
Take the grandkids, other kids in your life, or your friends and take a nature walk to collect items for these crafts. Enjoy your time together outside. Life is good. This craft works best with flower buds and petals that are not very thick. Keep that in mind as you gather your plant items.
Step 2
Cut a couple squares of clear contact paper that are slightly larger than the diameter of the mason jar ring.Set one aside for the moment.Place the canning jar ring on the center of the contact paper square and with a permanent marker draw around the outside edge of the ring. This will tell you where to place your flower petals, it will be your boundary line.
Step 3
Go ahead and take the contact paper off of its paper backing and put it sticky side up on your work surface. Tip: I bent each of the little corners back so they would stick onto the countertop and the paper would not shift around. This will make it easier for children, especially.
Step 4
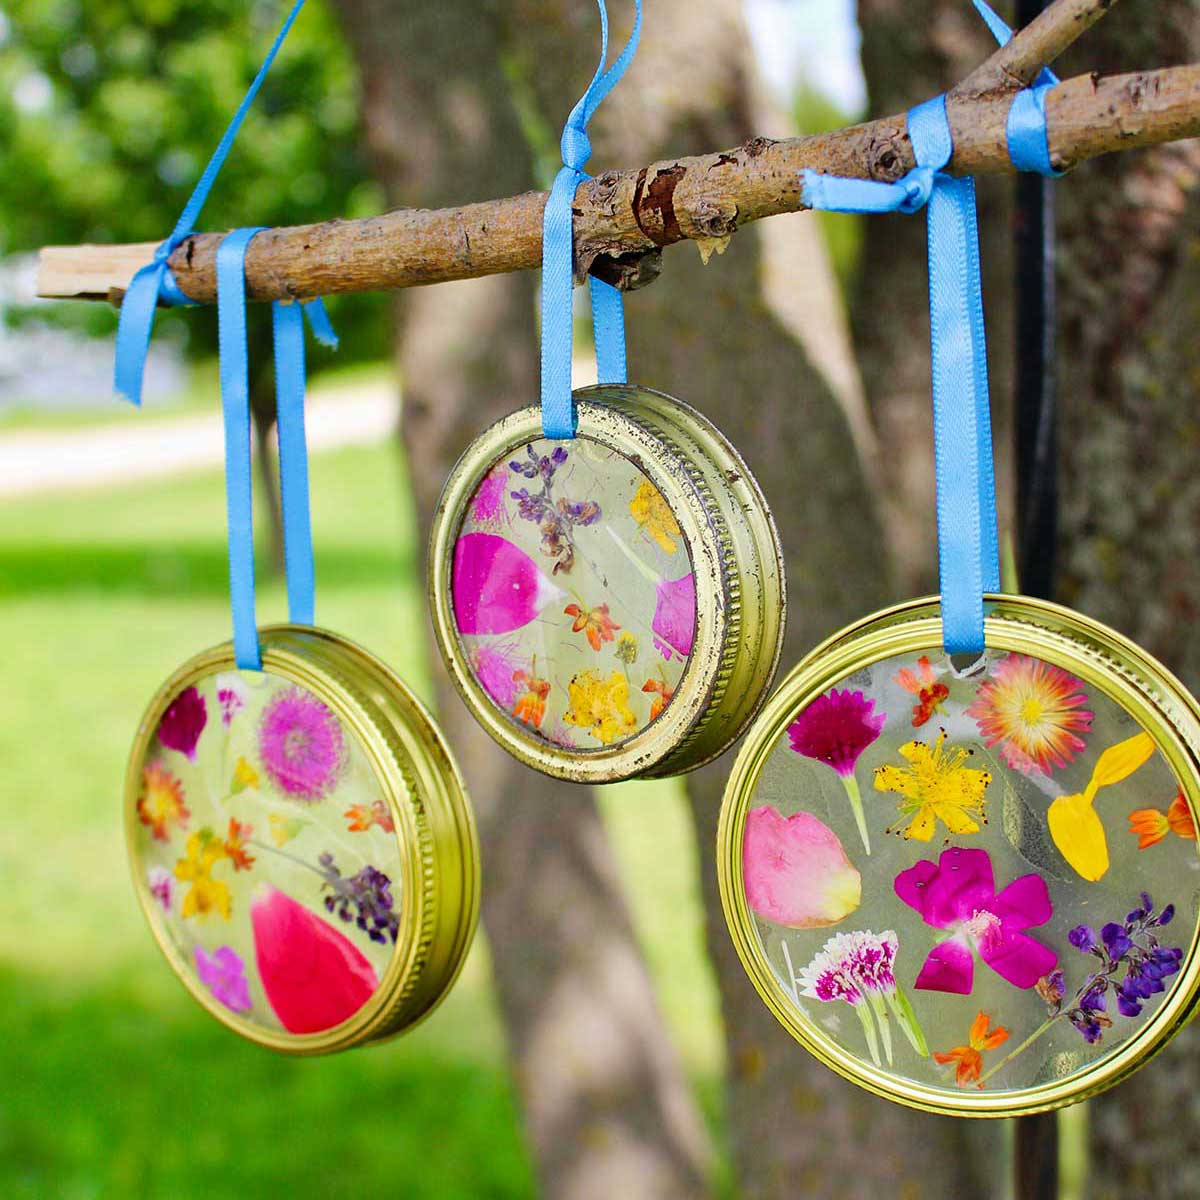
It’s good to cut off any extra portions of the flower that makes them thicker. You can pull petals off the flowers and just use the petals, too.Place the blooms face down on the sticky contact paper. Arrange the petals around them in whatever pattern or design you desire.
Step 5
After you have all your petals and blooms in place on the contact paper, take your second square piece, cut and remove it from the paper backing. Place this piece over the blooms so all the petals are sandwiched in between the two pieces of clear contact paper. This will keep them bright and colorful for a long time. Press and work on the paper to get out the bubbles and seal it as well as possible.
Step 6
When you’re satisfied with that, take your scissors, and cut out the circle that you drew on the contact paper earlier. You will need to then trim off about a 16th of an inch all the way around inside of the line in order to have the contact paper circle fit inside the mason jar ring.Use a hole punch to punch a hole about a half inch from the edge of the circle. This will be used later to place a ribbon through to hang it up. Note: The hole punch couldn’t punch a hole through two layers of contact paper but provided a circle area I could then clip out with a scissors.
Step 7
Before gluing or pressing in the paper, be sure that you have the best side of your project facing downward as you press it into that mason jar ring so that it will be what is seen when you turn it over and hang it up as a wind chime! For me this was the side that featured the small flower blooms.Fit the circle inside the ring and if it’s still too large trim off a very small amount around the circle until it fits inside the ring.Mine fit tightly into the canning jar ring, but I did go ahead and run a bead of glue around the inside rim of the mason jar lid. This is so that the contact paper was secured a little better inside that ring.
Step 8
Repeat this process and make two more garden suncatchers with the other two Mason jar rings.
Step 9
While you’re waiting for the glue to dry head outside again and find a stick that is about a foot-long and fairly straight but still interesting looking. Have some fun arranging the three (or more) canning jar rings in an arrangement that you like under the stick. I put my two larger rings on the outside and my smaller ring on the inside slightly higher than the two large rings.
Step 10
Now, take a ribbon and thread it through the hole that you made at the top of your contact paper circle on one of the suncatchers.Tie the ribbon together over the top of the branch so that the top of the mason jar ring and your flower garden suncatcher is facing forward.Tie the ribbon appropriately so it hangs the way that you want it to in order to make the arrangement you designed earlier.Repeat this with the other two circles and then hang them onto your stick as well.Use the same ribbon to make a hanger for your project. Tie the ribbon on one end of the stick and then loop it to the other end of the stick. Check the length of the ribbon to make sure you like the way that it looks and the way that the wind chime will hang. Then tie the other end of the ribbon to the other end of the stick.
Step 11
I did not have a large suction cup hook available, or I would have hung my wind chime on the its hook on our picture glass window. They can also be hung outdoors, but I don’t know how long they will last in the weather if it rains and such. A Garden Suncatcher Wind Chime would be a pretty garden decoration from a shepherd's hook.
Top similar recipes
Curated for youYour folders
 60 views
Glass Beaded Mason Jar Wind Chime
craftsbyamanda.com
Your folders
 42 views
Glass Beaded Mason Jar Wind Chime
craftsbyamanda.com
Your folders
 219 views
Foil Painted Shamrock Craft for Kid...
craftsonsea.co.uk
Your folders

 74 views
Paper Plate Ladybug Craft For Kids
simpleeverydaymom.com
Your folders

 55 views
DIY Wind Chimes With Terracotta Pot...
gardentherapy.ca
Your folders
 360 views
DIY Garden Lighthouse
thecountrychiccottage.net
Your folders

 241 views
Garden summer rolls
olivemagazine.com
5 minutes
Your folders
 186 views
Summer Garden Pasta
thekitchn.com
3.7
(11)
Your folders

 438 views
Summer Garden Pasta
foodnetwork.com
4.7
(158)
5 minutes
Your folders

 281 views
DIY SEED BOMBS FOR KIDS
naturalbeachliving.com
Your folders
 19 views
Glass Bead Suncatcher
onelittleproject.com
Your folders
 29 views
Stained Glass Suncatcher
onelittleproject.com
Your folders

 292 views
Summer Garden Pasta | Recipes
barefootcontessa.com
Your folders
 198 views
Summer Garden Crustless Quiche
allrecipes.com
4.8
(204)
1 hours
Your folders
 236 views
DIY Globe for Kids to Make
rainydaymum.co.uk
Your folders
 58 views
Grandmama's Wind Cake
southernplate.com
60 minutes
Your folders
 75 views
Glass Bead Heart Suncatcher
onelittleproject.com
Your folders

 79 views
DIY Cloud Dough: Easy Recipe for Ki...
savoringthegood.com
Your folders

 226 views
Summer Garden Crustless Zucchini Pi...
ambitiouskitchen.com
4.9
(27)
45 minutes