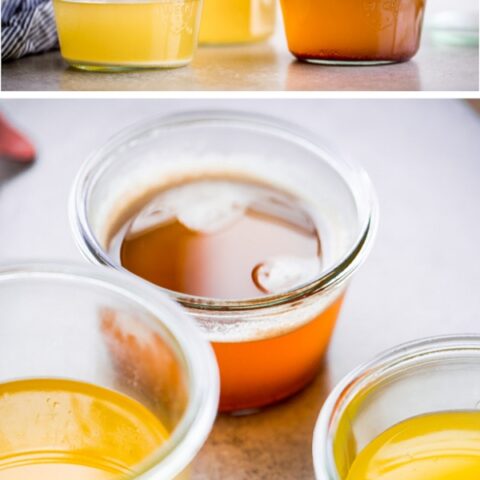
How to make Clarified Butter, Ghee, & Brown Butter
4.8
(26)
Your folders
Your folders
Prep Time: 5 minutes
Cook Time: 20 minutes
Total: 25 minutes
Servings: 1
Author : Laura / A Beautiful Plate
Ingredients
Export 0 ingredients for grocery delivery
Instructions
Step 1
Line a fine-meshed sieve with a few layers of cheesecloth and set over a large heatproof measuring cup. Set aside.
Step 2
Cut the butter into 1/2-inch slices and place in a medium saucepan. Heat the butter over low heat until completely melted.
Step 3
Allow the butter to simmer over low heat, as the butter bubbles and splutters, foam–or whey proteins–will begin to rise to the surface. I use a metal spoon and carefully skim the surface (do not stir the butter) to remove the foam during the entire cooking process (I have a small bowl set aside for it). This allows you to see the butter and watch it more carefully. Don’t throw out the foam, it can be stirred into sauce, tossed with pasta, etc. Adjust the heat as necessary.
Step 4
Once the foam dissipates (time will vary depending on quality and quantity of butter) and the butter starts spluttering, very small, clear bubbles should form on the surface of the butter. This is a sign that it is almost finished cooking, watch carefully.
Step 5
Remove the butter from the heat immediately, allow it to sit for a few minutes, skim any remaining foam that rises to the surface, and carefully pour the butter through the cheesecloth lined sieve, leaving the solids on the bottom of the pan. Allow the butter to cool before transferring to a heatproof jar or container. Use or store in the refrigerator (it should keep for at minimum a month, if not significantly longer).
Step 6
Repeat Steps 1-4 above.
Step 7
Once the foam dissipates and the butter stops spluttering, continue to cook the butter just until the milk solids begin to caramelize and turn golden brown on the bottom of the pan. It will be slightly more golden in color than clarified butter, and just begin to have a light nutty fragrance.
Step 8
Remove the butter from the heat immediately, allow it to sit for a few minutes, skim any remaining foam that rises to the surface, and carefully pour the butter through the cheesecloth lined sieve, so that the cheesecloth catches the milk solids. Allow the butter to cool before transferring to a heatproof jar or container. Use or store in the refrigerator (it should keep for at minimum a month, if not significantly longer).
Step 9
Cut the butter into 1/2-inch slices and place in a medium saucepan. Heat the butter over low heat until completely melted.
Step 10
Allow the butter to simmer, at this point you can increase the heat to medium to speed up the process (however, watch it carefully the whole time).
Step 11
Continue to cook the butter as it splutters and bubbles, stirring continuously with a rubber spatula and scraping the bottom of the pan continuously (this will help the milk solids caramelize more evenly). The foam will eventually subside, small bubbles will form, and the milk solids will begin to caramelize lightly. Reduce the heat to low and swirl the pan until the butter becomes fragrant (nutty) and a light amber in color.
Step 12
Turn off the heat immediately (the butter will continue to cook) and transfer the butter to a heatproof bowl, be sure to scrape any remaining brown bits that stick to the bottom of the saucepan into the bowl–this is the best and most flavorful part of brown butter! Cool the butter, and then store in a glass jar or container. Use or store in the refrigerator (brown butter will keep for at minimum a week, if not longer).