How To Make Sourdough Bread: A thorough Step By Step Guide
5.0
(2)
Your folders
Your folders
Prep Time: 720 minutes
Cook Time: 45 minutes
Total: 2205 minutes
Servings: 18
Ingredients
Export 6 ingredients for grocery delivery
Instructions
Step 1
Before starting this recipe, read the post and the FAQ above the recipe card. It has valuable information that will help you understand the process, jargon, and method of baking sourdough bread. While you can use the cups and tablespoons to measure the ingredients in this recipe, I highly recommend using the metric measurements for a more consistent outcome. You can switch between US and metric measurements by clicking on the "metric" below the ingredients list. The recipe below will include measurements in grams, but you can measure with cups/tablespoons and use those.
Step 2
8 p.m. - Mix 10 grams of sourdough starter with 50 grams of room-temperature water until milky in a pint or quart-sized jar.Then, add 50 grams of unbleached flour and stir vigorously for 1-2 minutes or until everything is thoroughly mixed.
Step 3
Clean the sides of the jar and mark the current level. Cover with a lid loosely.
Step 4
Keep warm at 70F for 10 to 12 hours or until the leaven peaks or at least doubles in size. An oven with just the light on is an excellent place to keep the starter warm overnight. Adjust the feeding ratio of the leaven to have it hit a peak when you're ready to start mixing the dough.See approximate ratios below:1:2:2 ratio at 66F - 67F room temp for an 8-hour rise time1:3:3 ratio at 70F for an 8-hour rise time1:5:5 ratio at 70F for a 10-12 hour rise time
Step 5
8 a.m.: - To a large bowl or a plastic container, add 500 grams warm (90F) filtered water and 110 grams of peaked starter from the night before. Mix until the water looks milky.
Step 6
Add the dry ingredients & knead: Now add 525 grams of unbleached bread flour, 75 grams of whole wheat flour, and 1 tablespoon of salt. Stir quickly to bring everything together. Mix by hand for 3-4 minutes or until thoroughly mixed and no wet flour remains. Alternatively, mix everything in a mixer fitted with a paddle attachment for 1 minute on low speed (speed 1-2 out of 8).The dough should be chunky and wet but not like cake batter. If the dough resembles a cake batter, add enough flour to make it chunky and wet. Cover and rest in a warm spot.See the notes for makeshift proofing box options.This marks the start of bulk ferment or first proof. If the dough is kept at 80°F, bulk ferment should last about 4-6 hours. Set a timer for 4 hours to help you keep track.
Step 7
Over the next ~4-6 hours, stretch the dough to build strength by performing 4 - 6 sets of stretches every 30 minutes. Set a second timer to help you remember. Approximate times: 8:30 am - stretch and fold9:00 am - stretch and fold9:30 am - stretch and fold10:00 am - stretch and foldKeep the dough covered in a warm spot (80F) in between the stretch and folds (S & F). S & F - To stretch the dough, lightly wet your hands, then grab a chunk of the dough and pull it up as far as it will stretch. Now fold it over. Rotate the container a quarter turn and repeat. Go around the bowl continuously until the dough stretches no more. Set the dough folded side down and smooth side up. Coil Folds - Alternatively, you can do coil folds. Lift the dough in the middle by placing wet fingertips underneath both sides of the dough and your thumbs above the dough. Once one of the sides lifts off the bowl, push the bent part over, creating a fold. Repeat the same motion until the dough does not stretch to allow for one more coil. Then, turn the bowl 90° until the dough is nice and tight. Set it seem side down. Cover it. Return to the warm area.With each set of stretches, the dough will feel tighter, stick less to your hands and bowl, and require less stretching to get to a tight ball. Be careful not to stretch it beyond its stretching ability, or the gluten will tear and weaken the dough. Towards the last sets, the dough shouldn't spread out as much, have defined edges, and dome downwards. After the stretches, leave the dough undisturbed until the 4-hour timer goes off, then either move on to the next step, or keep an eye on the dough until it is adequately risen and slighly puffy.When the dough is ready for the next step, the surface of the dough should be covered in tiny bubble "blisters," and feel puffy and jiggly. If the dough does not, leave it in a warm spot for as long as it needs until it has risen by about 30% - 50%. This marks the end of bulk ferment.
Step 8
This will help to create surface tension, build height, and establish the structure for the final shaping. 12 pm - Lightly dust the top of the dough inside the bowl/bin with flour. Turn over the container and allow the dough to fall onto the counter. With floured hands, gently stretch the dough into a rough square.
Step 9
Visually divide the dough vertically into thirds. Now gently fold the right and left sides over the center third. Grab the end closer to yourself and start to roll by pulling and tucking, then rolling and setting the roll seam down.
Step 10
Leave to rest uncovered for 30 minutes. This will help the surface to dry slightly and prevent the need for flour as you do the final shaping.
Step 11
12:30 p.m. - Using a bench scraper in one swift motion, turn over the rest of the dough bottom side up (do not add flour). Gently stretch the dough into a circle. Grab the top portion (12 o'clock), stretch it out and over the top third. Now grab a chunk from the top right side and fold it over the folded top part. Repeat with the left side. Continue bringing both sides over the center in a zig-zag motion until you reach the end. Now lift the side closer to yourself and fold it away from yourself, forming a smooth roll.For an oval banneton - pinch the ends of the roll and tuck them slightly under. Now, with a bench scraper, push the wide side of the dough away from yourself and then towards yourself across the counter to elongate the roll.For a round banneton, use a bench scraper to swirl the dough in a circular motion, tightening all other sides and creating a smooth ball. Tip: to cover the bread in seeds of choice, lightly spray the top of the dough with water, then roll the top in seeds.Set the dough top side down into a rice-floured banneton.
Step 12
Cover the dough with a disposable shower cap or a clean kitchen towel. Refrigerate for 18 hours or until the following morning. During cold retard or cold proofing/fermentation, the sourdough enzymes and bacteria will continue the gluten breakdown as the yeast's activity slows due to colder temperatures. You should still see a 10% - 15 % increase in volume during cold retard as the dough will continue rising until the temperature drops below the yeast's optimal temperature. If you do not see a rise, next time, extend the bulk fermentation period for a little longer, or make sure your starter is healthy and strong. Check to make sure that the water you add is 90°F and the temperature during proofing is around 80°F.
Step 13
Adjust the oven rack to the center. Place a 5-quart round or a 7-quart oval Dutch oven with the lid on the rack. Preheat to 475°F for at least 30 to 40 minutes or up to 1 hour.
Step 14
Turn over the dough - Right before the oven is preheated remove the basket with the dough from the fridge. Set a piece of parchment larger than the banneton on the counter. Turn over the dough from the basket onto the parchment.
Step 15
Score: Using a sharp knife or a razor blade (lame), score the dough off the center lengthwise at a 45° angle about 3/4 inches deep. This will create a weak spot for expansion as the sourdough bread bakes. Prepare 2 ice cubes - they will be added into the pot with the dough to help keep the crust from forming before the dough has a chance to fully expand (optional).
Step 16
With oven mittens remove the preheated Dutch oven. Gently drop the scored dough into the pot being careful not to burn your hands. Add 2 ice cubes to the sides of the dough and quickly cover with the lid to trap the stem.
Step 17
Transfer the Dutch oven back into the oven and bake for 20 minutes. Then, remove the lid and bake for another 20-25 minutes depending on your preference for the darkness of the crust.
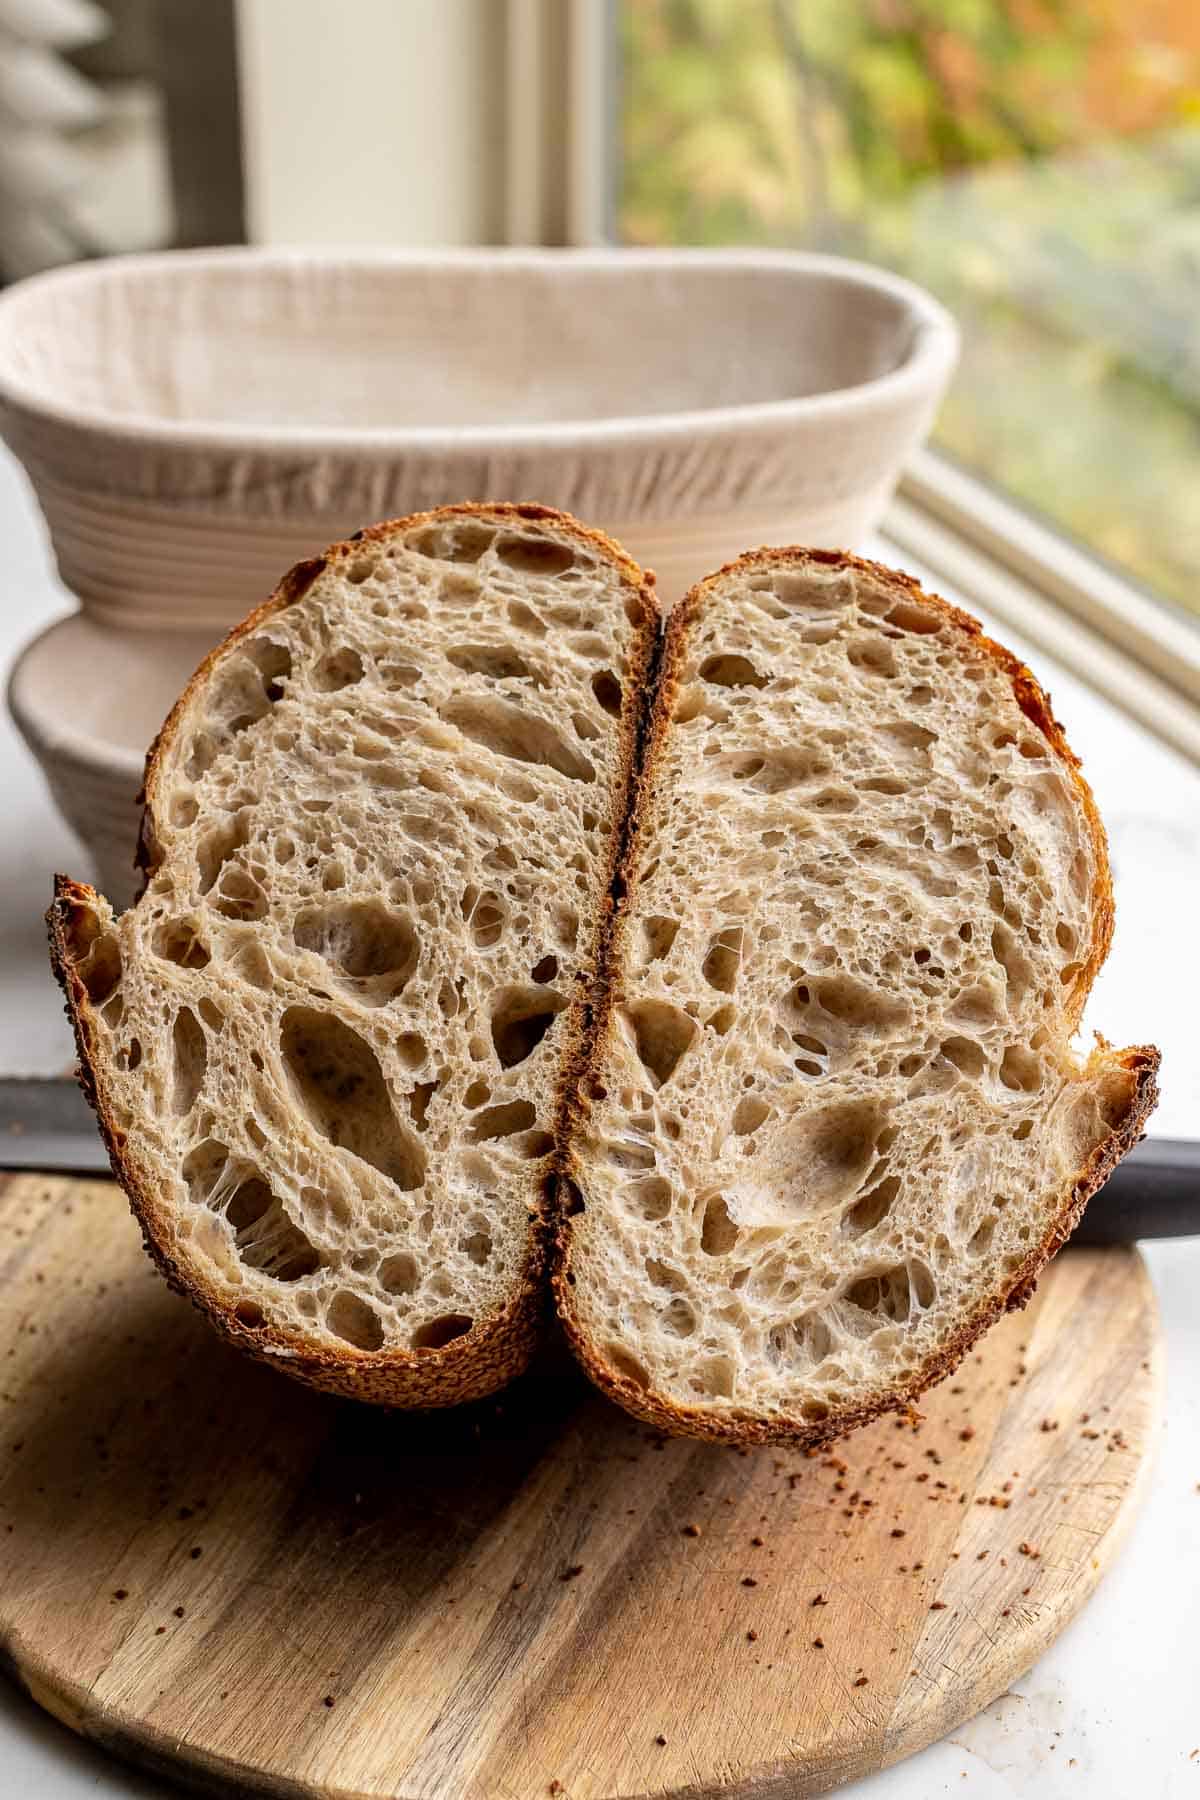
Step 18
Remove the bread from the oven and set on a cooling rack. Cool completely before cutting, at least 2-4 hours.