No Knead Neapolitan Style Pizza Dough Recipe
4.1
(66)
Your folders
Your folders
Prep Time: 45 minutes
Cook Time: 10 minutes
Servings: 4
Author : meathead
Ingredients
Export 4 ingredients for grocery delivery
Instructions
Step 1
Mix. In a 2 quart (1.9 L) bowl, mix together the flour, salt, sugar, and yeast. Add the water and mix it well with a wooden spoon, rubber spatula, or your clean hands, but not a mixer. When the flour has absorbed all the water, the dough will be wetter than normal bread dough, and sticky, like putty. If it is too wet and runny, add a little more flour. Cover the bowl with plastic wrap and set it aside at room temp, 72°F (22.2°C) until it has more than doubled, about 18 hours. The exact time will depend on the actual temp of the room.
Step 2
Scatter enough flour on the work surface to keep the dough from sticking, just a light coat because we don't want to be adding a significant amount of flour to the dough (unless it is too runny). Scrape the dough out of the bowl and onto the flour. Get it all out. They make plastic bowl scrapers for this task, but you can do it by hand or with a wooden spoon.
Step 3
Shape. Work the dough into a rough square about 12" (30.4 cm) on all sides, and cut it into four equal parts for four individual pizzas about 8 to 10" (20.3 to 25.4 cm) each. For larger pies, cut the dough in thirds or in half. Just make sure you can fit it on your pizza stone. If it is sticking to your hands, wet them. Some people keep a bowl of water handy for the purpose. If your hands get sticky with dough sprinkle them with flour and rub them together. It will come off (thanks for the tips @wartface).
Step 4
Take each corner of each portion and fold it until they meet in the center. Flip it until the folds are underneath and form it into a low round mound. If it gets sticky, put it down and dust it with flour. There is no need to pound it or stretch it.
Step 5
You can now prepare one or all for baking. You can wrap them in plastic wrap and store them in the fridge for 3 days. You can freeze them with only a minor loss of quality. Before using frozen dough it needs to come back to room temp. Unwrap the ball, put a little flour on a work surface, put the ball on the flour, and cover it with a couple of layers of damp paper towel or a damp kitchen towel.
Step 6
Fire up. Preheat the grill with direct heat on all burners, put in a pizza stone, and let it heat up to about 600°F (315.6°C) on the top surface. You may need to do a test run to determine the ideal stone and air temp. I discuss this in more detail in my article on the Science of Pizza here.
Step 7
Make the crust. If you just made the round mounds, if you can, let them sit for about an hour, but if you're in a hurry, get right down to it. Flour the work surface lightly so the dough will hold enough flour on the underside so that it won't stick. Now start pressing the mound down and out with your fingers. No rolling pin. Just press the dough out until it gets about 8" (20.3 cm) across. Keep turning it so it does not get too thin in any location and so the bottom stays well-floured.
Step 8
Pick up the round by an edge and hold it in front of you like the steering wheel of a car and start turning it round and round allowing the weight of the dough to stretch itself. Shake it a bit to help it stretch. When it is thin enough that you can see a little light through it, you're almost there. Try not to allow a hole to develop or let it get paper thin. If you do break through, you can usually patch it together. Resist the temptation to toss it in the air. If the dough is not perfectly round, so much the better. A little lopsidedness says "authentic home made artisanal made with loving hands."
Step 9
If you have a peel, lightly flour it, especially the far edge. If you don't have a peel, the back side of a half-sheet pan will work just fine. The flour acts like ball bearings to help the dough slide off. I recommend a light dusting of corn meal which makes really good ball bearings and adds a special rusticity to the crust. Plop the dough on the peel and make sure it is not sticking. It will shrink a bit while you are adding the toppings, just make sure it is not too large for your stone. Bring one edge of the dough right up to the edge of the peel. This will help you with the transfer to the stone. Apply the sauce right up to the edge. That will give the pie beautiful color.
Step 10
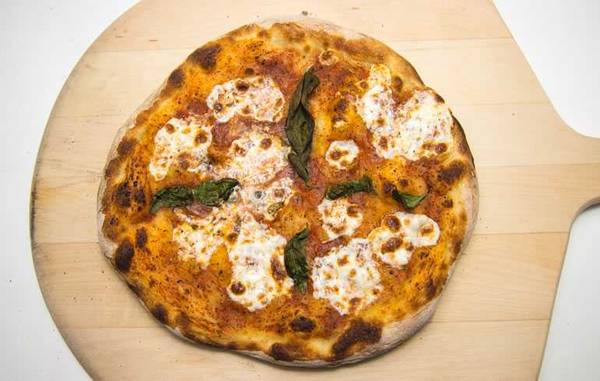
Add toppings. Now it is time for the toppings. The secret is to not go crazy. Less is more. Pile it too high and the dough will not puff properly. I cover toppings in my recipes (see the links at the top of the page), so let's just focus on the process now. This is a Margherita pizza. Notice that I chiffonaded the basil. Take the basil leaves and stack them on top of each other. Roll them like a cigar, and then cut across the roll. You end up with thin strips. Notice also that I am using an open sided sheet pan rather than a peel.
Step 11
Cook. Now take your peel and lay the edge farthest from you on the edge of the stone farthest from you. Wiggle and shake until it slides onto the stone. Keep a spatula nearby so you can push if it sticks to the peel. Close the grill or oven. The timing will vary depending on oven temperature, the thickness of your dough, the toppings and how wet and cold they are. After three minutes check. Don't wait too long and be surprised by a burnt crust. The trick here is to get the bottom amber to brown with a few scorched splotches, and still get the toppings cooked. The cheese should be bubbly, but you don't want raw sausage, although some crunch to the peppers and onions is nice. Getting everything cooked properly is controlled not only by heat but by how you cut the toppings, and you will learn what is best for your preferences and your oven with practice.
Step 12
You need to know if the back is hotter than the front and hopefully you learned that with the white bread test in my article on calibrating a grill or smoker. You might need to reach in there with tongs or the peel and rotate it 45 degrees if one edge is cooking too fast. If you are cooking in an indoor oven and the bottom is progressing faster than the top, turn off the oven, the stone has plenty of energy stored in it, and turn on the broiler to speed the cooking of the top. In a professional wood burning pizza oven the pizzaiolo or pizzaiola, the pizza master or mistress, will often slip the pie onto the peel and lift it up near the top of the oven where hot air is trapped to speed the cooking of the toppings. Check out the above to see how the process works and how the pizza is cooked on the Pizza Party, a very nice and relatively inexpensive wood burning pizza oven that I use.
Step 13
Serve. When it is done, remove it with the peel, or just lift the stone off and bring it to the table. I like to bring in the stone with the pie to keep it hot. But the stone will scorch your table, so pile at least 6 place mats down and put it on top of them. Cut it with a wheel, knife, or even scissors.
Step 14
Here's a look at a cross section of the cooked crust. You can see it is dark brown and crunchy on the bottom and golden on the top with air pockets that make it light.