Opera Cake
4.7
(97)
Your folders
Your folders
Total: 3 hours
Servings: 9
Author : Chef Philippe
Ingredients
Export 8 ingredients for grocery delivery
Instructions
Step 1
Before starting this Opera Cake recipe, make sure you have organised all the necessary ingredients.
Step 2
The two sheets of Joconde biscuit have been cooked beforehand, using two Flexipan® Entremets mats (33.5 x 33.5cm). When the Joconde sheets are cold, remove them gently from the mat onto your worktop surface.
Step 3
Place a square tart ring (20 x 20cm) in one corner of the Joconde biscuit. Use the square ring as a guide and cut the biscuit to the same dimensions.
Step 4
The biscuit should perfectly line the inside of the mould. Make sure you cut along the inner rim of the square.
Step 5
You should obtain a perfectly neat square, as shown in the photo. Set aside.
Step 6
Cut the rest of the biscuit in half, then gather the pieces together in order to cut another square. Cut along the inner rim of the square.Even though this second square is composed of two pieces of biscuit, this will not make any difference once the Opera cake is assembled.
Step 7
Repeat the operation with the second sheet of Joconde biscuit and cut a third square. Set aside.
Step 8
Place one biscuit square on your kitchen worktop.
Step 9
In the microwave, melt the chocolate couverture for the coating. Work in periods of 20 seconds, stirring at each interval, to prevent the chocolate from burning.
Step 10
Using a brush, spread the melted chocolate on the surface of the biscuit. Apply a very thin layer of chocolate. This will create a hard shell on the biscuit to make it resistant to moisture.
Step 11
Refrigerate the biscuit for about 10 minutes to allow the chocolate to set.
Step 12
Prepare the chocolate ganache. Place the ganache in the fridge, making sure it does not firm too much. Try to stir it regularly while it is in the fridge, and take it out when the consistency is smooth and creamy. Set aside at room temperature.
Step 13
Assembling the cake: Take the chocolate-coated biscuit square out of the fridge. Place it on your kitchen worktop. The chocolate should now be set.
Step 14
Flip the biscuit so the chocolate-coated side is facing down.
Step 15
Place the square ring around the biscuit. This is the same square as the one we used to cut the biscuit at the start.
Step 16
Using a pastry brush, steep the sponge cake with coffee syrup. For the syrup, I used sugar syrup (16°), coffee extract (the amount varies according the desired flavour intensity) and little Grand-Marnier or Cointreau.
Step 17
If you wish to make this recipe without using any alcohol, simply remove the syrup and Grand-Marnier (or Cointreau) from the ingredients.
Step 18
When the whole surface has been moistened with syrup, add the equivalent of one rubber spatula (or 1 and a half) of coffee crème au beurre. The consistency should be smooth and creamy. It should be lump free and spread easily.
Step 19
Using a cranked spatula that is slightly smaller than the square frame, spread the cream into a thin layer, to a thickness of 3 or 4 mm.
Step 20
Make sure you do not coat the sides of the ring with coffee cream, otherwise you won't see the distinct layers of the cake when you release it from the ring.
Step 21
Take the square of biscuit that is made of two pieces. This time, leave the biscuit on your worktop surface to steep with syrup, as we're going to apply syrup on both sides. Using a brush, steep one side of the biscuit.
Step 22
Gently flip and arrange the biscuit over the coffee cream, making sure the soaked side is facing down.
Step 23
Brush some syrup over the other side of the biscuit.
Step 24
We're now going to use the chocolate ganache as a fourth layer. Using a rubber spatula, add the equivalent of two scoops of chocolate ganache. The consistency should be smooth and lump free.
Step 25
Using the cranked spatula, spread into a thin layer. The chocolate layer should be thin and neat. As mentioned earlier, try not to coat the sides of the ring.
Step 26
At this stage, the Opera cake should look like this.
Step 27
On your worktop surface, steep one side of the last biscuit square with coffee syrup.
Step 28
Arrange the biscuit on top of the chocolate ganache, soaked side facing down...
Step 29
... and adjust gently with your hands.
Step 30
Brush the remaining syrup over the other side of the biscuit.At this stage, there should be a gap of 6 or 7 mm to the top of the square ring.Traditionally, the thickness of an Opera cake should not exceed 3 mm.
Step 31
Spread another layer of coffee butter cream, to a thickness of 3 or 4 mm.
Step 32
Even the surface with the cranked spatula.
Step 33
Cover with a sheet of cling film...
Step 34
... in direct contact with the surface of the coffee cream.Up to this stage, this recipe can be prepared the day before.If you wish to make it several days in advance, you will need to store it in the freezer. On the day, all you will need to do is the icing.
Step 35
For the chocolate icing: Organise the necessary ingredients.
Step 36
Melt the dark chocolate over a bain-marie. When melted completely...
Step 37
... add the grapeseed oil.
Step 38
For the icing operation: Take the cake out of the fridge, make sure it was refrigerated for at least 2 hours beforehand.If you stored the cake in the freezer, remove it several hours before and let it defrost slowly in the fridge. When you're ready for the icing operation, the cake should be very cold, but not frozen.Using 2 cake boards with a thickness of 2 or 3 mm...
Step 39
... place them under opposite edges of the square ring. This will cause the cake to slide down a little, creating a small gap on the surface of the cake. We're going to use this cavity to pour the icing. The thickness should not exceed 2 or 3 mm.
Step 40
Gently remove the cling film.
Step 41
Pour the chocolate icing (at room temperature) on top of the cold coffee butter cream.
Step 42
Even the surface, this time using a large cranked spatula that allows you to slide across the cake in one motion.
Step 43
If necessary, pour some more icing and even the surface.
Step 44
Gently release the cake from the square ring, sliding it upwards.
Step 45
If you would like to trim the edges of the cake, I recommend returning it to the fridge for a while to allow the icing to set.
Step 46
It should take about 10 minutes for the icing to set.
Step 47
Dip the blade of a knife in hot water, then trim the edges to about 0.5cm in a sharp motion.
Step 48
This will ensure the cake has perfectly neat sides.
Step 49
Repeat the operation on all sides of the cake.
Step 50
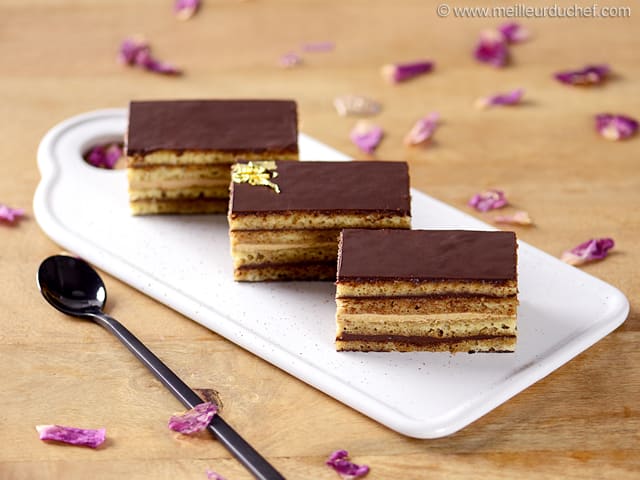
Finally, apply a small piece of gold leaf in the centre...
Step 51
... taking care to arrange it with the tip of a knife.Gold leaf sheets are very thin and volatile, so make sure there is no air draft in your kitchen. Enjoy!I hope you will enjoy this classic French dessert!