Artisan Sourdough Bread Recipe
4.8
(119)
Your folders
Your folders
Cook Time: 50 minutes
Total: 3 hours, 50 minutes
Servings: 1
Cost: $24.66 /serving
Author : Laura // A Beautiful Plate
Ingredients
Export 4 ingredients for grocery delivery
Instructions
Step 1
New to sourdough baking? I highly recommend reducing the hydration in this recipe if you are new to sourdough baking. This is a high hydration dough and can be challenging to work with (and build strength in) if you're not an experienced baker. If you're looking for an easier to handle dough, I recommend reducing the water quantity to 310-330 grams. If you're working with a lower hydration, you may be able to get away with just 3-4 sets of stretch and folds. Follow the dough's lead!
Step 2
IMPORTANT NOTE: I do not prepare an off-shoot levain for my sourdough baking, as this baking timeline and method works well for my schedule, as well as my starter's feeding schedule. This choice is up to you and can be adapted/tweaked to fix your schedule, but please plan accordingly. Keep in mind that you'll need to account for the starter quantity in the recipe (90 grams), as well as the normal quantity needed to continue to maintain and feed your starter.
Step 3
Autolyse: In a large mixing bowl, whisk together the flours. Add the 90°F/32°C filtered water and mix with your hands until thoroughly combined and no dry bits are visible. Cover with a clean shower cap or plastic wrap, and rest at 80°F/26°C for 1 hour or up to 2 hours. This step hydrates the flours and helps build dough structure.
Step 4
Add Starter and Rest: While this test isn't fool-proof, your sourdough starter should pass the 'float test' when it's ready. Place a tiny spoonful of your ripe starter in a jar of water, it should float to the top. If it sinks, give it more time (15 to 20 minutes) and test again. Add the starter and spread it over the autolyse mixture. Use your fingertips to spread the starter over the autolyse mixture. Fold the edges of the dough into the center to fully incorporate the starter. Use your thumb and fingers to pinch the dough (pincer method) repeatedly until the starter is well incorporated. Don’t be delicate. You want to work quickly, but fully incorporate the mixture. Cover and rest at 80°F/26°C for 30 minutes.
Step 5
Add Salt and Rest: Sprinkle the salt over the surface of the dough. Use your thumb and fingers to pinch and incorporate the salt thoroughly (you shouldn't feel any granules at the end of mixing) into the dough. Depending on the coarseness of your salt, this might take a couple minutes. Be thorough. Cover and rest at 80°F/26°C for 15 minutes. Imporant Note and Tip: If you’re struggling with higher hydration doughs and dough strength, there are two additional mixing methods that can try: slap and fold or the Rubaud method. Please see the full video included in this post for visual demonstration.
Step 6
Bulk Fermentation: We will preform a total of 6 sets of stretch and folds (see blog post for further instruction) in the first two hours of bulk fermentation. The first three will take place in 15-minute intervals. The remaining three will occur in 30-minute intervals. Covering and rest teh dough at 80°F/26°C between each set. The dough will not rise much during the stretch and fold period, but it should get considerably stronger. Dip your hands in water (to prevent sticking) before each fold. I like to rub nmy hands together to avoid incorporating much more water, as this is already a high hydration dough. How to Preform a Stretch and Fold: Grab the top portion of the dough with both hands. Gently pull and stretch it upwards (without tearing) and fold over the opposite edge. Rotate the bowl 180 degrees and repeat from the other side. Rotate the bowl 90 degree and repeat once again on both sides. This entire process is one stretch and fold set. After performing the stretch and folds, I like to gently lift the dough to round it nicely in the bowl (see video). *If your dough is developing quickly, you can reduce the total number of stretch and folds to 3 or 4 sets, 30 minutes apart.
Step 7
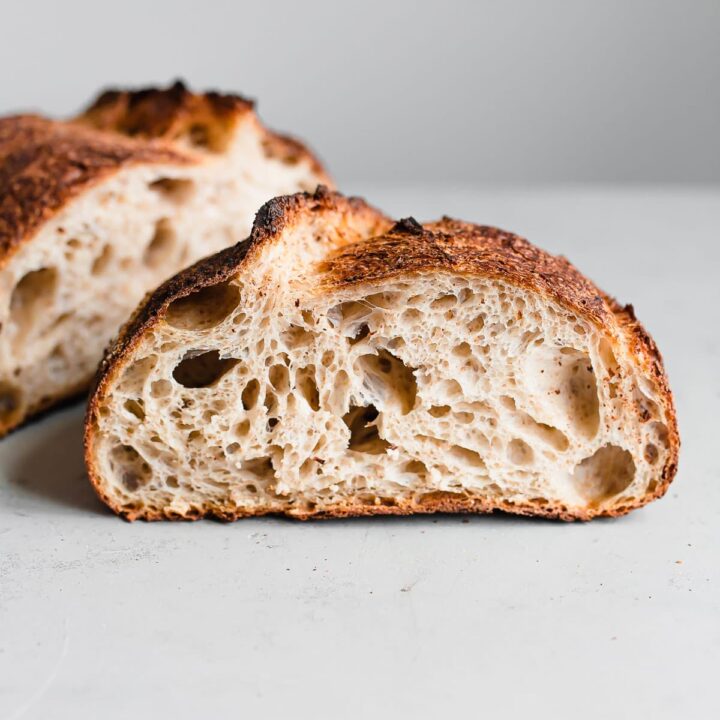
Bulk Fermentation (continued): Allow the dough to rest, covered at 80°F/26°C, for an additional 1.5 - 2 hours after the last stretch and fold - watch it carefully. Generally, I like to end bulk fermentation when the dough is just under double in size. This has produced good results for me and this guideline works well for this specific sourdough process and timeline. The total bulk fermentation time will vary tremendously based on your ambient kitchen temperature, dough temperature (FDT), flour type, and several other factors, so watch it carefully. Judging the right point to end bulk fermentation and move to the pre-shape period requires practice and trial-and-error. At the end of bulk fermentation, the dough should be well aerated and there will be many gas bubbles on surface, as well as on the edges of the bowl (see video). The dough should be slightly rounded on the edges of the bowl. If the dough is flat, you most likely didn’t build enough strength during mixing, stretch and folds, or bulk.
Step 8
Pre-Shape: Transfer the dough, without degassing, onto a clean countertop. It will be sticky. Use a bench knife to gently shape the dough into a round, pulling it gently towards you on the countertop in a circle to create some tension on the skin of the dough. As you do this, you’ll notice that the dough comes into a shape and starts to feel bouncy (see video). The key is to do this step quickly and as gently as possible. Rest the dough, uncovered, for 15 to 20 minutes, or until it has relaxed slightly for the final shaping. Pre-shaping gives the dough some extra tension and strength (and is particularly important if you are doubling the recipe and preparing two loaves, as you'll need to divide it prior). Allowing it to rest allows the gluten to relax slightly before preforming the final shape.
Step 9
Final Shape: Dust a 9-inch round or 10 or 11-inch oval banneton basket with rice flour (be extra liberal if you are not using a cloth or linen liner). Dust the surface of the dough lightly with bread flour. Use a bench knife to gently lift and flip it flour side down onto your countertop. Depending on your preference, banneton, or baking vessel, shape the dough into a round or batard. *Tip: Please watch the video above for visuals on how to shape a batard (oval loaf) or my latest video on how to shape rounds (boules) and bake in a Dutch oven. After shaping, gently pick up the shaped dough, flip, and transfer into your floured banneton, with the seam side facing up. Drape a kitchen linen over the banneton and place the banneton in a plastic bag (*I use a clean plastic produce bag). Seal with a clip and allow the dough to rest at room temperature for 10 minutes.
Step 10
Final Proof: Place covered banneton basket in the refrigerator and retard dough for 15-16 hours at 38°F/3°C. This slow and cold fermentation stage helps develop flavor and improves the final crust texture.
Step 11
Preheat the Oven: Preheat your Challenger Pan, Dutch Oven, or combo cooker (with lid on) in a 500°F/260°C oven for at least 1 hour.
Step 12
Poke Test for Proofing: Once the oven and baking vessel have preheated for an hour, remove the banneton from the fridge and uncover. Test the dough for proper proofing by lightly flouring one small section (while the dough is still in the banneton). Press your finger lightly into dough. A properly proofed dough should very SLOWLY spring back and still leave a light indentation. That is a sign of a well proofed dough that is ready to be baked. If it springs back quickly and completely, it is under-proofed (return to the fridge, covered, for an additional hour or so). If the dough compresses and doesn’t spring back at all, it is over-proofed. Unfortunately at that point, it’s hard to make up for in that stage of the process - but it will still taste delicious!
Step 13
Transfer and Bake: If you are using a Challenger Pan or combo cooker, you can skip parchment and carefully invert the basket directly into the preheated base before scoring. If you are using a traditional Dutch oven, please watch this video for visuals: Place a large piece of parchment over the banneton, then top with a thin cutting board. Invert and flip carefully, so that the banneton is upside down, setting it down onto your countertop. The dough should release, right side up, from the banneton onto the parchment. Trim any excess parchment paper, creating two handles on both ends for lifting the dough. Use a bread lame to score the dough (1/2-inch deep), carefully transfer into the preheated pan, cover tightly with the lid, and place in the oven. Bake covered at 500°F/260°C for 25 minutes.
Step 14
Remove the lid. The dough should have risen and expanded considerably, and the crust should be set, but only lightly golden in color.
Step 15
Reduce the oven temperature to 475°F/240°C (*note: if your oven runs hot or your loaves are browning too quickly, reduce the temperature to 450°F/232°C) and continue to bake uncovered for an additional 15-25 minutes or longer until the crust is deep golden and caramelized. I like to rotate the pan several times during this final stage to ensure even browning.
Step 16
Carefully remove the bread from the pan and transfer to a cooling rack. Cool completely before slicing. This will take several hours. Slicing into warm bread will result in a gummier texture and cause the bread to stale faster. For more tips, read this guide on how to store, freeze, and refresh sourdough.