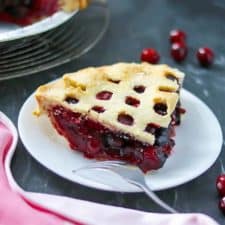
Cranberry-Cherry Pie
Your folders
Your folders
Prep Time: 30 minutes
Cook Time: 50 minutes
Servings: 8
Author : Lila Ruth
Ingredients
Export 12 ingredients for grocery delivery
Instructions
Step 1
Preheat oven to 350 Degrees
Step 2
For The Filling:
Step 3
In a medium to large bowl, add frozen cherries and fresh cranberries. Add lemon juice and vanilla extract, toss until evenly combined.
Step 4
In a separate, small bowl, whisk together the coconut sugar, tapioca starch and gelatin.
Step 5
Pour dry mixture over berry/cherry mix and toss again. Set aside.
Step 6
For The Crust:
Step 7
Whisk together almond flour, tapioca starch and salt.
Step 8
Cut butter into flour, making sure no pieces are larger than pea size.
Step 9
Slowly add your cold water into your flour/butter blend until dough has formed. (You can mix by hand or food processor if preferred). It will be stickier and more pliable than traditional dough–similar to play-doh. Let dough rest for a few minutes, it will thicken slightly.
Step 10
Press half of the dough into the pie pan and work dough up the sides and around the edges. You may find it easier to work with the dough if you dip your fingers into water first. I keep a small cup by my working station. (Alternatively, you can roll the dough in-between two pieces of parchment paper, remove top layer and turn over onto pie pan and make any necessary adjustments.
Step 11
Pour filling into prepared pan.
Step 12
Roll out the remaining half of the dough in between two pieces of parchment paper. (And not too thin, you want a little thickness for the top layer, it will be easier to work with).
Step 13
Peel off top layer of parchment paper. Swiftly and carefully turn rolled dough onto pie. Peel back the paper and trim excess. It’s ok if there are cracks, they can be fixed by dipping your fingers into water and mending.
Step 14
Make a few vent holes and brush with full fat coconut milk as an “egg” wash if desired. Sprinkle the top with coarse coconut sugar, flute edges and carefully place pie into oven for 45-60 minutes (my oven takes closer to 60 minutes, but start checking in at 30 minutes). I like to place aluminum foil or a pie crust shield around the edges at this point to avoid outer edge burning.
Step 15
Let pie cool before serving as the filling will set during the cooling process. Enjoy!!