How to Make Sublimation Photo Blankets
Your folders
Your folders
Ingredients
Export 6 ingredients for grocery delivery
Instructions
Step 1
What is a Sublimation Print?
Step 2
A sublimation print is an image printed on sublimation paper with sublimation ink from a sublimation printer.
Step 3
Because of my sublimation blanket blanks, I printed my images full-sized.
Step 4
Don’t trim your images just yet, we’ll talk about what size to trim them to shortly.
Step 5
Let’s Make a Sublimation Photo Blanket
Step 6
To make our sublimation photo blanket we need to get some measurements.
Step 7
How to Measure Your Blanket
Step 8
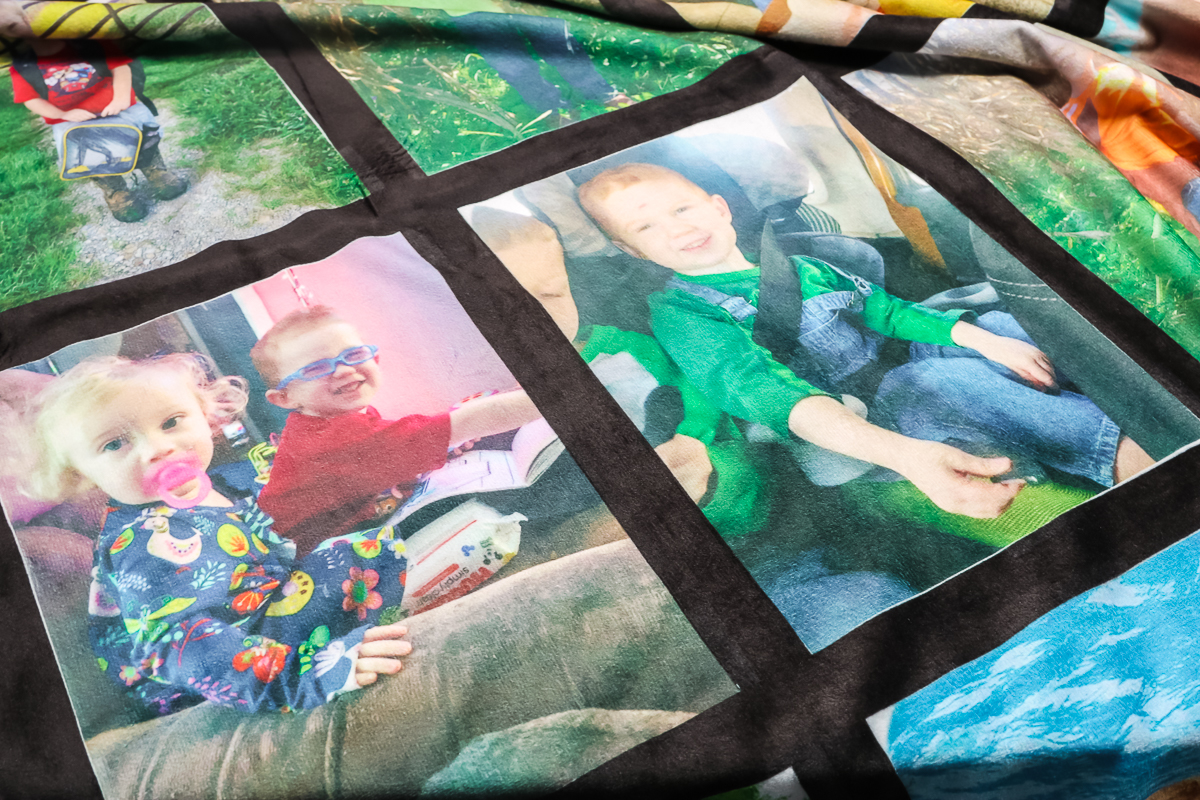
My blanket itself is pretty large. You can see a portion of it in the photo below. The white areas are where we will be sublimating our photos.
Step 9
We need to measure each white rectangle. I can’t stress enough not just to trust the measurements that come with the blanket or with the listing.
Step 10
Lay the blanket flat and measure in a few spots across the white area.
Step 11
What Size Should I Make My Prints?
Step 12
Once we have the measurement of our sublimation area we can prepare our sublimation print.
Step 13
Because the outside edge of the sublimation area is black I want to make my prints slightly oversized. I am setting mine to 1/8″ larger on all sides.
Step 14
Even though the outside edge is black getting sublimation on it could still result in a line showing.
Step 15
I don’t want to get too much sublimation on the black portion.
Step 16
If your goal is to prevent any sublimation from the black you could either cut your prints to the exact size as the white area or take long strips of heat-resistant tape and line the edge of your white areas. Sublimation wouldn’t get on the tape.
Step 17
I don’t want to use that much tape and I don’t want my print to end up being too small so I’m going to add my print just a little oversized.
Step 18
I’ll show you a close-up of the finished product so you can see how it looks.
Step 19
Bottom line; measure the actual blanket! My blanket measurements were not the same as the Amazon listing.
Step 20
Trim Prints to Fit Sublimation Blanket
Step 21
I printed all of my images the full size my printer would allow on an 8.5″ x 11″ sheet of paper.
Step 22
I am making my finished print 10.5″ long by 8″ wide. To do this I’m using my paper trimmer and I am trimming one side right at the end of the print.
Step 23
Let’s start with the long side. Trim one end right at the end of the print and then turn it around and line it up on the 10.5″ mark and trim off the excess.
Step 24
Now we’re going to trim one side of the short side right along the edge of the print and then turn it and trim the other side at 8″.
Step 25
Now I have a perfectly sized print for my sublimation areas. Repeat this process for each photo.
Step 26
How to Apply Sublimation Prints
Step 27
Because of how this blanket is set up we’re going to pre-press each panel to make sure all of the moisture is out of it.
Step 28
I am using my Cricut Autopress, because the mat that comes with the Autopress is so cushioned I am removing it and using a firmer heat-resistant mat. You could use a heat-resistant mat, Nomex pad, or if you’re using a different Heat Press you’re probably fine with the mat it comes with.
Step 29
If you’re using an EasyPress I would not use the EasyPress Mat, use something a bit firmer for this project.
Step 30
After you pre-press, lint roll the area really well to remove any lint, dust, hair, etc.
Step 31
Now we’re going to add our sublimation print. Take your time to line the print up very carefully. If you trimmed your photo to be slightly larger than your sublimation area make sure it’s just onto the black area.
Step 32
Use heat-resistant tape to hold the print into place.
Step 33
I am pressing one panel at a time because they fit within the heated area of my Autopress.
Step 34
Once the sublimation print is in place add protective paper over the top and then press.
Step 35
My blanket instructions recommend 360 degrees for 60 seconds. Make sure you check wherever you purchased your blanket for the correct settings.
Step 36
After the press is complete remove your sublimation print and then move the entire blanket to the next panel.
Step 37
How to Protect Your Sublimated Areas
Step 38
You need to make sure the panels you’ve already sublimated are hanging outside of the press area of your heat source.
Step 39
Because I’m using the Autopress I can slide the blanket right through the back.
Step 40
Follow the correct process for each sublimation print. Pre-press, lint roll, apply print, and cover with protective paper. Press for the maximum temperature for the full time and continue this way for each panel.
Step 41
Pro tip – map out where you want each sublimation print and move from one side to the other.
Step 42
I started in the upper left corner and moved across the top row and then down one row.
Step 43
If you move around and leave the middle portion for last you may not be able to press that portion without applying heat to a previously sublimated area.
Step 44
I picked a blanket where each of the panels fit in the heat press I have. I would recommend that for the best results. Press one sublimation print at a time.
Step 45
Another tip – check and double-check that your images are orientated correctly. Applying a print upside down will ruin the entire blanket.
Step 46
Making a larger blanket like this is really easy as long as you pick the right size for your printer and heat press setup.
Step 47
I did want fewer tape marks so I tried as little tape as possible. I found about eight pieces of tape per panel helped to hold the image in place so I didn’t have any white areas along the edges.
Step 48
How to Prevent White Edges Around the Photo
Step 49
To prevent having white edges around the photo I lined up one corner of my print, taped it down, and then proceeded to each of the four corners.
Step 50
Be aware that the fabric will stretch as it hangs off the heat press. This can stretch out the sublimation areas. I used my fingers to pull them back into shape while taping them down.
Step 51
You have to do this with every single panel. These blankets do take a while to make so be prepared for that.
Step 52
I found I got better at locating my designs the more I did. By the end of the blanket, I was pretty good at locating the design just right.
Step 53
This blanket comes in a set of two, so you could definitely do one as your test or your experiment and then do the other.
Step 54
How to Remove Sublimation Tape Marks
Step 55
After I finished sublimating this blanket I threw it in the washer and dryer to see if the tape marks would come out.
Step 56
You can see them less after washing and drying but you can still see them in the photo below.
Step 57
While I was making my blanket I tried two different brands of tape to see if it would happen with both of them.
Step 58
After applying heat the tape was kind of pulling some of the black on the blanket. It may just be because I purchased an inexpensive blanket from Amazon but I wanted you to be aware of that happening.
Step 59
Use Your EasyPress Mini to Remove Tape Marks
Step 60
I like to use my EasyPress Mini and run it over the tape marks. I do this with almost all of my fabric sublimation projects.
Step 61
As long as you don’t leave the heat in one place for too long it shouldn’t affect the sublimation.
Step 62
Run the Mini over each of those areas and you should see the tape marks almost disappear.
Top similar recipes
Curated for youYour folders
 137 views
HOW TO MAKE SUBLIMATION FLIP FLOPSH...
heyletsmakestuff.com
Your folders
 63 views
How to Make a Photo Puzzle
thecountrychiccottage.net
Your folders
 309 views
How to make buttermilkHow to make b...
thekitchenmagpie.com
Your folders

 268 views
How to Make GlueHow to Make Glue
onecrazymom.com
Your folders
 51 views
test photo
recipes.plantjammer.com
Your folders
 337 views
How to make tahini
bbc.co.uk
10 minutes
Your folders
 432 views
How to Make Buttermilk
cookieandkate.com
4.7
(6)
Your folders

 401 views
How to make bouillabaisse
gourmettraveller.com.au
1 hours, 30 minutes
Your folders
 363 views
How To Make Calzones
thekitchn.com
4.0
(3)
Your folders

 341 views
How to Make Nougat
wikihow.com
96.0
(14)
Your folders

 366 views
How to Make Falafel
themediterraneandish.com
4.8
(245)
20 minutes
Your folders
/20211014-Youtiao-Tim-Chin_hero_2-f6f4c1f5412b46b48523d6488fa5663b.jpg)
 285 views
How to Make Youtiao
seriouseats.com
Your folders

 471 views
How to Make Buttermilk
cookieandkate.com
4.7
(7)
Your folders
 393 views
How to make lasagne
bbc.co.uk
4.6
(40)
2 hours
Your folders

 293 views
How to Make Gravy
wikihow.com
100.0
(1)
Your folders

 298 views
How to Make Stromboli
gatherforbread.com
5.0
(2)
20 minutes
Your folders
 85 views
How to Make Stromboli
gatherforbread.com
Your folders

 1438 views
How to Make Falafel
themediterraneandish.com
20 minutes
Your folders

 714 views
How to Make Onigiri
wikihow.com
96.0
(5)