Sourdough Pizza
Your folders
Your folders
Prep Time: 1 hours
Cook Time: 4 minutes
Total: 1 hours, 4 minutes
Author : Melissa Johnson
Ingredients
Export 12 ingredients for grocery delivery
Instructions
Step 1
Levain
Step 2
Prepare your 120g of starter by mixing 40g of starter with 40g of water and 40g of flour. This is a 1:1:1 starter preparation, but other builds are fine too. Mark your jar with a rubberband and let it sit at room temperature for 4-8 hours until roughly tripled.
Step 3
Mixing and First Rise
Step 4
Mix the ingredients, including the 120g of mature starter, together by hand, or in a mixer with the dough hook attachment, until everything is incorporated and forming a ball around the hook.
Step 5
Scrape the dough out onto a floured counter and knead it for 3-5 minutes, adding a small amount of flour until the dough is manageable.
Step 6
I prefer to hand knead the dough, but if you want to keep the dough in your mixer for 5-10 minutes until it passes the windowpane test, that is fine too. Covering it while it's still shaggy, and doing several rounds of stretching and folding over the course of a couple of hours is also an option.
Step 7
Lightly oil a bowl, dab the "top" of your dough ball in the oil, then lay the bottom side down in the bowl and cover.
Step 8
Let the dough rise until it has approximately doubled. I tend to leave the dough at room temperature for a few hours and then put it in the refrigerator for a day or so, and finally pull it out when it is fully risen or close to fully risen and just needing a few more hours at room temperature.
Step 9
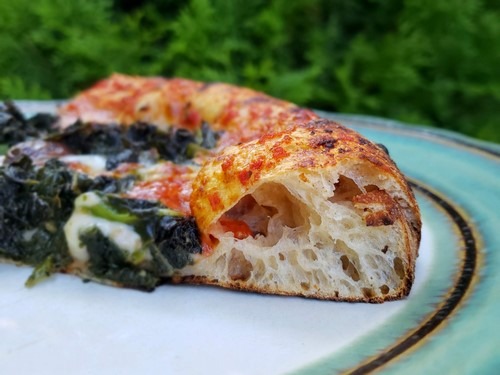
The bulk fermentation can be just a few hours if you use warm water and have a warm house or put the dough in a lit oven, or this can be five days if you use sleepy starter and put the dough in a 37F refrigerator. I did the latter recently, and the pizza was tasty-sour and the crust perfectly bubbly.
Step 10
Preshape and Second Rise
Step 11
When the bulk fermentation is finished, lightly oil a 9x13 baking pan and your counter.
Step 12
Scrape out the dough onto the oiled counter, gently press out most of the air, and divide the dough into 4-5 pieces. The total dough weight is approximately 1140g. This makes five approx. 225g or four 285g pizzas. (You can go larger and smaller, but you may need to adjust cook time.)
Step 13
Form each piece into a ball by folding the sides of the piece inward. Then hold the ball in one hand with the taut top on your palm, while you pinch the bottom pieces together with your other hand.
Step 14
Place the balls in the oiled pan seam-side down, and cover or put the entire pan in a plastic bag. The final proof can be at room temperature for 45-90 minutes or in the refrigerator for 8-12 hours. Various combinations of room temperature and cold proofing work, and a lot depends on how warm the dough was when you shaped it, and if your room temperature is very warm. Even in a heat wave, I've not seen a big difference in pizza outcome when the first dough ball of a batch was formed into a pizza and cooked an hour before the last dough ball.
Step 15
Topping Prep
Step 16
45-90 minutes before the dough is finished proofing, set up your toppings and the area where you will be stretching and "decorating" your pizza. My preferred pizza sauce is NYTimes Classic Marinara plus 6 ounces of tomato paste (sometimes I skip the paste). I like to make it ahead of time, and simply pull it out of the refrigerator to warm up a bit when I'm setting up the toppings.
Step 17
Shaping and Baking (by oven type)
Step 18
Wood-Fired Oven
Step 19
About 30 minutes before your dough is finished proofing, fire up your pizza oven. Make sure your Uuni or other pizza oven is clean and ready to go -- the stone tiles have been brushed off, and the charcoal/wood tray has been emptied.
Step 20
Have everything you need on hand: kindling, charcoal, gloves, an aluminum pizza peel, and a "hot plate" to lay the door on (also the cast iron pan if you cook vegetables or meat too). I use a couple pieces of kindling as a rack, and steel/aluminum baking sheets and cooling racks for the pizzas that come out of the oven. (See gallery)
Step 21
Your damper in the chimney should be open, and the flue at the base of the chimney inside the oven should be about half open.
Step 22
Place 4-6 pieces of very dry kindling in the fuel area of your pizza oven. Light them and put the cover back on. Checking on them every few minutes, let them burn for about 5-10 minutes, until they are fully burning. Add about 15 pieces of lump charcoal and wait another 10 minutes or until the temperature is over 700F. About 5 minutes before cooking your pizzas, you can add wood again for an extra burst of heat. Wait a few minutes for the wood to be fully lit and the smoke to be white or clear, not black, before before loading a pizza. This entire process takes about 20 minutes, and this is what has worked for me, but you may prefer different time parameters, fuel types and amounts.
Step 23
Prepare your pizza peel with flour and cornmeal. Rub the flour into the wood and sprinkle the cornmeal on the top of the flour. I prefer a wood peel for prepping and loading pizzas, and an aluminum peel for removing them. A third smaller peel for turning the pizza is a helpful option, too.
Step 24
Remove a dough ball from the proofing pan and gently grasp one side of the circle with both hands. Holding the top edge of the circle (10 o'clock and 2 o'clock), let the rest of the dough droop/stretch downward while you then rotate and re-grab the dough like you're turning a steering wheel. This will develop about a 1/2-1 inch crust edge and stretch the middle. (Using a rolling pin is fine too.)
Step 25
If the dough only stretches a bit, lay it down on your floured counter for 5-10 minutes while you work on your other dough balls and check on your oven temperature. By the time you come back to the first circle, the gluten should have relaxed and you will be able to stretch it further. Try not to let any part of the dough get thin enough to see through or you may end up with a hole.
Step 26
Lay your pizza dough on the floured/cornmealed pizza peel. Stretch and adjust the dough a little more, aiming to position one edge of the pizza all the way at the front edge of the peel. When you insert the peel into the oven, the front edge of the dough will "catch" on the hot stone, making it easier to slide the peel out from under the pizza.
Step 27
Now top your pizza dough to your liking and put it in the oven. If you leave the pizza on the peel for more than a few minutes, it may begin to stick to the peel, so keep your assembly line moving.
Step 28
After about 1.5 minutes of cooking, rotate your pizza with an aluminum peel. The heat is strongest in the back of the oven near the fire, so this will encourage even cooking and char spots. After about 1.5 more minutes, your pizza is likely done.
Step 29
Using an aluminum peel, remove the pizza from the oven and put the pizza on a rack if not eating right away (this keeps the bottom crispy), or on a plate or a steel/aluminum sheet to serve.
Step 30
Repeat with the next pizza and so on. When you're finished cooking the pizzas, let the fuel burn off and the oven cool down before cleaning and storing it.
Step 31
See the last photo gallery for ideas for things to cook while the oven is warming up (pitas), cooling down (s'mores, garlic knots from extra dough), and still very hot (steak and veggies).
Step 32
Kitchen Oven
Step 33
About 30 minutes before your dough is finished proofing, preheat your kitchen oven with a baking stone or steel in it to 500F, using the top shelf if you have a top broiler. You can also use an upside-down baking sheet as your baking surface, with parchment paper under the dough, and preheated to only 450F.
Step 34
Flour and sprinkle cornmeal on the peel as described above, or use a square of parchment paper for each pizza.
Step 35
Remove a dough ball from the proofing pan and gently grasp one side of the circle with both hands. Holding the top edge of the circle (10 o'clock and 2 o'clock), let the rest of the dough droop/stretch downward while you then rotate and re-grab the dough like you're turning a steering wheel. This will develop about a 1/2-1 inch crust edge and stretch the middle. (Using a rolling pin is fine too.)
Step 36
If the dough only stretches a bit, lay it down on your floured counter for 5-10 minutes while you work on your other dough balls and check on your oven temperature. By the time you come back to the first circle, the gluten should have relaxed and you will be able to stretch it further. Try not to let any part of the dough get thin enough to see through or you may end up with a hole.
Step 37
Lay your pizza dough on the piece of parchment paper or floured/cornmealed pizza peel. Stretch and adjust the dough a little more, aiming to position one edge of the pizza all the way at the front edge of the peel if that is what you're using. When you insert the peel into the oven, the front edge of the dough will "catch" on the hot stone, making it easier to slide the peel out from under the pizza.
Step 38
Now top your pizza dough to your liking and put it in the oven. If you leave it on the peel for more than a few minutes, it may begin to stick to the peel, so keep your assembly line moving or use parchment paper.
Step 39
For a pizza stone or steel, bake for 7 minutes, then switch to broil for 1 minute more. Keep the oven on broil an additional minute before you load the next pizza. This helps reheat the stone before you switch back to bake mode.
Step 40
For a baking sheet, bake the pizza on parchment paper on the sheet for 8 minutes, then broil (still at 450F) for 1-2 minutes. Then move the pizza to a bare lower rack, removing the parchment after the transfer, and bake 3-4 more minutes.
Step 41
Remove the pizza from the oven with a peel, spatula, or even by tugging on a corner of the parchment paper.
Step 42
Put the pizza on a rack if not eating right away (this keeps the bottom crispy), or on a plate or a steel/aluminum sheet to serve.
Step 43
Repeat with the next pizza and so on.
Top similar recipes
Curated for youYour folders

 411 views
Sourdough Pizza Crust
wildthistlekitchen.com
5.0
(2)
Your folders

 475 views
Sourdough Pizza Crust
wildthistlekitchen.com
5.0
(2)
Your folders
 590 views
Sourdough Pizza Crust
kingarthurbaking.com
4.7
(402)
18 minutes
Your folders

 1222 views
Sourdough Pizza Dough
ooni.com
4.0
(198)
1 minutes
Your folders

 332 views
Sourdough Pizza Crust
santabarbarabaker.com
Your folders

 225 views
Sourdough Pizza Crust
heartscontentfarmhouse.com
5.0
(1)
10 minutes
Your folders

 145 views
Sourdough Pizza Dough
farmhouseonboone.com
4.6
(418)
13 minutes
Your folders

 218 views
Sourdough Pizza Dough
theperfectloaf.com
3.8
(16)
10 minutes
Your folders

 347 views
Sourdough Pizza Dough
cooking.nytimes.com
4.0
(849)
Your folders
 347 views
Sourdough Pizza Crust
baking-sense.com
4.6
(63)
15 minutes
Your folders

 215 views
Sourdough Pizza Crust
alsothecrumbsplease.com
5.0
(2)
8 minutes
Your folders

 159 views
Sourdough Taco Pizza
therosehomestead.com
Your folders
 42 views
Sourdough Taco Pizza
therosehomestead.com
Your folders

 174 views
Sourdough Pizza Bases
homegrownhappiness.co.nz
4.8
(31)
12 minutes
Your folders
 89 views
Sourdough Pizza Crust
littlespoonfarm.com
Your folders
 232 views
Sourdough Pizza Dough
abeautifulplate.com
5.0
(13)
10 minutes
Your folders
 37 views
Sourdough Pizza Dough
abeautifulplate.com
Your folders

 167 views
Grilled Sourdough Pizza
breadtopia.com
Your folders

 210 views
Sourdough Pizza Dough
farmhouseonboone.com
4.5
(392)
13 minutes