How To Create and Maintain Small Batch Sourdough Starter
5.0
(5)
Your folders
Your folders
Ingredients
Export 8 ingredients for grocery delivery
Instructions
Step 1
Combine the bread flour and dark rye flour in a large container with a tight-fitting lid. Use a whisk to really combine them to make sure both flour are equally mixed. This gives you 300 grams in total. Enough to feed the starter for the first week. You may have a bit of leftover
Step 2
Start with 1:1 ratio, which means equal weight of flour and water. Weigh out 30 grams of the flour mix into the jar. Add 30 grams of filtered tap water (that's what I'm using). Use a small silicone spatula to stir until no dry bits of flour is visible. You will get a paste consistency. Close the lid loosely. You don't want to screw the lid tight as the starter needs some oxygen, but you don't want it to open loose that things can get in there. You can also use a cheesecloth to cover and use a rubberband to secure it on the jar. Keep the starter at a room temperature in between 75-82 F (25-28 C) for 24 hours
Step 3
There won't be much activity after 24 hours. Transfer the entire content to a new clean jar and give it a good stir and cover loosely again with a lid (or cheesecloth). We only do this in the first few days to prevent mold from growing at this early stage. You don't need to feed the starter yet as there isn't any activity. Let it sit for another 24 hours
Step 4
You might see that the mixture has grown in volume (or rises up) after 48 hours. This is a good sign showing that some wild yeast and bacteria have been innoculated
Step 5
Give it a good stir and transfer 20 grams to a clean new jar and discard the rest. You don't want to keep the discard at this early stage as it doesn't contain the right balance of yeast and bacteria in the starter yet. Things are still sorting out at this stage
Step 6
We will use the 1:1:1 ratio, meaning: equal weight of starter, flour, and water. Add 20 grams of water and 20 grams of your flour mix. We start feeding the starter now since it has shown some activity. Use a spatula to stir again until you don't see dry bits of flour. It should give you a paste consistency
Step 7
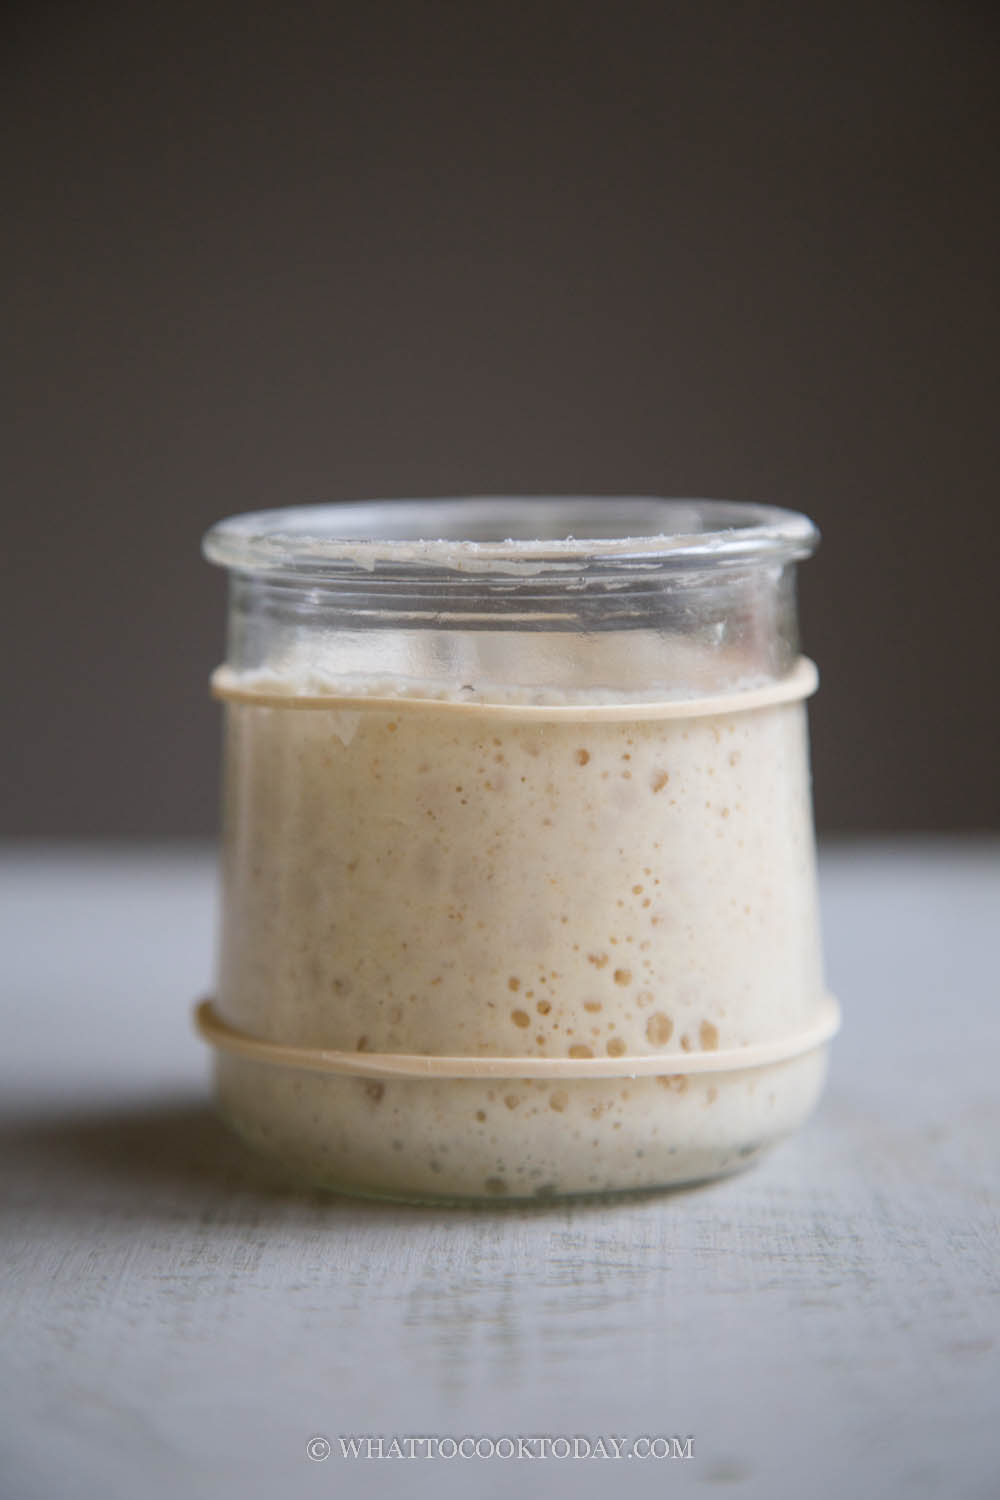
Use a rubber band secured around the jar to show you where the starter starting point is and when it increases in volume, you can tell whether it has doubled or tripled or so on
Step 8
I usually record down the daily activity of my starter (still doing so). This is optional, but it's helpful to do so
Step 9
12 hours later you may notice that there are lots of activity. The volume may have increased by 3-4 times. The starter also smells funky. This is normal. Don't worry. The mixture is also runny
Step 10
Measure out 20 grams of this starter and discard the rest. Feed 1:1:1 ratio again. Add 20 grams water and 20 grams flour mix and stir well until no bits of dry flour is visible. Cover loosely and let it sit for another 12 hours
Step 11
You will notice the starter rises again, double or triple! Discard all and keep 15 grams of starter in the jar. Feed 1:1:1 ratio. Add 15 grams water and 15 grams flour mix and stir. Cover loosely and let it sit for 12 hours
Step 12
You may or may not have any activity. The smell is still funky. This is most likely the balance of the wild yeast and bacteria are establishing now. Discard all but keep 15 grams of starter in the jar again and continue feeding 1:1:1 ratio. Cover loosely and let it sit for 12 hours
Step 13
You may or may not see any activity again. If you don't see any activity at all, don't feed. Give the starter a stir and then observe again for the next 12 hours. Make sure you keep it at a warm temperature in between 75-82 F. Feeding the starter when there's no activity will dilute the starter
Step 14
If you notice some increase in volume, even though not much, maybe only 10-20%, then you can feed. Discard all but 15 grams again. Continue feeding 1:1:1 ratio and observe for another 12 hours
Step 15
If there's still no activity, don't feed! Give it a good stir and make sure you do not close the lid too tightly. Don't get discouraged. Observe again for another 12 hours
Step 16
If you notice some increase in volume, small or a lot, then you can feed. You may notice that the starter has started to smell a bit better, taking more of a sour note and less of that stinky note! Discard all but 15 grams again. Continue feeding 1:1:1 ratio and observe for another 12 hours. You can move the starter to a fresh jar if things start to get a bit messy inside the jar (which is normal as a sourdough starter is sticky stuff!)
Step 17
If previously there hasn't been any activity and you haven't been feeding and just stirring and observe as I suggested above,there should be some activity by now. It could be minimal but some. If not, then continue to stir and observe. It took me about 3 days like this before some activity started to show. Every sourdough starter is different. Some takes a bit longer, some just takes off! So, please don't give up!
Step 18
If there's activity, then continue feeding as usual with 1:1:1 ratio. Discard all but 15 grams of starter. Take note of the smell. It should be more pleasant now and you will notice the sour note, you are on the right track. The consistency still runny at this point. Observe again 12 hours later
Step 19
At this point, my starter actually doubles in volume! Yours may or may not, but as long as there's an increase in volume, it's okay!
Step 20
Continue to feed 1:1:1 starter and discard all but 15 grams of starter. I won't collect the discard just yet
Step 21
Repeat the same routine as you did in the morning. Feed 1:1:1 again
Step 22
Combine the bread flour and dark rye flour in a large container with a tight-fitting lid. Use a whisk to really combine them to make sure both flour are equally mixed. This gives you 500 grams in total. Enough to feed the starter for few weeks
Step 23
The goal from here onwards is to feed your starter when it is at its peak (doubles in volume). You don't want to wait too long after it peaks to feed because the acidity continues to build up in there and overtime, it weakens the yeast.
Step 24
You will see some activity perhaps double in volume. There shouldn't be any more stinky smell and should smell pleasantly sour/tangy. I start collecting discard in a jar and keep this jar in the fridge. When you have collected enough, you can use this discard to make other things. So really, not much waste of flour and water
Step 25
Repeat the same routine. Keep 15 grams starter and feed 1:1:1 and keep the rest of the discard. If you have been using cheesecloth, you want to switch to a lid now. Just loosely secure it on the jar
Step 26
Repeat the same process
Step 27
As your starter gets stronger, it will consume the flour and water in a much faster rate. When it use to take 12 hours to peak, now it may take 6-8 hours to peak. When this is the case, you can play with the ratio
Step 28
Now instead of keeping 15 grams, I keep 8 grams of starter and starting to change the ratio to 1:2:2 meaning the amount of flour and water doubles the amount of the starter. In this case 8 grams starter, 16 grams water,16 grams flour mix. Continue to collect discard
Step 29
I start to increase the ratio with each feeding. Increasing the ratio also helps to strengthen the starter. If your starter is peaking too soon, you can increase your feed ratio to help slow down the activity so it won't peak when you are sleeping in the middle of the night. If your starter is taking too long to peak, try lowering the ratio and it will peak much quicker
Step 30
Switch to 1:3:3 ratio. 8 grams starter, 24 grams water, 24 grams flour mix. You will notice that your starter continues to get stronger and will hold its peak longer too before it gradually falls off.
Step 31
UPDATE: I try not to go above 1:3:3 ratio for long-term maintenance. Sometimes I'll do 1:5:5, but most of the time I maintain at 1:3:I try to control with temperature if your starter peak too soon. For example: at a cooler temperature (around 75 F/24 C) , it takes the starter longer to peak.
Step 32
Read my post above on how to store sourdough starter if you don't bake often
Step 33
I keep all the discards in the jar for 2 weeks in the coldest part of my refrigerator, about 37 F (about 3 Celcius), usually no longer than that as I bake very often and maintain a small amount of starter and would have used it up by then. For longer than 2 weeks, I suggest freezing the discard. It's better to portion it out into 200-300 grams portions so you don't have to thaw them all out at once. They can last for months in the freezer
Top similar recipes
Curated for youYour folders

 189 views
How To Maintain a Sourdough Starter
foodbyjonister.com
Your folders
 85 views
How To Maintain + Feed Sourdough St...
pantrymama.com
5.0
(2)
Your folders
 41 views
How To Maintain + Feed Sourdough St...
pantrymama.com
Your folders

 64 views
How to Feed and Maintain A Sourdoug...
amybakesbread.com
Your folders
 128 views
How to Feed, Maintain, and Store a ...
alexandracooks.com
5.0
(17)
Your folders
 151 views
How To Make A Small Sourdough Start...
pantrymama.com
3.7
(25)
Your folders

 1085 views
Small Batch Sourdough Bread
aheadofthyme.com
5.0
(18)
50 minutes
Your folders
 268 views
How to Make Sourdough Starter
tastesoflizzyt.com
4.8
(29)
Your folders
 450 views
How To Make Sourdough Starter
themodernproper.com
Your folders
 525 views
How to Feed Sourdough Starter
acouplecooks.com
3.7
(64)
Your folders
 529 views
How to Make Sourdough Starter
acouplecooks.com
3.8
(259)
120 hours
Your folders
 226 views
How to Make Sourdough Starter
foodiewithfamily.com
5.0
(3)
Your folders
 233 views
How to Make Sourdough Starter
growforagecookferment.com
4.9
(7)
Your folders
 220 views
How To Freeze Sourdough Starter
cravethegood.com
5.0
(1)
2 hours
Your folders

 245 views
How to Make Sourdough Starter
acouplecooks.com
5.0
(2)
120 hours
Your folders
 55 views
How To Revive Sourdough Starter
pantrymama.com
Your folders

 182 views
How To Make Sourdough Starter
healthline-store.com
Your folders

 344 views
How to Make Sourdough Starter
aheadofthyme.com
5.0
(3)
Your folders

 316 views
How to Make Sourdough Starter
thesuburbansoapbox.com
5.0
(1)