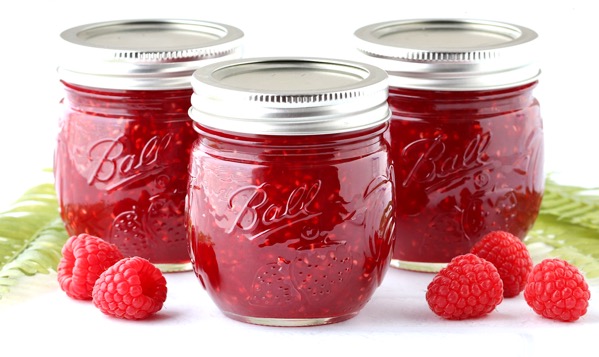
Raspberry Jam Recipe for Canning
Your folders
Your folders
Prep Time: 20 minutes
Cook Time: 15 minutes
Total: 35 minutes
Servings: 72
Author : Heidi
Ingredients
Export 4 ingredients for grocery delivery
Instructions
Step 1
Wash jars, lids, and bands in hot soapy water, dry completely, and set bands aside.
Step 2
Simmer lids in warm water in suacepan until ready to place them on jars.
Step 3
Keep jars warm by simmering in hot water until ready to use. Do not boil.
Step 4
Fill 20 quart stock pot or water bath canner with hot water, and place on stove over medium-high heat. {you’ll need enough water to later cover your jars with at least 1 inch of water}
Step 5
Crush raspberries in large mixing bowl or shallow glass baking dish using hand masher until nice, smooth consistency. {small chunks are okay}
Step 6
Transfer crushed raspberries to 8 quart stock pot. Add pectin, lemon juice and butter to the pot, and stir constantly with wooden spoon over high heat, while bringing to a rolling boil.
Step 7
Once boiling, add sugar, return to rolling boil, then boil for 1 minute while stirring constantly.
Step 8
After 1 minute, remove foam from top of jam by skimming it off with a metal spoon.
Step 9
Then… one by one, remove a jar from hot water, transfer to a cookie sheet {this will catch any spills}, place regular mouth canning funnel on jar, and ladle in raspberry jam mixture leaving 1/4 inch empty head space at top of the jar. Then wipe off rim of lid and threads of jar with damp cloth.
Step 10
Continue until all jars have been filled.
Step 11
Remove warm lids from saucepan {a magnetic lid lifter works like a charm}, and place one lid on each jar.
Step 12
Then screw one band on each jar just until snug {not overly tight}.
Step 13
Place filled jars on rack in 20 quart stock pot or water bath canner, then lower down into hot water. Make sure there is enough water in pot that there is at least 1 inch of water above the jars. If necessary, add more HOT water.
Step 14
Place lid on your pot, and bring to a gentle boil.
Step 15
Once water is boiling, set your timer for processing. Boiling time will vary depending on where you live… for altitude 0 – 1,000 feet boil 10 minutes, for 1,001 – 3,000 boil 15 minutes, for 3,001 – 6,000 boil 20 minutes, for 6,001 – 8,000 boil 25 minutes, and for 8,001+ boil 30 minutes.
Step 16
Once jars have finished boiling, turn off heat, remove the lid from the pot and let jars sit for 5 minutes before removing. After 5 minutes, lift up rack to elevated resting position, then carefully remove jars one by one using a jar lifter, and transfer to a folded towel to cool.
Step 17
The lids on the jars will begin to ‘pop’ into the sealed position, signifying the jam has been preserved.* {see notes} If any lids do not pop within the first 12 – 24 hours, transfer those to the refrigerator and use those up first.
Step 18
It may take jam up to 24 – 48 hours to finish setting.
Step 19
Homemade Raspberry Jam Shelf Life: Jars can be stored in your pantry, or a cool, dry cupboard for up to 1 year. Label the top of each lid with the type of jam and the date it was made. Remove bands when storing, and be sure to never stack jars on top of each other. Always inspect lids to ensure the seals are good before using. When ready to use, transfer a jar to your refrigerator, and use within 1 month. ENJOY!