The Perfect Grilled Steak Recipe
4.6
(188)
Your folders
Your folders
Prep Time: 120 minutes
Cook Time: 45 minutes
Servings: 4
Author : Kris Coppieters
Ingredients
Export 2 ingredients for grocery delivery
Instructions
Step 1
Prep. About 2 to 4 hours before cooking, trim off most of the external fat. Fat can melt and cause flareups that can deposit soot on the meat and burn the surface. Then sprinkle salt all over the meat. About 1/2 teaspoon kosher salt per pound (half that amount if you use table salt).
Step 2
Fire up. On a charcoal grill set up your grill for 2-zone cooking. You want one side scorching hot and the other side at about 225°F. This is tricky and you will have to experiment to get it set up right, so do a dry run or two until you get it down.
Step 3
Get a chimney full of charcoal fully hot and covered in white ash, and push them all to one side. Get them close to the cooking surface, as close as 1" below the meat. I have been known to put bricks in the bottom of a Weber kettle and raise the lower grate to about 2 to 3" below the top grate. I then put dry wood on the coals. On a kamado, insert the deflector plate.
Step 4
On a gas grill set up with 2-zones shooting for 225°F in the indirect zone. Start the meat on the indirect zone, put wood on the direct zone, and close the lid. On a pellet grill, set the temp for 225°F. Most of them are all indirect.
Step 5
Cook. Most home grilled steaks, if you slice into them, progress from dark on the surface, to brown just below the surface, to tan, to pink, and on to red. If you want your steak medium rare, the sad fact is that it is usually only medium rare in a small band of the interior by the time you get the exterior to the right color brown. That means that as much as 1/2 of the interior is overcooked. The challenge is to get the interior the same color bumper to bumper.
Step 6
To get this done right, we employ the reverse sear cooking method. For the first phase, cooking indirect, you want the meat to warm slowly. I sometimes place the lid on an angle. With the lid on tight, the steaks get too hot too quickly and they get tough.
Step 7
Sometimes I leave the lid off and put a pan over just the meat. Every grill is different and the weather is also a factor. Experiment.
Step 8
After about 15 minutes start checking the interior temp with a very thin probe on a very fast thermocouple thermometer like the industry gold standard, the Thermapen. Push it most of the way through and slowly back it out and note the lowest temp. Check every 5 minutes in more than one location. Don't worry about poking the meat. Steak is 75% liquid, so if you poke a hole in a 16-ounce steak and it loses 1/4 ounce of juice, you'll still have 11.75 ounces of fluid left.
Step 9
Why should you keep the probe away from the bone? Muscle and bone are very different composition. Muscle is mostly water. Bone has a hard, dense, outer shell, and the center, can be gelatinous or a honeycomb of mostly air. When you begin to cook meat with bone, the muscle and bone heat at different rates. At first the bone does not heat up as rapidly as the meat, but then, when the bone gets hot, it can get hotter than the muscle. So if you take the temperature close to the bone or touching the bone at the beginning of a cook, the temperature will be lower than the center of the muscle mass because the bone is acting like an insulator. If you take the temperature near or touching the bone, the reading will be higher.
Step 10
Flip the meat once or twice so it heats evenly on both sides. At this low temp, the exterior color should not go much beyond tan, if you added wood it might get a ruddy glow. When the temp in the deepest part of the meat hits 110 to 115°F, open the lid and leave it open. This could take 30 minutes.
Step 11
The surface tastes best when high heat instigates several important chemical reactions. The Maillard reaction is a chemical reaction between amino acids and sugars created by heat. Caramelization is the browning of sugar by oxidation under heat and there are small amounts of sugars in meat. Combined they beget a rich, complex, caramel or butterscotch flavor.
Step 12
There are also fats on the surface, and they contribute a lot to the flavor of the meat. When heat melts the fat and chemically alters it, the flavor is drastically altered. Fat reaches its most rich and succulent zenith when golden brown, just before it blackens, and muscle is peak when it is nut brown. Blackening or charring is carbonization, and the taste is not much better than eating charcoal, so you want to stop the process just short of blackening. That's why I never eat at places named "Char House". They tell you on the marquee they plan to ruin my steak!
Step 13
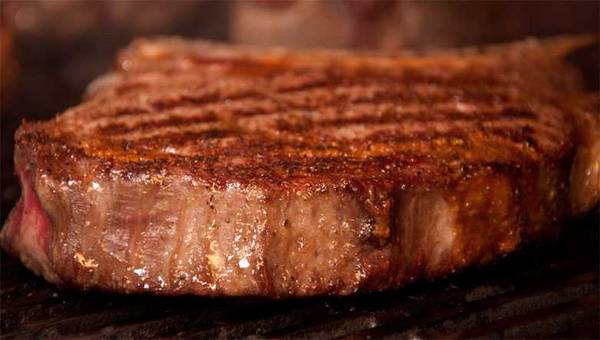
Remember, searing is the treatment of the surface. It has nothing to do with sealing in the juices. And remember, grill marks are flavorful and crunchy, and they look great , but the goal is to get the entire surface as dark as the grill marks. If the grill marks taste wonderful, why not give the same treatment to the whole surface?
Step 14
On a charcoal grill bunch the coals all together if necessary or add new hot coals. On a gas grill, crank up the burners. You can take the meat off the grill and add more coals and wait for them to get hot if necessary, and you can take the meat off a gas grill while you wait for it to heat up.
Step 15
Paint the meat with "beef love" and sprinkle on the black pepper. Gently press it into the surface so it doesn't all fall off, but a lot will. Now move it to the hot side of the grill, as hot as possible, as close to the heat source as possible. The oil helps conduct heat to the meat, assists with browning by frying the surface, and adds flavor. Beware of flareups. They can cause soot.
Step 16
You want the lid open for this step so all the heat is concentrated on one surface. You don't want heat trapped under the hood cooking the top or sides. They're just about done. When the meat is on the hot side, stand by your grill! Do not wander off and chat up your guests or check your email. Things will move quickly because the meat's surface is already close to 200°F, and you need to be ready to react. If you have charcoal about 1" below the meat, each side can be ready in as little as 3 minutes!
Step 17
You want the surface to get scorching hot so it will brown quickly without transferring heat to the center. By cooking hot and fast, the heat works mostly on the surface and doesn't have time to migrate deep into the meat.
Step 18
Keeping the lid open when searing the exterior is essential. This prevents heat buildup from cooking the center of the meat. With the lid closed, the air all around the steak warms and it starts to cook from all sides. In this step we are working only on one surface at a time, nothing else. Check the color of that surface every minute or so and make sure you put the meat back down so the grates touch different parts of the surface. We do not want grill marks. We want everything evenly dark. If a little of the edge fat blackens, that's OK, but don't blacken the muscle fibers.
Step 19
Flip the meat frequently, every minute. Become a human rotisserie, This allows the energy buildup in the surface to bleed off into the air after you flip. When you flip, try to place the meat on a virgin section of the grate that has not been cooled by contact with steak. After you flip, hit the top side with beef love and freshly ground black pepper. There's enough heat there to extract flavor.
Step 20
The procedure is identical for the second side. Wait til the color is perfect, paint on beef love, black pepper, flip, sear, and remove form the heat.
Step 21
On a kamado, remove the meat and put it on a platter. Lift out the deflector plate. Open the lower vent all the way and get the coals good and hot. Use a hair drier in the bottom vent if needed. Lower the cooking grate as close to the coals as possible. an put the steaks back on. Lid open.
Step 22
On a gas grill, if you have a sear burner, use it. If not, remove the meat and set it aside on a plate for a few minutes while you get the grill ready to sear. Remove the grates, and set them down Close the lid and turn all burners on high. After it's max heat, open the lid, leave it open, pat one surface of the meat dry, and put it on the hottest part of the grill, dry side down. You might even be able to remove your grates and lower them to sit right on top of the flavor bars or deflectors that protect your burners. Remember, the closer you get to the heat source, the better. You might consider buying GrillGrates. They replace your factory grates and amplify the heat just like the "infrared" or sear burners. You can even flip them upside down to use them like a perforated griddle for an amazing sear. You may want to consider buying a cheap charcoal grill like a hibachi just for searing steaks. Get your grill as hot as possible by preheating it longer than usual with all burners on high and the lid down. You might even be able to remove your grates and lower them to sit right on top of the flavor bars or deflectors that protect your burners. Remember, the closer you get to the heat source, the better.
Step 23
Leave the lid up during searing and flip the meat every minute or two.
Step 24
Another option is to preheat a cast iron pan or a griddle in the hot zone, and sear by conduction. It goes fast and covers the entire surface. Again, leave the lid up for the sear phase. Then again, you may want to consider buying a cheap charcoal grill like a hibachi just for searing steaks.
Step 25
On a pellet grill you should definitely buy a cheap hibachi or use a superheated cast iron griddle or pan for the searing. Most pellet grills are not suited for superheated searing.
Step 26
When you have both exteriors perfect, the interior should be in the medium rare range, 130 to 135°F (click here for a chart of steak doneness). Err on the side of undercooking, you can always put a steak back on the grill, but if it is overcooked, you cannot bring it back to life.
Step 27
Serve. Remove the steaks from the grill and serve immediately while still hot. There is no need to rest the meat. It has been proven that this does nothing to improve juiciness. Here's another video, showcasing how to properly grill a steak.