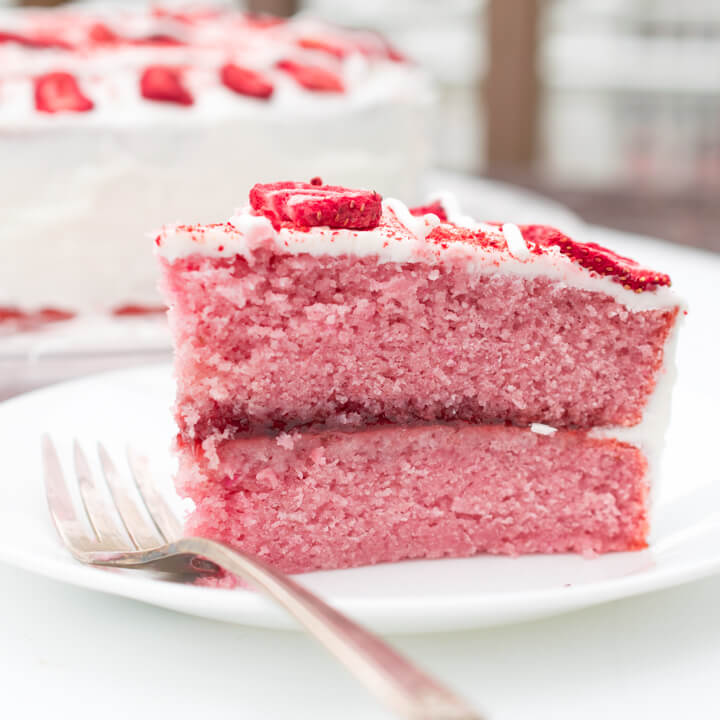
Vegan Strawberry Cake
5.0
(3)
Your folders
Your folders
Prep Time: 35 minutes
Cook Time: 45 minutes
Total: 100 minutes
Servings: 16
Cost: $1.47 /serving
Author : Yup, it's Vegan
Ingredients
Export 17 ingredients for grocery delivery
Instructions
Step 1
After removing the strawberry stems, add them to a food processor or blender and puree until smooth. Optional but recommended: strain the puree through a sieve to remove the seeds.
Step 2
Add the strained strawberry puree to a saucepan over medium heat. Once bubbling, reduce the heat to low, and continue to cook, stirring occasionally, until reduced significantly and thickened, about 20 minutes. You should end up with about 2/3 cup of the mixture, weighing approximately 115 grams; this doesn't need to be exact.
Step 3
Set the strawberry reduction aside to cool. It should cool completely to room temperature before using it in the recipe.
Step 4
Before starting, make sure all of your ingredients for this vegan strawberry cake are at room temperature, otherwise your cake will bake up weirdly. Trust me!
Step 5
Preheat the oven to 350 degrees Fahrenheit (make sure you are not using convection mode; this will cause the cake to bake unevenly). Line two 9-inch cake pans with circles of parchment paper on the bottom. Do not flour or grease the pans.
Step 6
In a small bowl, whisk together the aquafaba and cream of tartar vigorously until the aquafaba is fluffy and foamy, and set aside. No need to whip it to stiff peaks (you can if you want to though), just get it foamy.
Step 7
Measure the volume of the strawberry reduction, and add enough soy milk so that the total volume of the strawberry reduction and soy milk is 2 cups. So, if your strawberry reduction is 2/3 cup, you should use 1 and 1/3 cup of soy milk.
Step 8
Stir together the strawberry reduction soy milk, 2 tsp vinegar, vanilla and butter flavors, and set aside. The soy milk will curdle a little bit; this is normal. If using food coloring, stir it into this mixture too, using an amount according to package directions.
Step 9
Sift all of the dry ingredients (including the sugar) into a mixing bowl and stir well, sifting a second time if the mixture still appears lumpy. Don't skip this step - sifting is important!
Step 10
Add the vegetable oil and shortening into the bowl. Use a strong fork to break up the shortening and then mix everything together well. The mixture will first turn crumbly like a shortbread dough and then as you continue to mix, will start to resemble wet sand (see photos in blog post). This will take some elbow grease. Make sure to scrape around the bottom of your mixing bowl to get any flour pockets hiding out there. Don't continue until the mixture is fully smooth.
Step 11
Add 1/3 of the wet ingredients to the bowl and mix until combined. Add another 2/3 and repeat. Finally, add the remaining 1/3 and mix until the batter is very smooth and runny, which will take a minute or two (see photos in blog post).
Step 12
Give the aquafaba mixture another whisk to get it foamy again, as it may have deflated a bit while you were mixing the rest of the cake. If it's still partially liquidy, take only the foamy part and not the part that is liquid. Then, whisk it into the cake batter until mixed in evenly (if you only fold it in, you might get streaks or a gummy layer - mix well if needed). Divide the cake batter between your two cake pans.
Step 13
Bake the vegan strawberry cake layers for approximately 24-28 minutes, or until a toothpick inserted into the center comes out clean and dry. Be sure not to open the oven until it has been at least 15 minutes (preferably longer), otherwise you will risk your cakes deflating when you open the oven door.
Step 14
Let the cakes cool in their pans on top of a cooling rack for about 10 minutes. You can then run a sharp knife around the edges of the pans before very gently inverting the cakes to cool completely. I recommend lightly flouring or spraying your cooling rack before flipping the cakes onto it; they are very moist and have a tendency to stick. After flipping them over, gently peel off the parchment paper.
Step 15
These cakes can be layered and frosted once completely cooled (and the layers can be gently evened out if needed, although they tend to bake pretty flat). Take care in handling them; they are rather delicate. Leftover cake can be stored covered in the fridge for a couple of days. If your layer cake is fully frosted it can also be stored covered at room temperature. If stored in the fridge, it's recommended to bring it to room temperature before slicing, to reduce crumbliness.
Step 16
To make the strawberry frosting, add the freeze-dried strawberries to a food processor and pulverize into a fine powder. Stir into the white frosting until evenly combined.
Step 17
On the bottom layer of the cake, add a thin coating of frosting to the top, then add a slightly taller ring of frosting, about 1/2 inch wide, around the outside (this is to hold in the jam). Spread strawberry jam evenly onto the top of the cake layer, excluding the thicker frosting on the outside.
Step 18
Carefully place the second layer of cake onto the first one, and then frost the top and outsides with the remaining strawberry frosting. I don't recommend decorating this cake with fresh strawberries; they are watery and will ruin your frosting. Royal icing strawberries would be a great touch if you're more ambitious than I am!