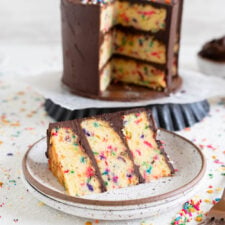
Funfetti Cake with Dark Chocolate Buttercream
5.0
(5)
Your folders
Your folders
Prep Time: 1 hours
Cook Time: 40 minutes
Total: 1 hours, 40 minutes
Servings: 6
Cost: $4.40 /serving
Author : Erin

Ingredients
Export 12 ingredients for grocery delivery
Instructions
Step 1
Preheat the oven to 350°f / 180°c. Grease three 6” cake pans, and line with parchment paper on the bottom.
Step 2
In a medium bowl, whisk together the eggs, egg yolk, vanilla, buttermilk, and yoghurt.
Step 3
In the bowl of a stand mixer fitted with the paddle attachment, combine the flour, sugar, baking powder, and salt. Mix briefly to combine.
Step 4
With the mixer on low, add the butter a cube at a time, until fully incorporated and the mixture looks like sand.
Step 5
Add half of the wet ingredients into the mixer. Mix until just combined, then add the second half of the wet ingredients. Mix on medium speed until just combined. Add in the sprinkles and mix to combine.Remove the bowl from the mixer and give a few folds with a rubber spatula to ensure that no dry ingredients remain.
Step 6
Divide the batter between your three cake tins (I prefer to do this by weight - see notes). Bake for 25 to 30 minutes, or until the cakes are springy to the touch, and a skewer inserted into the middle comes out clean.
Step 7
Remove from the oven and cool for 15 minutes in their pans, then turn onto a wire rack and allow to cool completely.
Step 8
Melt the dark chocolate in 15 second increments in the microwave, stirring well between each until melted. Set aside to cool completely.
Step 9
In the bowl of a stand mixer fitted with the paddle attachment, beat the butter on high speed until light and fluffy, approx. 4 minutes. Add the salt, powdered sugar, vanilla bean paste, and cocoa, and mix until smooth, scraping down the sides once or twice.
Step 10
Add the melted chocolate and mix well until silky. If needed, add cream 1 tbsp at a time to get the frosting to a nice smooth, fluffy consistency.
Step 11
Level off the cake layers. Secure one of the layers of cake to a cake turntable, cake stand or cake board using a little buttercream. Add about half a cup of buttercream onto the first layer of cake (I used a cookie scoop that had a 2 Tbsp volume and added 3 scoops), and smooth using an offset spatula.
Step 12
Place the second layer of cake onto the first, pressing very lightly to secure, and sealing the joins with a thin layer of buttercream. Add more buttercream, smooth down, then top with the third layer of cake - I like to put this one upside down to ensure that the top of the cake is flat.
Step 13
Crumb coat the cake - to do this, apply a thin layer of buttercream over the surface of the cake, and smooth with a bench scraper or icing smoother. Refrigerate the cake for 15-20 minutes, until the crumb coat has set. Press a piece of plastic wrap over the surface of the buttercream while you are chilling down the cake.
Step 14
If you have started with a chilled or frozen cake, or the buttercream seems to be not too sloppy, you can skip the chilling down of the crumb coat if you like, or reduce the time to 5 mins. If you have an empty freezer you can also throw it in the freezer for 5 minutes to help set it!
Step 15
Add a second layer of buttercream to the cake - I like to make this one thicker and smooth down the edges.
Step 16
Smooth the buttercream on the outside of the cake using a bench scraper, scraping down between passes. Fill in any gaps, and add additional buttercream where needed. Continue until you are happy with the finish.
Step 17
Chill the cake until you are ready to serve. Bring to room temperature for about an hour before serving.