Homemade Banana Pudding from scratch
5.0
(1)
Your folders
Your folders
Prep Time: 50 minutes
Cook Time: 40 minutes
Total: 1050 minutes
Servings: 14
Cost: $3.06 /serving
Author : Dini @ The Flavor Bender
Ingredients
Export 15 ingredients for grocery delivery
Instructions
Step 1
Place the milk in a saucepan. Slice the bananas into the milk.
Step 2
Heat the milk and banana mix over medium heat, stirring occasionally to prevent the milk from burning.
Step 3
Heat until the milk starts to steam or simmer. Do not let it come to a full boil.
Step 4
Remove the milk from the heat and let it cool down slightly.
Step 5
Transfer to the fridge and let the bananas infuse the milk for at least 4 hours, or up to 12 hours.
Step 6
Strain the banana milk mixture, without pressing the banana pieces through the sieve. You only want the milk portion. To make sure you get all the milk, allow the strainer to sit over the milk for awhile to drain all of the milk. You should get 2 ½ cups of milk. If not, just top it with some milk to get 2 ½ cups.
Step 7
Place the 2 ½ cups banana milk and sugar in a saucepan. Heat until the milk mixture is steaming.
Step 8
While the milk is heating, place the eggs, egg yolks, cornstarch, and vanilla in a bowl. Whisk until you have a smooth mixture.
Step 9
When the milk is heated, pour about 1 cup of the hot milk in a thin stream into the egg mixture, while constantly whisking the egg mixture. This is to temper the eggs.
Step 10
The tempered egg mixture should now be at least warm. Gently pour it back into the remaining hot milk mixture in the saucepan while whisking the milk mixture constantly.
Step 11
Return the banana milk custard mix back to the stove, and cook over medium or medium-low heat until thickened. Make sure to whisk frequently to prevent curdling, but also check if the mixture is coming to a boil.
Step 12
When the mixture comes to a boil (bubbles break the surface), lower the heat of the stove and whisk for a further minute.
Step 13
Remove the custard base from the heat and add the butter. Whisk it in until the butter is emulsified.
Step 14
Place the custard in a bowl (or shallow dish) and cover the custard with plastic wrap. Make sure to press the plastic wrap onto the surface of the custard and cover the whole surface to prevent a skin from forming on top.
Step 15
Allow the custard to chill in the fridge. A large, shallow dish will chill the pastry cream faster. This can take 4 hours (depending on the dish), or up to 8 hours.
Step 16
Once the custard is chilled, remove it from the fridge and whisk it until smooth. Now the custard is ready to be mixed with the whipped cream.
Step 17
When the custard is chilled, make the stabilized whipped cream.
Step 18
Place the chilled whipping cream (heavy cream) in a chilled metal bowl (of your mixer).
Step 19
Place the water in a small microwaveable bowl. Sprinkle the gelatin and stir it in. Allow the gelatin to bloom in the water for about 10 minutes.
Step 20
Microwave the bloomed gelatin for about 10 - 20 seconds to dissolve the gelatin. But DO NOT let it boil.
Step 21
Stir in about 1 tbsp of the chilled heavy cream to temper the gelatin mixture.
Step 22
Start whisking the heavy cream and pour in the gelatin mixture. Make sure the gelatin isn’t poured directly onto the whisks, since this will cause the gelatin to set and forms clumps.
Step 23
Whisk the heavy cream on high for a few seconds to incorporate the gelatin.
Step 24
Once the gelatin is incorporated, lower the speed to medium high, and whisk the cream until it's just starting to form stiff peaks. Make sure to NOT let the heavy cream curdle / become grainy.
Step 25
Fold in about ⅓ of the whipped cream into the banana flavored custard. Once mixed well, either fold the rest of the whipped cream into the custard, or fold the custard into the remaining whipped cream in the mixer bowl. Either way is fine. Now the pudding base is ready.
Step 26
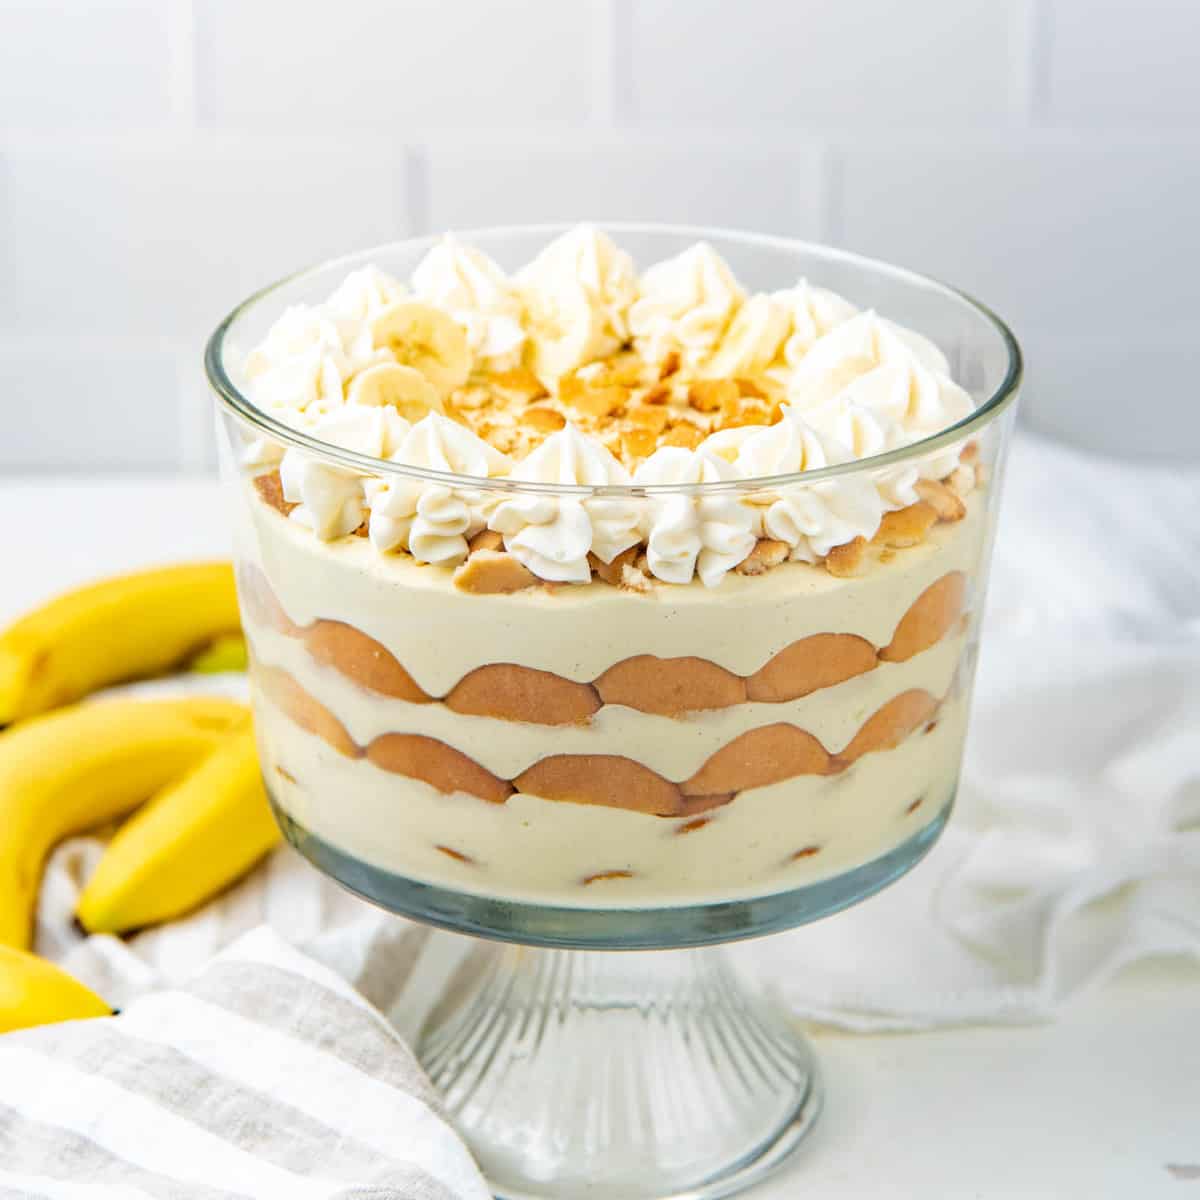
Choose the dish you'll be serving the banana pudding in. I used an 8 - 9 inch trifle bowl here, but a large casserole dish (about 9 x 9 inch square or slightly rectangular) will work as well.
Step 27
You can create as many layers as you like, depending on how thinly you spread the pudding base layer. Start with the pudding base, and have enough to top the dessert as the final layer.
Step 28
Spread a layer of the banana pudding base at the bottom of your dish. Top it with a layer of Nilla wafers, followed by sliced bananas (about ½ cm thick). I like to slice the bananas only as I layer them, and not ahead of time (to prevent browning).
Step 29
Break some Nilla wafers in half and layer them against the wall of the dish (IF you’re serving this in a glass container). This is optional and purely for aesthetics.
Step 30
Spread a layer of the banana pudding base on top of the bananas. Make sure the bananas are completely covered with the pudding. Banana slices that are exposed to air will brown quickly.
Step 31
Repeat the layers until you have used up all of the banana pudding base, while making sure the final layer on top is also the pudding.
Step 32
Cover the dish with plastic wrap and refrigerate for at least 1 hour.
Step 33
Top the pudding with whipped cream (optional). You can either pipe it along the edge or spread a layer of whipped cream on top.
Step 34
Decorate with whole or crushed Nilla wafers.
Step 35
You can also decorate with more banana slices, but make sure to do this just before serving (to prevent browning).