Recipe Book Cover -
Your folders
Your folders
Ingredients
Export 889 ingredients for grocery delivery
Instructions
Step 1
TO PREP THE CHIA PUDDING Blend all in a bowl, cover with a lid or plastic wrap, and place into a refrigerator for a couple of hours. FOR THE GRANOLA Preheat the oven to 400°F. Mix all ingredients in a bowl and spread evenly with a spatula on a baking sheet lined with parchment paper. Bake for 10 minutes or until golden brown. When ready, let it cool down for 10 minutes and scoop into a bowl. Smash the big chunks so you can fit them all easier into glasses. Take a heaping tablespoon of granola and start filling your glasses. Repeat three times for each glass for the bottom layer. To make the chia layer, you need a large funnel to help you to make the process easier and tidier. It will take about 4 to 5 tbsp for each glass. Create another granola layer and chia layer. When ready, divide the cup of pomegranate into two halves and create a layer in each glass. Apply another chia layer, and you may top with coconut whipped cream if you like. Or it could be coconut yogurt or ice cream if you prefer.
Step 2
TO PREP THE CHIA PUDDING Blend all in a bowl, cover with a lid or plastic wrap, and place into a refrigerator for a couple of hours.
Step 3
FOR THE GRANOLA Preheat the oven to 400°F. Mix all ingredients in a bowl and spread evenly with a spatula on a baking sheet lined with parchment paper. Bake for 10 minutes or until golden brown. When ready, let it cool down for 10 minutes and scoop into a bowl. Smash the big chunks so you can fit them all easier into glasses. Take a heaping tablespoon of granola and start filling your glasses. Repeat three times for each glass for the bottom layer. To make the chia layer, you need a large funnel to help you to make the process easier and tidier. It will take about 4 to 5 tbsp for each glass. Create another granola layer and chia layer. When ready, divide the cup of pomegranate into two halves and create a layer in each glass. Apply another chia layer, and you may top with coconut whipped cream if you like. Or it could be coconut yogurt or ice cream if you prefer.
Step 4
TO MAKE THE CHIVE AIOLI In a small bowl, add all the ingredients and mix to combine. Set aside. TO SAUTÉ MUSHROOMS In a medium pan, heat 1–2 tablespoons of olive oil or vegan butter. Add the sliced mushrooms and cook for 10–15 minutes on medium heat. Add a few tablespoons of water every couple of minutes and let it cook. Mushrooms should start to soften and shrink in size. In the last minute of cooking, add the spices and fresh chives. TO MAKE THE DILL TOFU SCRAMBLE Start scrambling the tofu halfway through cooking the mushrooms. Using a non‑stick pan, crumble the tofu with your hands into the pan. Cook on medium‑high heat for a few minutes until the tofu starts to brown. Turn down the heat to medium‑low and add the unsweetened almond milk. Stir to combine and add the rest of the ingredients. Thoroughly combine and remove from heat. TO SERVE THE CROISSANT Slice an opening lengthwise into the croissant to create a pocket. Spoon the scrambled tofu inside the croissant. Add any other toppings you like and drizzle the aioli over the top. Serve immediately.
Step 5
TO MAKE THE CHIVE AIOLI In a small bowl, add all the ingredients and mix to combine. Set aside.
Step 6
TO SAUTÉ MUSHROOMS In a medium pan, heat 1–2 tablespoons of olive oil or vegan butter. Add the sliced mushrooms and cook for 10–15 minutes on medium heat. Add a few tablespoons of water every couple of minutes and let it cook. Mushrooms should start to soften and shrink in size. In the last minute of cooking, add the spices and fresh chives.
Step 7
TO MAKE THE DILL TOFU SCRAMBLE Start scrambling the tofu halfway through cooking the mushrooms. Using a non‑stick pan, crumble the tofu with your hands into the pan. Cook on medium‑high heat for a few minutes until the tofu starts to brown. Turn down the heat to medium‑low and add the unsweetened almond milk. Stir to combine and add the rest of the ingredients. Thoroughly combine and remove from heat.
Step 8
TO SERVE THE CROISSANT Slice an opening lengthwise into the croissant to create a pocket. Spoon the scrambled tofu inside the croissant. Add any other toppings you like and drizzle the aioli over the top. Serve immediately.
Step 9
Begin by combining the strawberries, sugar, vinegar, and vanilla in a medium‑sized pot over medium‑high heat. Let simmer until sugar dissolves, stirring occasionally. After 4–5 minutes, remove from heat and let cool so that sauce thickens. Set aside. Whisk together all the ingredients (except for the bread) into a large bowl and set aside so that everything marries together and activates for about 5 minutes. Preheat griddle to medium‑high heat and add one tablespoon of vegan butter, melting it. Also, preheat the oven to 400°F and prep a large baking sheet by lining it with parchment paper. Dip one slice of bread into the batter, soaking it in for a few seconds on each side. Place slice onto the heated griddle, cooking on each side for about 3–4 minutes until golden brown. Repeat until all french toasts are made. Once done, add all french toast onto a baking sheet (side by side) and bake for 10–15 minutes until crisp on the edges. Remove and serve. To serve — stack french toast atop each other, spoon a generous amount of balsamic glazed strawberries and drizzle with date pure maple syrup if desired. Enjoy!
Step 10
To cook polenta, combine milk and vegetable stock in a saucepan and bring to a gentle boil. Add polenta and whisk for a few seconds to ensure there are no clumps. Stir in garlic powder, season with salt & pepper, cover with a lid and turn the heat down to medium-low. Simmer polenta for 8–10 minutes, stirring continuously, until it’s just starting to thicken. Stir in nutritional yeast flakes within the last 2 minutes of cooking. Turn the heat off and let the polenta ‘sit’ on the hob for a few minutes to absorb all the liquid. If you prefer your polenta a little thinner, add water, a little at a time, to achieve the desired consistency. While polenta is cooking, heat the olive oil in a pan. When the oil is hot, add sliced mushrooms, garlic powder, salt & pepper, and saute for 8–10 minutes until the mushrooms are crispy. Transfer the polenta into a bowl, top with sautéed garlic mushrooms, micro herbs/greens, sliced avocado, and a generous sprinkle of shelled hemp seeds.
Step 11
Preheat your oven to 375°F. Line your muffin tin with paper liners or lightly grease. Set aside. In a large bowl, mix the flour, baking powder, and salt. Set aside. In a small bowl, mix the peanut butter and brown sugar until creamy. Add the milk, banana, and vanilla and mix until well blended. Next, add the wet ingredients to the dry ingredients until combined – be careful not to overmix. Finally, fold in the nuts or chocolate chips (or both!). Scoop the batter into the muffin tin. Bake for 18–22 minutes, or until a toothpick comes out clean when poked into the center of the muffin. Let the muffins cool for about 15 minutes before serving.
Step 12
Blend in a high-speed blender until smooth and thick, just like the perfect sorbet.
Step 13
Put oats, protein powder, chia seeds, and salt in a bowl or single‑serving mason jar and stir to combine. Add non‑dairy milk, cauliflower rice, cashew butter, almond extract, and mix until well incorporated. Sweeten to taste. Cover and refrigerate overnight or for a minimum of 6 hours. Stir and add additional milk as needed for desired consistency.
Step 14
Start by heating the coconut oil in a pan on medium heat with the almond milk. Place all the remaining waffle ingredients, including the melted coconut oil and almond milk, into a bowl and mix well. Heat up the waffle iron and dab or brush with coconut oil. This recipe used the small waffle iron where the waffles come out looking like a four‑leaf clover. Ladle some of the batter mixture into the iron and cook until super crispy. While the waffles are cooking, mix up the coconut yogurt with lemon zest, maple syrup, and vanilla, stirring to combine. Once the waffles have been cooked, serve with a dollop of coconut yogurt, fruits, micro herbs, and edible flowers. Drizzle with maple syrup.
Step 15
In a small bowl, combine the peanut butter syrup ingredients. Heat in the microwave for 30 seconds, stir and set aside until ready to use. This can also be made up to 4 days in advance and chilled, but you may need to reheat when ready to use. In a small bowl, combine the non‑dairy milk and vinegar and set aside to curdle for 5 to 10 minutes. Combine the mashed bananas, oil, maple syrup, and vanilla in a large bowl. Add the milk mixture. Combine the buckwheat flour, oat flour, flaxseed meal, baking powder, salt, ginger, cloves, and nutmeg in another bowl. Add the dry ingredients to the wet and stir until just combined. Heat a large frying pan or griddle over medium heat. Generously spray with cooking spray. Use a ¹⁄³ ‑cup (80 ml) measuring cup to scoop the batter onto the pan (about 2 or 3 pancakes at a time, depending on the pan size). Cook for about 4 minutes, or until the edges of the pancakes begin to lift and look golden. Flip with a spatula and cook for 2 to 3 more minutes. Transfer the pancakes to a plate and cover with a kitchen towel until ready to serve. Repeat, spraying the pan before each batch, until all the batter is used. Serve the pancakes warm, topped with banana slices, nuts, chocolate chips (if using), and peanut butter syrup.
Step 16
FOR THE HERBED CREAM CHEESE Open your tofu and drain all the liquid by squeezing in a tofu press or over a strainer. It’s okay if it crumbles a little, but you need the tofu to be as dry as possible. In a food processor, add all ingredients for the tofu cream cheese, leaving the herbs out, and mix. Scrape down the sides of the bowl with a spatula and mix until smooth. Transfer the tofu cream cheese to a mixing bowl, add fresh herbs and mix with a spoon until incorporated. Taste test for seasonings; add more salt, pepper, lemon juice if needed. Cover and place in the fridge overnight (or at least 4 hours). FOR THE CARROT LOX Make the brine for the carrot lox. In a mixing bowl, add soy sauce, water, maple syrup, rice vinegar, capers brine, liquid smoke, garlic powder, smoked paprika, brown rice miso paste, a pinch of salt, and pepper. Whisk until combined. Fold your nori sheet in 4 (or use sprinkled nori) and add it to the brine; mix with a spoon to combine and set aside. Using a vegetable peeler or a mandoline, peel long strips of carrots. Soak your carrot strips into the brine. Cover and place in the fridge overnight (or at least 4 hours). TO MAKE THE TOASTS Toast your choice of bread. Next, spread a generous amount of herbed cream cheese. Finally, add strips of carrot lox and garnish with your topping of choice. Enjoy!
Step 17
FOR THE HERBED CREAM CHEESE Open your tofu and drain all the liquid by squeezing in a tofu press or over a strainer. It’s okay if it crumbles a little, but you need the tofu to be as dry as possible. In a food processor, add all ingredients for the tofu cream cheese, leaving the herbs out, and mix. Scrape down the sides of the bowl with a spatula and mix until smooth. Transfer the tofu cream cheese to a mixing bowl, add fresh herbs and mix with a spoon until incorporated. Taste test for seasonings; add more salt, pepper, lemon juice if needed. Cover and place in the fridge overnight (or at least 4 hours).
Step 18
FOR THE CARROT LOX Make the brine for the carrot lox. In a mixing bowl, add soy sauce, water, maple syrup, rice vinegar, capers brine, liquid smoke, garlic powder, smoked paprika, brown rice miso paste, a pinch of salt, and pepper. Whisk until combined. Fold your nori sheet in 4 (or use sprinkled nori) and add it to the brine; mix with a spoon to combine and set aside. Using a vegetable peeler or a mandoline, peel long strips of carrots. Soak your carrot strips into the brine. Cover and place in the fridge overnight (or at least 4 hours).
Step 19
TO MAKE THE TOASTS Toast your choice of bread. Next, spread a generous amount of herbed cream cheese. Finally, add strips of carrot lox and garnish with your topping of choice. Enjoy!
Step 20
Preheat the oven to 428°F. Wash your sweet potatoes, then transfer them to a baking tray. Prick the sweet potato all over with a fork, then bake for around 40–50 minutes, until tender. While the sweet potato is cooking, heat the cherries in a saucepan over medium‑high heat until they begin to break down. Use a fork to mash the cherries to your desired consistency, then turn off the heat. Add the chia seeds, maple syrup, and lemon juice and stir until evenly combined. Transfer to a small bowl and cool in the fridge and allow to thicken until the sweet potato has cooked and cooled slightly. Once the sweet potato has cooled, split the top open with a knife. Stuff the sweet potato with peanut butter and cherry chia jam. Top with the sliced bananas, and sprinkle over some cinnamon and ground almonds. Serve!
Step 21
Preheat the oven to 350°F. In a medium‑size bowl, add all of the dry ingredients and mix with a fork. Set aside. In a smaller bowl, mash the bananas with a hand masher or fork. Add the maple syrup and almond milk. Mix with a fork until incorporated. Add the chia seeds and mix well. Let stand for 10–15 minutes to thicken. Add the cashew butter to the mashed banana mixture and whisk together. Next, add the chopped dates and hand whisk until blended. Pour the wet into the dry and hand mix and turn until well incorporated. Use an ice cream scoop or a tablespoon to drop the dough in balls on the lined cookie sheet. If using an ice cream scoop, make sure to level off the dough with the back of a spoon or knife. Press down each dough ball with fingers to flatten and make them 1 cm thick (just under ½ inch). Leave a bit of space in between them, although they will barely spread out with baking. Bake in preheated oven on the middle rack for 15–20 minutes, or a bit longer until bottoms are golden. Start checking them at 15 minutes. Place on a rack to cool completely. Store in a covered container at room temp or in the fridge. They will keep for several days, and you can also freeze them.
Step 22
To a large pot, add the water, piloncillo, and cinnamon sticks. Bring to a boil, then lower the heat and simmer for 5 minutes to dissolve the piloncillo. Next, add in the plant milk, vanilla, and oats. Cover and bring to a low boil again, then lower the heat to simmer for 15 minutes, stirring frequently. If you prefer your oatmeal a little thicker, cook for an additional 5 minutes with the lid off. Divide between bowls and serve with plant milk, sweetener of choice, a sprinkle of cinnamon, sliced bananas, dried fruit, or whatever else you can think of. Enjoy!
Step 23
Prepare filling by adding apples, water, orange juice, coconut sugar, and cinnamon to a large frying pan. Cook over medium heat until soft and fragrant, adding more water as needed. Prepare crêpes while apples are cooking. Mix flour, dairy-free milk, cinnamon, and coconut sugar in a medium bowl until smooth and runny. Heat a frying pan over medium heat with one tablespoon of oil. Add two tablespoons batter per crêpe, using the back of a spoon to smooth the batter out. Cook for a minute on each side and repeat the process until all the batter is used up. Add cooked apples to each crêpe and gently roll-up. Top with pecans and Biscoff spread.
Step 24
Peel and grate the potato with the thick side of a grater, and squeeze as much water as you can from it with your hands. Place it in a bowl and warm it in the microwave at 30-second increments, stirring in between, doing this 2 or 3 times in total. This will dry out your potato even more and pre-cook it so it comes out of the pan perfectly crispy but also cooked through. Heat a non‑stick pan at medium‑high heat and add olive oil to coat. Spread the grated potato across the pan so that all the pieces are touching and can stick together, but so that most of them are also in contact with the pan. Add a sprinkle of salt and pepper and the diced bell pepper. Once the potatoes are golden on the bottom, flip them and brown them on the second side. In the meantime, whisk together all the ingredients for your batter. Once the potatoes are golden on both sides, pour the batter on top and sprinkle with the fresh herbs. Add the vegan cheese shreds (or other fillings) over half of the omelet, and once you see that the batter has set and it’s golden on the bottom, flip the empty half over towards the half that has your fillings. Let the cheese melt slightly and serve topped with some extra fresh herbs if desired and some freshly ground pepper. Enjoy!
Step 25
In a mixing bowl, combine the pineapple juice, Teriyaki sauce, rice vinegar, brown sugar, garlic, and ginger. Add your tofu to the sauce. Let marinate for at least 30 minutes. Mix all your ingredients for the mango salsa and refrigerate until it is time to serve. The flavor will continue to develop, and I would even say that the next day is even better! Next, prepare your lime dressing and refrigerate. Fry up your tofu to brown on both sides, approximately 5 minutes on each side. In a dry pan, heat your tortillas for 30 seconds on each side and cover with a towel until ready to serve. To assemble, take your tortilla and place your fried tofu in the center. Next, put a small amount of purple cabbage and then the mango salsa. Finally, drizzle a little lime dressing and sprinkle some more coriander. Enjoy!
Step 26
Separate the broccoli florets from their stems and set aside the stems and one head of broccoli’s florets. While using both stems, you will only be using one broccoli heads’ florets for this recipe (save the other one for future use.) Remove as much stem as possible from the broccoli florets and place the florets into a food processor, and pulse until breadcrumb‑like. Set broccoli aside in a bowl and wipe down the food processor. Spiralize the broccoli stem. Roughly trim the noodles and place them in the bowl with the floret crumbs. Place all of the ingredients for the dressing into the food processor and pulse until chunky but dressing‑like. Don’t overprocess it – you don’t want this dressing to be watery. Pour the dressing into the bowl, add the beans and toss well to combine thoroughly. Serve immediately or let sit in the refrigerator to let flavors marinate.
Step 27
Chop a head of cauliflower into small bite‑sized chunks. Set aside. Get two medium‑sized bowls out, one for the wet ingredients, one for the dry. In one bowl, combine all wet ingredients. In the other bowl, combine all dry ingredients. Transfer the cauliflower bites a few at a time into the wet mixture, toss to coat. Once the cauliflower has been coated in the wet mixture, roll it around (a few pieces at a time) in the dry mix until fully coated. Transfer to air fryer or pan if cooking in the oven. Arrange the cauliflower bites in a thin, even layer in the air fryer; try not to cook too many at a time. Fry on medium heat for about 25–30 minutes, tossing every 10 minutes. They should be crunchy and brown when done.
Step 28
TO PREPARE THE MISE EN PLACE To prepare your mise en place, finely dice the onion and mince the garlic. Next, wash and drain the lentils and rice (separately). However, the brown rice adds a nice flavor and makes the dish more nutritious. Lastly, gather the water (or stock) and spices and preheat the oven to 350°F. TO COOK THE DISH To cook the dish, heat a large pan or Dutch oven over medium‑high heat and then add the oil. Add the onions and cook until they soften and brown slightly, about 5 to 8 minutes. At that point, turn the heat to low and add the garlic. Stir for about 30 seconds. Then add the spices and cook for another 30 seconds or so. Next, add the brown rice and stir to combine.
Step 29
TO PREPARE THE MISE EN PLACE To prepare your mise en place, finely dice the onion and mince the garlic. Next, wash and drain the lentils and rice (separately). However, the brown rice adds a nice flavor and makes the dish more nutritious. Lastly, gather the water (or stock) and spices and preheat the oven to 350°F.
Step 30
TO COOK THE DISH To cook the dish, heat a large pan or Dutch oven over medium‑high heat and then add the oil. Add the onions and cook until they soften and brown slightly, about 5 to 8 minutes. At that point, turn the heat to low and add the garlic. Stir for about 30 seconds. Then add the spices and cook for another 30 seconds or so. Next, add the brown rice and stir to combine.
Step 31
TO PREPARE THE MISE EN PLACE To prepare your mise en place, finely dice the onion and mince the garlic. Next, wash and drain the lentils and rice (separately). However, the brown rice adds a nice flavor and makes the dish more nutritious. Lastly, gather the water (or stock) and spices and preheat the oven to 350°F. TO COOK THE DISH To cook the dish, heat a large pan or Dutch oven over medium‑high heat and then add the oil. Add the onions and cook until they soften and brown slightly, about 5 to 8 minutes. At that point, turn the heat to low and add the garlic. Stir for about 30 seconds. Then add the spices and cook for another 30 seconds or so. Next, add the brown rice and stir to combine. Add the water and bring to a simmer. Reduce the heat to low and continue to simmer for about 10–15 minutes. Then add the lentils, stir and return to a boil, turn the heat to low, cover and let cook for approximately 20 to 30 minutes, or until the rice and lentils are cooked through. If after 30 minutes the rice and lentils are not quite cooked, but there is no liquid left, add a bit more liquid and continue to cook. If using white rice (long grain), add the lentils to the onions first and cook for approximately 15 minutes before adding the rice (as you want them both to be done simultaneously). The exact time will depend on the type of rice used. Meanwhile, you can go ahead and prepare the onions. Once the liquid has been absorbed and the rice and lentils are tender, turn off the heat and taste for seasoning. Season well with salt and pepper. Because salt was not added at the beginning (so the lentils cook properly), you will need to use more salt than just a final seasoning. At this point, let rest for approximately 10 minutes or so. TO PREPARE THE ONIONS To prepare the onions, cut in half and then cut each half in half width‑wise — this just makes for smaller slices. Next, slice the onions and then separate the slices with your hands to break up the pieces. Place the onions onto a large baking tray that has been lined with parchment or aluminum foil. If using coconut oil to coat the onions, you can either first melt the oil and pour over the onions or simply smear the oil in your hands and toss the onions right on the tray. The heat from your hands will melt the oil enough so that it nicely coats the onions. Place the onions into the hot oven and let cook for 20 to 30 minutes, tossing often. If necessary, continue to cook and toss until the onions are nice and golden with some blackened crispy bits. The closer the onions get to be done, the more frequently they will need to be tossed. Alternatively, the onions can be sautéed on the stovetop; however, this is not generally considered the “traditional” way of cooking them. To prepare the dressing, mix the ingredients. TO SERVE THE DISH To finish the dish, chop the herbs. You can add as much of each herb as you like, but equal parts cilantro, Italian parsley, and mint is a nice combination. If you don’t have all three types, this dish is also nice with just one type of herb. Lastly, add half of the onions to the lentil mixture and fold to combine. To serve the dish, drizzle with some lemon‑mint vinaigrette and top with a handful of crispy onions.
Step 32
TO PREPARE THE MISE EN PLACE To prepare your mise en place, finely dice the onion and mince the garlic. Next, wash and drain the lentils and rice (separately). However, the brown rice adds a nice flavor and makes the dish more nutritious. Lastly, gather the water (or stock) and spices and preheat the oven to 350°F.
Step 33
TO COOK THE DISH To cook the dish, heat a large pan or Dutch oven over medium‑high heat and then add the oil. Add the onions and cook until they soften and brown slightly, about 5 to 8 minutes. At that point, turn the heat to low and add the garlic. Stir for about 30 seconds. Then add the spices and cook for another 30 seconds or so. Next, add the brown rice and stir to combine. Add the water and bring to a simmer. Reduce the heat to low and continue to simmer for about 10–15 minutes. Then add the lentils, stir and return to a boil, turn the heat to low, cover and let cook for approximately 20 to 30 minutes, or until the rice and lentils are cooked through. If after 30 minutes the rice and lentils are not quite cooked, but there is no liquid left, add a bit more liquid and continue to cook. If using white rice (long grain), add the lentils to the onions first and cook for approximately 15 minutes before adding the rice (as you want them both to be done simultaneously). The exact time will depend on the type of rice used. Meanwhile, you can go ahead and prepare the onions. Once the liquid has been absorbed and the rice and lentils are tender,
Step 34
turn off the heat and taste for seasoning. Season well with salt and pepper. Because salt was not added at the beginning (so the lentils cook properly), you will need to use more salt than just a final seasoning. At this point, let rest for approximately 10 minutes or so.
Step 35
TO PREPARE THE ONIONS To prepare the onions, cut in half and then cut each half in half width‑wise — this just makes for smaller slices. Next, slice the onions and then separate the slices with your hands to break up the pieces. Place the onions onto a large baking tray that has been lined with parchment or aluminum foil. If using coconut oil to coat the onions, you can either first melt the oil and pour over the onions or simply smear the oil in your hands and toss the onions right on the tray. The heat from your hands will melt the oil enough so that it nicely coats the onions. Place the onions into the hot oven and let cook for 20 to 30 minutes, tossing often. If necessary, continue to cook and toss until the onions are nice and golden with some blackened crispy bits. The closer the onions get to be done, the more frequently they will need to be tossed. Alternatively, the onions can be sautéed on the stovetop; however, this is not generally considered the “traditional” way of cooking them. To prepare the dressing, mix the ingredients.
Step 36
TO SERVE THE DISH To finish the dish, chop the herbs. You can add as much of each herb as you like, but equal parts cilantro, Italian parsley, and mint is a nice combination. If you don’t have all three types, this dish is also nice with just one type of herb. Lastly, add half of the onions to the lentil mixture and fold to combine. To serve the dish, drizzle with some lemon‑mint vinaigrette and top with a handful of crispy onions.
Step 37
Bring the veggie broth to a boil and add all the ingredients except oil. Turn down the heat and let it simmer for 10min, take it off the heat, add the oil, and set aside. Remove the Nori sheets and lemongrass before serving. Boil the noodles according to the instructions on the package. Marinade Tempeh slices in ¼ cup tamari and ½ teaspoon garlic powder for 6 hours or overnight. When ready, sauté on few drops of heated oil, few minutes on each side until golden. Cut them into squares before serving. Lightly sauté or steam the Bok choy. Fill your bowls with noodles, add veggies and pour the broth on top and serve.
Step 38
Preheat oven to 360°F. Cut bell peppers in half, discard seeds, and place them on a large baking tray, placing them flat with the skin up. Half the tomatoes and add to the tray, then add cherry tomatoes, sliced red onion, and garlic cloves—season with salt and pepper and drizzle with some olive oil. Place in the oven to bake for about 15–20 minutes until the vegetables soften and turn darker. Once roasted, remove the vegetables from the oven. Peel the skin off the peppers and tomatoes, then place all vegetables in a large pot. Pour in vegetable stock and bring to a boil, then reduce heat and cook on low for about 10–15 minutes. With an immersion blender or in a blender, blend the soup until smooth. Serve with some plant‑based cream, a spoonful of cooked quinoa, and some basil leaves.
Step 39
In a large pot, combine the potatoes, the bay leaf, some salt and seven cups of water and boil until the potatoes are tender. Check them with a fork to make sure they are soft inside. When done, rinse the potatoes under cold water; the skins should peel off easily. Mash the potatoes until smooth, add the potato starch, and stir to form a dough. If the dough feels too sticky to shape, add more potato starch. To prepare the stuffing, heat the olive oil in a sauté pan over medium‑high heat. Add the onion, stir and cook for 5 minutes. Add the mushrooms and cook for another 5 minutes. Finally, add the lentils, and salt, and pepper to taste and cook for 2 minutes. Set aside to cool. To form the cakes, take about three tablespoons of the dough in your hand and press it into your palm. Place a spoonful of stuffing over the dough, close it by folding it over, and shape it into a round disk. Heat a thin layer of coconut oil in a skillet over medium heat and cook the potato cakes on both sides until they develop a golden-brown crust, about 4 minutes per side.
Step 40
FOR THE TURMERIC QUINOA Pour the quinoa into a fine mesh strainer and rinse under running water for at least 30 seconds. Drain well. Combine the rinsed quinoa and water with turmeric, pepper, and salt in a saucepan. Bring the mixture to a boil over medium‑high heat, then decrease the heat a bit to maintain a gentle simmer. Cook until the quinoa has absorbed all of the water, about 10 to 12 minutes. Reduce heat as time goes on to maintain a gentle simmer. Remove the pot from heat, cover, and let the quinoa steam for 5 minutes. Then, remove the lid and fluff the quinoa with a fork. While the quinoa is cooking, prep your veggies. Wash, peel, slice, shred, etc. FOR THE MISO GINGER SAUCE Blend all ingredients in a high-speed blender until smooth and creamy, adding water as needed. TO ASSEMBLE Layout individual nori sheet on a length of cling wrap, on a working surface, shiny side down. Drop ¼ of the quinoa in the center, and flatten. Now pile veggies of your choice (chard, avocado, carrot, beet, cucumber, cilantro) over the quinoa (right to the edges of the quinoa). Top with second ¼ of quinoa. Fold the nori as a package, bringing up each corner to meet in the middle, with some overlap. Fold the cling wrap up over, seal relatively tightly, then flip over and let sit for five minutes. Prep up the second nori wrap in the same way. Slice packets in half using a sharp, wetted knife, and enjoy either warm or (same day) cold. Dip in the miso ginger sauce as desired.
Step 41
FOR THE TURMERIC QUINOA Pour the quinoa into a fine mesh strainer and rinse under running water for at least 30 seconds. Drain well. Combine the rinsed quinoa and water with turmeric, pepper, and salt in a saucepan. Bring the mixture to a boil over medium‑high heat, then decrease the heat a bit to maintain a gentle simmer. Cook until the quinoa has absorbed all of the water, about 10 to 12 minutes. Reduce heat as time goes on to maintain a gentle simmer. Remove the pot from heat, cover, and let the quinoa steam for 5 minutes. Then, remove the lid and fluff the quinoa with a fork. While the quinoa is cooking, prep your veggies. Wash, peel, slice, shred, etc.
Step 42
FOR THE MISO GINGER SAUCE Blend all ingredients in a high-speed blender until smooth and creamy, adding water as needed.
Step 43
TO ASSEMBLE Layout individual nori sheet on a length of cling wrap, on a working surface, shiny side down. Drop ¼ of the quinoa in the center, and flatten. Now pile veggies of your choice (chard, avocado, carrot, beet, cucumber, cilantro) over the quinoa (right to the edges of the quinoa). Top with second ¼ of quinoa. Fold the nori as a package, bringing up each corner to meet in the middle, with some overlap. Fold the cling wrap up over, seal relatively tightly, then flip over and let sit for five minutes. Prep up the second nori wrap in the same way. Slice packets in half using a sharp, wetted knife, and enjoy either warm or (same day) cold. Dip in the miso ginger sauce as desired.
Step 44
FOR THE CAULIFLOWER Preheat your oven to 450°F and prepare your baking sheet with parchment paper. In a medium bowl, add water, flour, sea salt, black pepper, smoked paprika, dried parsley, red pepper flakes, garlic powder,, and whisk together until fully combined. Set aside. In a separate bowl, add bread crumbs and set aside also. Now, dip each cauliflower into the batter (shaking off any excess) and then toss it into bread crumbs. Then lay each cauliflower side by side on the baking sheet (about an inch apart). Repeat until all cauliflower is coated. Bake for 25–30 minutes or until golden brown and ‘crunchy’ looking. Be sure to flip each cauliflower on the opposite side halfway through baking time In the meantime, cook quinoa according to the packaging. FOR THE ORANGE SAUCE In a small saucepan on medium‑high heat, add all ingredients (except for the arrowroot starch) and bring to a slight boil whisking everything together. Once the sauce thickens a bit, reduce heat and add arrowroot starch mixture, whisking it in until sauce begins to thicken more. Remove from heat and set aside. When the cauliflower bites are done, remove them from the oven and carefully add them into the sauce immediately. Toss them carefully until fully coated. Sprinkle with sesame seeds. To serve, add a few spoonfuls of quinoa to a bowl, then top with orange cauliflower, and garnish with chopped green onions, optional.
Step 45
FOR THE CAULIFLOWER Preheat your oven to 450°F and prepare your baking sheet with parchment paper. In a medium bowl, add water, flour, sea salt, black pepper, smoked paprika, dried parsley, red pepper flakes, garlic powder,, and whisk together until fully combined. Set aside. In a separate bowl, add bread crumbs and set aside also. Now, dip each cauliflower into the batter (shaking off any excess) and then toss it into bread crumbs. Then lay each cauliflower side by side on the baking sheet (about an inch apart). Repeat until all cauliflower is coated. Bake for 25–30 minutes or until golden brown and ‘crunchy’ looking. Be sure to flip each cauliflower on the opposite side halfway through baking time In the meantime, cook quinoa according to the packaging.
Step 46
FOR THE ORANGE SAUCE In a small saucepan on medium‑high heat, add all ingredients (except for the arrowroot starch) and bring to a slight boil whisking everything together. Once the sauce thickens a bit, reduce heat and add arrowroot starch mixture, whisking it in until sauce begins to thicken more. Remove from heat and set aside. When the cauliflower bites are done, remove them from the oven and carefully add them into the sauce immediately. Toss them carefully until fully coated. Sprinkle with sesame seeds. To serve, add a few spoonfuls of quinoa to a bowl, then top with orange cauliflower, and garnish with chopped green onions, optional.
Step 47
Mash chickpeas with a fork, potato masher, or pastry blender. Stir in all other salad ingredients until well‑combined. Serve between slices of toasted wholegrain bread, and top with sliced tomato, avocado, and romaine lettuce. Enjoy!
Step 48
FOR THE TOFU Begin by preparing the tofu. Open the tofu package, drain, and press the tofu for 10–15 minutes. While the tofu is being pressed, if you need to make your rice – start it. Cut and wash the broccoli (if fresh). Prepare a large pot to steam the broccoli for about 5 minutes. Here is a quick video on how to steam broccoli. Once done, set aside. When the tofu is pressed, cut into uniform cubes. Add to a mixing bowl. Drizzle with one tablespoon maple syrup and a pinch of cayenne pepper. Lightly toss. Next, add four tablespoons of cornstarch and toss them together. Use a rubber scraper to fold the tofu to help prevent it from crumbling. Heat a large skillet to medium‑high heat. Once hot, add one tablespoon of oil. Once the oil is hot, add the tofu into as even of a layer across the pan as possible. Allow the tofu to brown for about 4–5 minutes and flip tofu, aiming to brown all sides (if possible). While the tofu is cooking, make the sauce. FOR THE SAUCE In a small bowl, add the ginger, garlic, red chili flakes, rice vinegar, sesame oil, coconut aminos, hoisin sauce, onion powder, sugar, cornstarch, and ¼ cup vegetable broth/stock (water would do fine as well). Stir until well combined. TO ASSEMBLE When the tofu is browned to your liking, add the sauce. Mix and gently coat the tofu with the sauce and cook for 3–4 minutes. The sauce should thicken a little as it heats. Feel free to add the cooked broccoli to the pan to add some sauce to the broccoli – or simply keep it on the side. Serve tofu and broccoli over cooked brown rice. Enjoy!
Step 49
FOR THE TOFU Begin by preparing the tofu. Open the tofu package, drain, and press the tofu for 10–15 minutes. While the tofu is being pressed, if you need to make your rice – start it. Cut and wash the broccoli (if fresh). Prepare a large pot to steam the broccoli for about 5 minutes. Here is a quick video on how to steam broccoli. Once done, set aside. When the tofu is pressed, cut into uniform cubes. Add to a mixing bowl. Drizzle with one tablespoon maple syrup and a pinch of cayenne pepper. Lightly toss. Next, add four tablespoons of cornstarch and toss them together. Use a rubber scraper to fold the tofu to help prevent it from crumbling. Heat a large skillet to medium‑high heat. Once hot, add one tablespoon of oil. Once the oil is hot, add the tofu into as even of a layer across the pan as possible. Allow the tofu to brown for about 4–5 minutes and flip tofu, aiming to brown all sides (if possible). While the tofu is cooking, make the sauce.
Step 50
FOR THE SAUCE In a small bowl, add the ginger, garlic, red chili flakes, rice vinegar, sesame oil, coconut aminos, hoisin sauce, onion powder, sugar, cornstarch, and ¼ cup vegetable broth/stock (water would do fine as well). Stir until well combined.
Step 51
TO ASSEMBLE When the tofu is browned to your liking, add the sauce. Mix and gently coat the tofu with the sauce and cook for 3–4 minutes. The sauce should thicken a little as it heats. Feel free to add the cooked broccoli to the pan to add some sauce to the broccoli – or simply keep it on the side. Serve tofu and broccoli over cooked brown rice. Enjoy!
Step 52
In a bowl, add dried TVP. In a small saucepan, boil water with a bouillon cube. Add boiling, seasoned water to TVP, mix to combine, and set aside to rehydrate for 10–15 minutes. In the same small saucepan on low heat, add vegan shredded cheese, Cajun seasoning, and almond milk. Heat on low, constantly stirring until you have a cheese sauce. Keep warm until you are ready to assemble your crunchwraps. Once TVP is rehydrated, add four tablespoons of oil to a pan on medium heat. Sauté onions until translucent and fragrant, about 5–7 minutes. Add minced garlic and sauté for an additional 1–2 minutes. Add rehydrated TVP and taco seasoning packet and mix thoroughly. Cook until heated through, about 7–8 minutes. Turn heat to low or simmer, and cover to keep warm until you are ready to assemble. Heat refried beans on the stovetop or in the microwave right before you are about to assemble your crunchwrap. Fry corn tortillas in oil until they are crispy. Make sure you fry them flat like a tostada shell. Heat large flour tortillas in the microwave until they are soft enough to fold, about 20–30 seconds. To assemble your crunchwrap supremes, add 2–3 tablespoons vegan ground beef (TVP) mixture to the center of the large flour tortilla. Drizzle with as much cheese sauce as you’d like. Add crispy tostada shell directly on top of the vegan ground beef and nacho cheese. Spread sour cream and refried beans on top of a crispy tostada. Top with lettuce, tomatoes, and avocado. Fold the flour tortilla over the entire center. Continue to fold, working around the whole tortilla until it is fully wrapped. If you’ve stuffed your crunchwrap too much, tear another piece of the flour tortilla and place it in the center, then fold around it. On a pan on medium‑low heat, place crunchwrap supreme folded side down until browned and crispy, about 5–10 minutes. Flip and cook on the other side until browned and crispy, an additional 5–10 minutes. Serve crunchwraps warm with hot sauce.
Step 53
Heat the olive oil over medium heat in a small skillet. Add the garlic. Sauté for 1 to 2 minutes; watch it carefully, so it doesn’t burn and turn down the heat a bit if necessary. Add the cannellini beans, oregano, salt, and pepper and sauté for 4 to 5 minutes until hot. To serve: Mash ½ of an avocado on each slice of toast. Spoon one‑quarter of the bean mixture over the mashed avocado on each slice. Drizzle with BBQ sauce and sprinkle with hemp seeds.
Step 54
FOR THE MARINATED TOFU Mix marinade ingredients in a shallow dish. Place tofu in the dish and coat with marinade. Let sit for 30 minutes, flip over, and let sit for another 30 minutes on the other side. Remove tofu from the marinade and grill on a pre‑heated grill pan for about 7 minutes on each side. Remove to a cutting board and slice into eight equal pieces. Set aside. FOR THE ROASTED RED PEPPER While tofu is marinating, place the red pepper on a baking tray and broil for a total of 30 minutes, rotating it twice at 10 minutes and 20 minutes to ensure even broiling. Remove the pepper from the oven and let cool. Peel the skin from the pepper. Pull out the stem and open the pepper up. Remove the seeds and dry the pepper in some paper towel or using a dish towel to remove excess moisture.
Step 55
FOR THE MARINATED TOFU Mix marinade ingredients in a shallow dish. Place tofu in the dish and coat with marinade. Let sit for 30 minutes, flip over, and let sit for another 30 minutes on the other side. Remove tofu from the marinade and grill on a pre‑heated grill pan for about 7 minutes on each side. Remove to a cutting board and slice into eight equal pieces. Set aside.
Step 56
FOR THE ROASTED RED PEPPER While tofu is marinating, place the red pepper on a baking tray and broil for a total of 30 minutes, rotating it twice at 10 minutes and 20 minutes to ensure even broiling. Remove the pepper from the oven and let cool. Peel the skin from the pepper. Pull out the stem and open the pepper up. Remove the seeds and dry the pepper in some paper towel or using a dish towel to remove excess moisture.
Step 57
FOR THE MARINATED TOFU Mix marinade ingredients in a shallow dish. Place tofu in the dish and coat with marinade. Let sit for 30 minutes, flip over, and let sit for another 30 minutes on the other side. Remove tofu from the marinade and grill on a pre‑heated grill pan for about 7 minutes on each side. Remove to a cutting board and slice into eight equal pieces. Set aside. FOR THE ROASTED RED PEPPER While tofu is marinating, place the red pepper on a baking tray and broil for a total of 30 minutes, rotating it twice at 10 minutes and 20 minutes to ensure even broiling. Remove the pepper from the oven and let cool. Peel the skin from the pepper. Pull out the stem and open the pepper up. Remove the seeds and dry the pepper in some paper towel or using a dish towel to remove excess moisture. Slice the roasted red pepper and split it into four equal portions. FOR THE ROASTED ONION SLICES Preheat oven to 350°F. Peel the onion and slice width‑wise into circles about ½ inch thick. Lay each onion slice flat on a baking tray lined with parchment paper and brush with a little olive oil on both sides. Add a pinch of salt and pepper. Roast for 25 minutes, turning halfway through. Separate rings into four equal portions and set them aside. FOR THE ASSEMBLY Spread two teaspoons of mayo on each wrap. You can sub with any other spread that you enjoy, such as hummus or pesto. Spread an even number of baby spinach leaves down one side of the wrap (about 8), leaving about 2 inches of space to be folded over. Layer red pepper, onions, two slices of tofu, sprouts, and hot sauce, leaving some space at the bottom of the wrap to be folded. Fold up the bottom of the wrap and roll up the wrap with the seam side down. These wraps can be heated on a grill if desired.
Step 58
FOR THE MARINATED TOFU Mix marinade ingredients in a shallow dish. Place tofu in the dish and coat with marinade. Let sit for 30 minutes, flip over, and let sit for another 30 minutes on the other side. Remove tofu from the marinade and grill on a pre‑heated grill pan for about 7 minutes on each side. Remove to a cutting board and slice into eight equal pieces. Set aside.
Step 59
FOR THE ROASTED RED PEPPER While tofu is marinating, place the red pepper on a baking tray and broil for a total of 30 minutes, rotating it twice at 10 minutes and 20 minutes to ensure even broiling. Remove the pepper from the oven and let cool. Peel the skin from the pepper. Pull out the stem and open the pepper up. Remove the seeds and dry the pepper in some paper towel or using a dish towel to remove excess moisture. Slice the roasted red pepper and split it into four equal portions.
Step 60
FOR THE ROASTED ONION SLICES Preheat oven to 350°F. Peel the onion and slice width‑wise into circles about ½ inch thick. Lay each onion slice flat on a baking tray lined with parchment paper and brush with a little olive oil on both sides. Add a pinch of salt and pepper. Roast for 25 minutes, turning halfway through. Separate rings into four equal portions and set them aside.
Step 61
FOR THE ASSEMBLY Spread two teaspoons of mayo on each wrap. You can sub with any other spread that you enjoy, such as hummus or pesto. Spread an even number of baby spinach leaves down one side of the wrap (about 8), leaving about 2 inches of space to be folded over. Layer red pepper, onions, two slices of tofu, sprouts, and hot sauce, leaving some space at the bottom of the wrap to be folded. Fold up the bottom of the wrap and roll up the wrap with the seam side down. These wraps can be heated on a grill if desired.
Step 62
Cut your tempeh to size to perfectly fit each bun. Add to a shallow dish and cover with enough barbecue sauce to coat fully. Lightly flip each piece until covered. Set aside until needed. You can marinate overnight for even more flavor. Wash and thinly slice your purple cabbage. Transfer to a large bowl with shredded carrots. In a medium bowl, add kale ripped from the stem into bite‑size pieces. Massage with lemon juice and a touch of oil. This will help break it down and remove any bitter flavor. Test a piece to see if it’s still bitter, you’ll know it’s ready when the bitterness goes away, and it reduces in size. Mix kale, carrots, and cabbage with a little liquid sweetener (like agave nectar), salt, and pepper, to taste. Cover and refrigerate until needed. Heat a grill pan to medium heat and lightly oil as needed. Place tempeh at a diagonal and cook for 4–5 minutes, flip, and repeat. Toast slider buns as desired. Assemble with grilled tempeh, kale slaw, and a touch of vegan mayonnaise and/or mustard on top. Serve warm.
Step 63
FOR THE RAINBOW SUSHI Begin by making sushi rice. Rinse rice thoroughly, then add to saucepan with water—Cook rice for 15 minutes or as instructed on the package. Remove from heat and fluff with a wooden spoon. Cover with a tea towel and let cool long enough to be able to handle with your hands. While you are waiting for the rice, prepare your veg. Thinly slice cabbage, and cut the carrot into matchsticks (I recommend using a mandolin for this). Chop kale leaves into small pieces, discarding the stems. Thinly slice avocado. Place bamboo sushi mat on the workstation (you can also use plastic wrap if you don’t have a bamboo sushi mat). Lay nori sheet on top of the mat and gently press sushi rice on top to cover nori sheet in a thin layer. Arrange veggies in an even layer (avocado, red cabbage, carrot, kale, and alfalfa, parallel to the edge of the nori sheet, leaving about 1‑inch of rice at the top undecorated. Gently roll the bamboo mat away from you to roll the nori sheet into a log like a burrito. (For a tightly packed roll, tuck the veg with your fingers as you go). Once in a roll, use a little bit of water to seal the edge. Slice sushi roll into bite-sized sushi pieces with a sharp knife and set aside. Continue this process until you’ve used all the rice, nori sheets, and veg. FOR THE TAMARI ALMOND BUTTER SAUCE Add almond butter, tamari, miso, lemon juice, cayenne pepper flakes, and water to a bowl. Whisk until smooth and creamy. Optional to add more water to thin if desired.
Step 64
FOR THE RAINBOW SUSHI Begin by making sushi rice. Rinse rice thoroughly, then add to saucepan with water—Cook rice for 15 minutes or as instructed on the package. Remove from heat and fluff with a wooden spoon. Cover with a tea towel and let cool long enough to be able to handle with your hands. While you are waiting for the rice, prepare your veg. Thinly slice cabbage, and cut the carrot into matchsticks (I recommend using a mandolin for this). Chop kale leaves into small pieces, discarding the stems. Thinly slice avocado. Place bamboo sushi mat on the workstation (you can also use plastic wrap if you don’t have a bamboo sushi mat). Lay nori sheet on top of the mat and gently press sushi rice on top to cover nori sheet in a thin layer. Arrange veggies in an even layer (avocado, red cabbage, carrot, kale, and alfalfa, parallel to the edge of the nori sheet, leaving about 1‑inch of rice at the top undecorated. Gently roll the bamboo mat away from you to roll the nori sheet into a log like a burrito. (For a tightly packed roll, tuck the veg with your fingers as you go). Once in a roll, use a little bit of water to seal the edge. Slice sushi roll into bite-sized sushi pieces with a sharp knife and set aside. Continue this process until you’ve used all the rice, nori sheets, and veg.
Step 65
FOR THE TAMARI ALMOND BUTTER SAUCE Add almond butter, tamari, miso, lemon juice, cayenne pepper flakes, and water to a bowl. Whisk until smooth and creamy. Optional to add more water to thin if desired.
Step 66
Preheat oven to 350°F. Heat oil in a pan over medium‑high heat and sauté garlic and onion for two minutes or until translucent. Then add mushrooms and lentils and sauté for another 2–3 minutes. Transfer the mushroom mix into a food processor and add panko, Worcestershire sauce, parsley, and onion salt. Process until the mixture is well combined but still a little chunky. Take a cookie tray lined with parchment paper, and start rolling your meatballs into 2‑inch‑thick balls. Brush with olive oil, then put them in the oven for 20–25 minutes. Sauté your onions with olive oil in a pan for 2–3 minutes. Add in your mushrooms and continue sautéing for another 2–3 minutes. Set aside. Add all of your ingredients for the gravy into a saucepan except for the cornstarch and your sautéed mushrooms and bring to a slow simmer. In a small bowl, make a slurry with your cornstarch and water and whisk until well combined. Slowly incorporate the slurry into the gravy while whisking constantly. Add in your sautéed mushroom mix. Serve over pasta or mashed potatoes and garnish with parsley.
Step 67
Preheat oven to 400°F degrees. Then take your firm tofu out of the package and wrap it in a towel for 5 minutes. Then, cut the tofu into cubes and add to a large mixing bowl. Gently toss with the tapioca flour, salt, and garlic powder and bake for 20 minutes. Meanwhile, in a medium mixing bowl, add in all the sauce ingredients. Mix and pour onto a saucepan. Cook over medium heat for 5–10 minutes. The sauce will start to thicken and reduce. Turn heat off, so it does not overcook. When the tofu is finished baking, add to the saucepan and gently mix to coat. Sprinkle the salted sesame seeds on top and serve with rice and some steamed veggies.
Step 68
Start by running water through the quinoa. You can run this under the tap for a little while. Then, drain out the water and leave to sit. Using a pot or rice cooker, add the brown rice and double the volume of water. Cook for 20‑minutes. We find sometimes cooking brown rice can take a little longer, so just check back in 20‑minutes to see how the rice is doing after adding a little bit of water if required. Next, prepare all of the ingredients by finely chopping them. You should also roughly chop the parsley. Start by frying onions in a little bit of oil. Then add the peppers and carrots. Prepare your vegetable stock. This includes boiling 300 ml of water and stirring in the vegetable stock. Add the soya single cream. When the vegetables are lightly fried and in the chopped tomatoes and vegetable stock. Next, add the butter beans and then the quinoa. Add all the herbs, spices, and optional nutritional yeast. Put the lid onto your pan and leave on medium heat, simmering for the next 20 minutes. Check occasionally to give the mixture a quick stir to ensure it doesn’t stick to the bottom of your pan. When the mixture is nearly ready, add a squeeze of lime juice and lime zest. Check to make sure the quinoa is cooked. If not, then add a little extra liquid and leave for another 5 minutes. Plate up your rice. Feel free to garnish the dish with half an avocado which we cut into 1cm slices, and an extra squeeze of lime juice.
Step 69
TO MAKE THE PATTIES Fry the seeds with three tablespoons of water for 10 minutes. Pour ²⁄³ of the beans together with oatmeal, miso paste, and spices in the food processor. Finely chop the mushrooms. Add one tablespoon of oil to a hot pan, fry mushrooms on medium to high heat for 6 minutes. Season with ½ teaspoon salt Add the fried mushrooms, the grated onion, the remaining beans, flax seeds, and walnuts to the pesto mass and chop them with the ‘pulse’ function of the food processor. Make four patties and place them on a piece of baking paper until roasting. Pour oil into a hot pan, fry patties at medium to high heat for 5 minutes per side. TO MAKE THE SAUCE Blend all the ingredients. TO MAKE THE BURGERS Cut the tomatoes, cucumbers, and the remaining onion into thin slices. Cut the vegan bacon pieces in half. Bake burger buns with the cut side up in a hot pan without oil or on the grill for a 1-minute warm-up. Each with sauce, lettuce, a patty, pickles, vegan bacon, tomatoes, and onion slices.
Step 70
TO MAKE THE PATTIES Fry the seeds with three tablespoons of water for 10 minutes. Pour ²⁄³ of the beans together with oatmeal, miso paste, and spices in the food processor. Finely chop the mushrooms. Add one tablespoon of oil to a hot pan, fry mushrooms on medium to high heat for 6 minutes. Season with ½ teaspoon salt Add the fried mushrooms, the grated onion, the remaining beans, flax seeds, and walnuts to the pesto mass and chop them with the ‘pulse’ function of the food processor. Make four patties and place them on a piece of baking paper until roasting. Pour oil into a hot pan, fry patties at medium to high heat for 5 minutes per side.
Step 71
TO MAKE THE SAUCE Blend all the ingredients.
Step 72
TO MAKE THE BURGERS Cut the tomatoes, cucumbers, and the remaining onion into thin slices. Cut the vegan bacon pieces in half. Bake burger buns with the cut side up in a hot pan without oil or on the grill for a 1-minute warm-up. Each with sauce, lettuce, a patty, pickles, vegan bacon, tomatoes, and onion slices.
Step 73
In a small bowl or dish, add one tablespoon of ground flaxseed and three tablespoons of water. Let it sit for 5–10 minutes while you prepare the rest of the burger. Heat a medium saucepan to medium heat. Once heated, add the diced red onion. Saute the red onion until translucent, about 5 minutes. Add one tablespoon of water as needed if the onions begin to stick. Next, add the minced garlic until it becomes fragrant, about 30 seconds – 1 minute. Transfer onion and garlic to a large bowl. Using a food processor, add the drained and rinsed chickpeas. Pulse until the mixture is broken down into small pieces, but before it starts to become a smooth mixture. Add to the onion and garlic mixture. Next, grind the raw cashews into small pieces, similar to the chickpeas. Add to the same large bowl. If needed, grind your oats to make oat flour. Add to same large bowl. To the mixture in the large bowl, add the oregano, thyme, rosemary, fresh basil, balsamic vinegar, flax & water mixture, salt & pepper. Mix until combined. The mixture should be sticking together without sticking to your hands too much. If the mixture is too dry, add one tablespoon of water as needed. If the mixture is too wet, add one tablespoon of oat flour, if needed. Feel free to taste the uncooked mixture at this point to adjust the seasonings, if needed. Patty the mixture into four burger patties. Preheat a non‑stick skillet, stovetop pan, or grill to medium heat. (If you do not have a non‑stick surface, you may have to add a small amount of oil.) Add each patty and cook until browned, about 5 minutes on each side. Once done, assemble the burgers with desired toppings.
Step 74
Preheat the oven to 400°F. Clean the butternut squashes, cut them in half lengthwise, and scoop out the seeds and strings. Place them face up on a baking tray, sprinkle some salt on top of each. Next, chop two of the lemon thyme springs and sprinkle them on top of each half. Add the four large garlic cloves (unpeeled) along with the squash halves, and bake for 45 minutes, removing the baked garlic cloves from the tray after 20 min in. if you’d like a deeper caramelization of the squash, you can set to broil for an extra 5 minutes. After the squash is baked and fork‑tender, leave to rest for 5–10 minutes before scooping the flesh from the skin. Add all the cooked butternut squash to a high‑speed blender along with the following ingredients baked garlic cloves (squeeze the baked garlic from the clove), chop the remaining lemon thyme, coconut aminos, coconut cream (optional), salt, smoked sweet paprika, Italian seasoning, and veggie stock. Start blending at low speed until all ingredients start mixing, and gradually increase the speed to high. For obtaining creamy soup blend for up to 2 minutes. Serve!
Step 75
Add the garlic‑infused olive oil to a large heavy‑bottomed saucepan over medium heat. Once warmed, add the carrots and the green parts of the spring onions to cook for about 8 min. Add the balsamic vinegar, and stir to combine. Continue by adding the chopped fresh tomatoes, tomato paste, and tomato passata. Stir to combine. Then add the red wine, season with salt, pepper, add Italian herbs, mix according to taste, and add sugar if needed. Add the lentils and let the sauce simmer for 10 to 15 min. You can add a bit of water to thin the sauce out, if necessary. You can serve it as it is or with a pasta of choice. To keep it vegan, sprinkle nutritional yeast or vegan parmesan on top.
Step 76
Preheat the oven to 275°F (140°C). In a food processor, combine the chickpeas and tamari and process until smooth. Next, add the vital wheat gluten, nutritional yeast, onion powder, garlic powder, paprika, and salt. Pulse until well mixed. Transfer the mixture onto a work surface and knead with your hands for 1 to 2 minutes to fully incorporate. Divide the mixture into eight equal pieces and shape them into ¼‑inch (6 mm) thick patties. Heat the olive oil in a large skillet over medium heat. Add the patties in batches if needed, and cook until golden brown, about 5 minutes per side. Reduce the heat to low, add the water to the skillet, cover, and cook for 10 minutes, in batches with additional water if needed, for 10 to 15 minutes; they should be firm to the touch. Remove the patties from the skillet (do not wash) and place them on a rimmed baking sheet. Place them in the oven while you make the sauce. To make the sauce, add the mushrooms to the same skillet over medium heat and cook, stirring, until the mushrooms are tender, adding about One tablespoon (15 ml) of water, so the mushrooms don’t burn. Season with salt and pepper to taste. Remove the mushrooms from the skillet and set them aside. In the same skillet over medium heat, combine the almond butter and vegetable broth and cook, stirring to blend. Add the wine, lemon juice, capers, and parsley—season with salt and pepper to taste. Simmer until the sauce thickens a little, about 3 minutes. Add the butter, stirring until melted. Return the mushrooms to the skillet and cook for a minute to heat through. To serve, transfer the cutlets to a serving platter and drizzle with the sauce and mushrooms.
Step 77
To prepare the dough, first combine water, instant, yeast, sugar, and sea salt in a large mixing bowl. Slowly stream in the warm water, and mix until a dough forms. Once a soft dough forms, turn it onto a generously floured surface and knead until smooth, around 5 minutes. Place the smooth dough back into the bowl, then cover and rest for 30–40 minutes. To prepare the TVP, soak the TVP in warm water for 10 minutes. After 10 minutes, drain the water and squeeze out excess liquid from the rehydrated TVP. Set aside. To prepare the vermicelli, follow package instructions — usually, this involves soaking in room temperature water (around 10 minutes) and boiling in water (around 3–5 minutes). Roughly chop the noodles into 0.3–0.5 cm long strands. Set aside and prepare the rest of the filling. To prepare the filling, prepare all the vegetables as instructed. In a large pan on medium heat, start by sautéing mushrooms, garlic, and ginger together until most of the mushrooms’ moisture evaporates. Add the TVP and fry until lightly browned around 5 minutes. Add all remaining filling ingredients (except for vermicelli) and continue to sauté until cabbage is cooked for around 5 minutes. Once finished, take off the heat and stir in the chopped vermicelli. Taste and adjust seasoning, then place finished filling in the refrigerator to chill while preparing the dumpling wrappers. To make the dumplings, take your rested dough and gently press it down to squeeze out excess air. Roll the dough into a long log and use a knife to divide it into around 22–25 pieces evenly. Roll each piece of dough into round balls. Take a ball of dough and first gently press it to flatten. Then take a floured rolling pin and roll the dough out on all sides into a round sheet, thickest at the center. Take each wrapper and place it around a tablespoon of filling in the middle. Fold the dough up by pleating the sides (like an accordion) in a counterclockwise motion. Towards the end, keep your thumb in the middle and press down while spiraling to seal. Place the completed dumplings on a floured surface and loosely cover them while you prepare the rest. To fry the dumplings, heat up around two tablespoons of vegetable oil on medium‑high heat in a non‑stick pan. Place each dumpling in the pan (don’t overcrowd the pan as they will expand!) and fry until lightly browned around 1–2 minutes. Then, add three tablespoons of water and quickly cover with a lid to trap steam. If your lid doesn’t have a built‑in hole, leave a small hole so the dumplings won’t burst when you open the lid. Remove the lid once most of the water has evaporated, around 5 minutes. Turn the heat up to high and cook for an additional 2 minutes, or until crispy and golden‑brown. Top the finished dumplings with sesame seeds and chopped scallions. Serve warm.
Step 78
FOR THE ROASTED PEPPERS Roast peppers on the stovetop over medium‑high heat. A gas stove works the best, but it will work fine on an electric stove. Char the peppers on all sides, turning with a pair of tongs. When good and charred, steam them for 10 minutes in a covered dish or a paper bag rolled shut to hold in the steam. Take a paper towel and rub off the char. It’s ok to leave a little of the char. De‑stem, de‑seed, and remove skins of bell peppers and dice. Set aside. FOR THE SOUP While peppers are roasting, add the onion to a 5½ quart pot along with two tablespoons of sesame oil. Sauté on medium heat for about 5 minutes or until transparent. Next, add the garlic and the carrots to the onions. Cook for about six more minutes or until the garlic becomes golden. Finally, add the wine and bouillon cubes. Mash the bouillon and cook for about 2 minutes or until wine is reduced to a syrup. Add water, coconut milk, and lentils, then boil and turn down to medium‑low for about 20 minutes. Or until lentils and carrots are soft. Add the red peppers, vinegar, Tamari, and salt. Cook for about ten more minutes to incorporate the flavors.
Step 79
FOR THE ROASTED PEPPERS Roast peppers on the stovetop over medium‑high heat. A gas stove works the best, but it will work fine on an electric stove. Char the peppers on all sides, turning with a pair of tongs. When good and charred, steam them for 10 minutes in a covered dish or a paper bag rolled shut to hold in the steam. Take a paper towel and rub off the char. It’s ok to leave a little of the char. De‑stem, de‑seed, and remove skins of bell peppers and dice. Set aside.
Step 80
FOR THE SOUP While peppers are roasting, add the onion to a 5½ quart pot along with two tablespoons of sesame oil. Sauté on medium heat for about 5 minutes or until transparent. Next, add the garlic and the carrots to the onions. Cook for about six more minutes or until the garlic becomes golden. Finally, add the wine and bouillon cubes. Mash the bouillon and cook for about 2 minutes or until wine is reduced to a syrup. Add water, coconut milk, and lentils, then boil and turn down to medium‑low for about 20 minutes. Or until lentils and carrots are soft. Add the red peppers, vinegar, Tamari, and salt. Cook for about ten more minutes to incorporate the flavors.
Step 81
Preheat oven to 425°F. Lay cauliflower steaks and veggies onto a sheet pan. Sprinkle the potatoes and Brussels with ½ teaspoon garlic powder, ½ teaspoon onion powder, ¼ teaspoon salt, freshly ground black pepper, and drizzle three tablespoons of balsamic vinegar over them. In a small bowl, melt four tablespoons of non‑dairy butter. Drizzle 1 Tablespoon of the melted butter over the Brussels sprouts and potatoes. Toss them with your hand to coat the potatoes and Brussels sprouts evenly. Into the remaining 3 Tablespoons of butter, add lemon juice, the remaining ½ teaspoon of garlic and onion powder, the remaining ¼ teaspoon salt, and some freshly ground black pepper. Stir to combine. Using a brush, coat the cauliflower steaks, top, and bottom with the garlic butter mixture. Roast on the middle rack of a 425°F oven for 50–60 minutes or until everything is brown and tender, stopping after 30 minutes to flip the steaks and stir the potatoes and Brussels. While the cauliflower and veggies are in the oven, make the gremolata. Finely chop the lemon zest, parsley, garlic, and capers together and set aside. When the cauliflower and veggies are done, remove from oven, plate, and immediately sprinkle with gremolata. Serve.
Step 82
FOR THE ‘CHICKEN’ WINGS Add the silken tofu, nutritional yeast, vegan chicken broth, salt, onion powder, sage, thyme, and black pepper to a food processor. Blend until smooth. Add the mixture into a medium-sized bowl along with the vital wheat gluten. Mix to combine with a wooden spoon. Knead the mixture with clean hands for a few minutes until the dough has come together and the gluten is developing. Bring a large pot of vegan no‑chicken broth to a boil. Divide the dough into 12 pieces and shape them into wings. See video above. Carefully place them in the no‑chicken broth and boil for 40 minutes. Remove from boiling broth and place on a wire rack to cool. FOR THE TIKKA MASALA SAUCE Add 1–2 tablespoons of oil to a large pan on medium‑high heat. Mince the onion and add to the pan. After about 10 minutes, add the minced ginger and minced garlic. Cook for another 2 minutes or until fragrant. Then, add the tomato paste, garam masala, coriander, cumin, turmeric, and salt. Mix well and cook for about 2 minutes. Mix frequently and be careful not to burn. Deglaze the pan with the can of tomato sauce, no‑chicken broth, & chili powder. Simmer for 20 minutes, uncovered. After 20 minutes of simmering, whisk in the can of coconut milk. Simmer for 15 more minutes. Add red pepper flakes and more salt, if desired. Turn off heat and set aside. FOR THE RICE PAPER ‘SKIN’ AND DREDGE Add hot water to a large bowl. Or use leftover warm no‑chicken broth that you used to cook the wings once it has cooled. Dip one piece of rice paper in hot water and soak for a few seconds until soft. Cut it in half. Then, wrap one ‘chicken’ wing in the rice paper. Try to cover all sides. Set wing back on wire rack. Once the rice paper dries and gets slightly sticky, you’ll be able to press the rice paper down to coat more evenly. Continue until all wings have been wrapped in rice paper. In a small shallow bowl, add the non‑dairy milk or aquafaba. Then, in a separate shallow bowl, add the all-purpose flour and seasonings. Toss one wing into the dry flour mixture, coat evenly, and shake off excess. Then, toss in non‑dairy milk. Toss back into the dry mix, evenly coat the wing, and shake off excess. If using, place your skewer stick into the bottom part of the wing. Set back on wire rack. Continue until all wings have been tossed in the dredge. FOR FRYING WINGS AND SERVING Place a small pot filled halfway with oil on medium‑high heat. I use a small pot so I can use less oil. Just fry 2 or 3 at a time. Once the oil is about 300°F–325°F, fry the ‘chicken’ wings for about 3–5 minutes OR until golden brown and crispy. Flipping with tongs, if needed. Remove golden brown ‘chicken’ wings and place on a wire rack with a baking tray underneath to catch the oil. Continue until all wings have been fried. Return the sauce to a simmer to heat up and toss the fried ‘chicken’ wings in the tikka masala sauce. Once the wings have been coated and the sauce is warm, remove from heat and serve immediately!
Step 83
FOR THE ‘CHICKEN’ WINGS Add the silken tofu, nutritional yeast, vegan chicken broth, salt, onion powder, sage, thyme, and black pepper to a food processor. Blend until smooth. Add the mixture into a medium-sized bowl along with the vital wheat gluten. Mix to combine with a wooden spoon. Knead the mixture with clean hands for a few minutes until the dough has come together and the gluten is developing. Bring a large pot of vegan no‑chicken broth to a boil. Divide the dough into 12 pieces and shape them into wings. See video above. Carefully place them in the no‑chicken broth and boil for 40 minutes. Remove from boiling broth and place on a wire rack to cool.
Step 84
FOR THE TIKKA MASALA SAUCE Add 1–2 tablespoons of oil to a large pan on medium‑high heat. Mince the onion and add to the pan. After about 10 minutes, add the minced ginger and minced garlic. Cook for another 2 minutes or until fragrant. Then, add the tomato paste, garam masala, coriander, cumin, turmeric, and salt. Mix well and cook for about 2 minutes. Mix frequently and be careful not to burn. Deglaze the pan with the can of tomato sauce, no‑chicken broth, & chili powder. Simmer for 20 minutes, uncovered. After 20 minutes of simmering, whisk in the can of coconut milk. Simmer for 15 more minutes. Add red pepper flakes and more salt, if desired. Turn off heat and set aside.
Step 85
FOR THE RICE PAPER ‘SKIN’ AND DREDGE Add hot water to a large bowl. Or use leftover warm no‑chicken broth that you used to cook the wings once it has cooled. Dip one piece of rice paper in hot water and soak for a few seconds until soft. Cut it in half. Then, wrap one ‘chicken’ wing in the rice paper. Try to cover all sides. Set wing back on wire rack. Once the rice paper dries and gets slightly sticky, you’ll be able to press the rice paper down to coat more evenly. Continue until all wings have been wrapped in rice paper. In a small shallow bowl, add the non‑dairy milk or aquafaba. Then, in a separate shallow bowl, add the all-purpose flour and seasonings. Toss one wing into the dry flour mixture, coat evenly, and shake off excess. Then, toss in non‑dairy milk. Toss back into the dry mix, evenly coat the wing, and shake off excess. If using, place your skewer stick into the bottom part of the wing. Set back on wire rack. Continue until all wings have been tossed in the dredge.
Step 86
FOR FRYING WINGS AND SERVING Place a small pot filled halfway with oil on medium‑high heat. I use a small pot so I can use less oil. Just fry 2 or 3 at a time. Once the oil is about 300°F–325°F, fry the ‘chicken’ wings for about 3–5 minutes OR until golden brown and crispy. Flipping with tongs, if needed. Remove golden brown ‘chicken’ wings and place on a wire rack with a baking tray underneath to catch the oil. Continue until all wings have been fried. Return the sauce to a simmer to heat up and toss the fried ‘chicken’ wings in the tikka masala sauce. Once the wings have been coated and the sauce is warm, remove from heat and serve immediately!
Step 87
FOR THE INSTANT POT Press the saute button on the Instant Pot (IP) and heat for 2 minutes. Add the onion and saute for about 3 minutes, stirring frequently and adding a splash of water when the onion starts to stick. Turn the IP off and add the rice, garlic, paprika, turmeric, salt, black pepper, and cayenne and stir. Next, add the mushrooms and canned tomatoes and stir again. Finally, add the broth and stir. Lock the lid into place, making sure the nozzle is in the sealing position. Use the manual setting and set the timer for 23 minutes. Use the natural release method when the timer goes off. When all of the pressure is out of the pot, carefully remove the lid and add the green and yellow bell pepper. Lock the lid back into place, making sure the nozzle is in the sealing position. Set the timer for 1 minute using the manual mode. Use the quick release method when the timer goes off and carefully take off the lid when all the pressure is out. Add the artichoke hearts, peas, parsley, and Worcestershire sauce, and stir. FOR THE STOVETOP Heat a large stockpot over medium heat for about 2 minutes. Add ¼ cup of broth (60 ml) and the onion and garlic. Cook for about 4 minutes, until all the broth is absorbed and the onions and garlic are nice and cooked. Add the rice, paprika, turmeric, salt, black pepper, cayenne, and stir. Add the mushrooms and canned tomatoes and stir again. Add the remaining broth (2¼ cups / 530 ml) and bring to a boil. Reduce the heat to very low, cover the pot with a lid, and gently simmer for about 30 minutes. Add the green and yellow peppers, place the lid back on the pot and cook for another 5–10 minutes until the rice is fully cooked and most of the liquid is absorbed. Turn off the heat, add the artichoke hearts, peas, parsley, and Worcestershire sauce, and stir. Cover the pot and let rest for 5 minutes.
Step 88
FOR THE INSTANT POT Press the saute button on the Instant Pot (IP) and heat for 2 minutes. Add the onion and saute for about 3 minutes, stirring frequently and adding a splash of water when the onion starts to stick. Turn the IP off and add the rice, garlic, paprika, turmeric, salt, black pepper, and cayenne and stir. Next, add the mushrooms and canned tomatoes and stir again. Finally, add the broth and stir. Lock the lid into place, making sure the nozzle is in the sealing position. Use the manual setting and set the timer for 23 minutes. Use the natural release method when the timer goes off. When all of the pressure is out of the pot, carefully remove the lid and add the green and yellow bell pepper. Lock the lid back into place, making sure the nozzle is in the sealing position. Set the timer for 1 minute using the manual mode. Use the quick release method when the timer goes off and carefully take off the lid when all the pressure is out. Add the artichoke hearts, peas, parsley, and Worcestershire sauce, and stir.
Step 89
FOR THE STOVETOP Heat a large stockpot over medium heat for about 2 minutes. Add ¼ cup of broth (60 ml) and the onion and garlic. Cook for about 4 minutes, until all the broth is absorbed and the onions and garlic are nice and cooked. Add the rice, paprika, turmeric, salt, black pepper, cayenne, and stir. Add the mushrooms and canned tomatoes and stir again. Add the remaining broth (2¼ cups / 530 ml) and bring to a boil. Reduce the heat to very low, cover the pot with a lid, and gently simmer for about 30 minutes. Add the green and yellow peppers, place the lid back on the pot and cook for another 5–10 minutes until the rice is fully cooked and most of the liquid is absorbed. Turn off the heat, add the artichoke hearts, peas, parsley, and Worcestershire sauce, and stir. Cover the pot and let rest for 5 minutes.
Step 90
Optional step: soak the raisins in hot water for 30 minutes to allow them to re‑hydrate and plump up to result in a softer texture. In a large saute pan, toast the almonds over medium heat until slightly golden and fragrant, occasionally stirring to prevent burning. Transfer to a bowl and set aside. Add the olive oil and saute the garlic for about 1 minute, until fragrant. Add cauliflower rice, almonds, green onions, and raisins. Saute for about 8 minutes until the cauliflower is translucent and cooked. Remove from the heat and add the lemon zest, juice, salt, and pepper. Serve warm or chilled. Store in the refrigerator for up to four days.
Step 91
FOR THE BASE Preheat your oven to 180 degrees c and line a square baking tin with greaseproof paper. Place the oreo cookies into a food processor and blend until crumb‑like. In a mixing bowl, combine the flour, oreo crumbs, melted coconut oil, and maple syrup. Mix and bring together with your hands until a dough forms. Press the dough into the lined tin and pop into the oven to bake for 10 minutes until golden in color. Set aside to cool fully. FOR THE COOKIE BUTTER Place the cookies, melted coconut oil, and vanilla into a food processor and whizz up. Blend everything together, scraping down the sides. You want to do that for a total of around 10 minutes, stopping every 2 minutes, scraping down the sides to incorporate the mixture It should turn thick and glossy when it’s at this stage. Spoon the cookie butter on top of the base and level. Pop into the fridge to set. This will take around 1–2 hours. Press some dairy‑free white chocolate chips into the cookie butter (optional). Spoon the coconut whip on top of the cookie butter and level with a spoon, sprinkle over some pieces of Oreo cookies (optional). Place back into the fridge to set. Once everything is set, remove from the tin and slice into bars. Serve with more cookie crumbles and an extra drizzle of melted dairy‑free dark chocolate (optional). Serve chilled, as they will soften if left at room temperature for too long. Store in a sealed container in the fridge, best eaten within a few days.
Step 92
FOR THE BASE Preheat your oven to 180 degrees c and line a square baking tin with greaseproof paper. Place the oreo cookies into a food processor and blend until crumb‑like. In a mixing bowl, combine the flour, oreo crumbs, melted coconut oil, and maple syrup. Mix and bring together with your hands until a dough forms. Press the dough into the lined tin and pop into the oven to bake for 10 minutes until golden in color. Set aside to cool fully.
Step 93
FOR THE COOKIE BUTTER Place the cookies, melted coconut oil, and vanilla into a food processor and whizz up. Blend everything together, scraping down the sides. You want to do that for a total of around 10 minutes, stopping every 2 minutes, scraping down the sides to incorporate the mixture It should turn thick and glossy when it’s at this stage. Spoon the cookie butter on top of the base and level. Pop into the fridge to set. This will take around 1–2 hours. Press some dairy‑free white chocolate chips into the cookie butter (optional). Spoon the coconut whip on top of the cookie butter and level with a spoon, sprinkle over some pieces of Oreo cookies (optional). Place back into the fridge to set. Once everything is set, remove from the tin and slice into bars. Serve with more cookie crumbles and an extra drizzle of melted dairy‑free dark chocolate (optional). Serve chilled, as they will soften if left at room temperature for too long. Store in a sealed container in the fridge, best eaten within a few days.
Step 94
FOR THE RASPBERRY TOPPING Place all ingredients in a small saucepan and bring to a simmer. Let cook for about 7 minutes until mixture begins to thicken. Remove from heat and strain out the seeds. Reserve liquid in the fridge until ready to use. FOR THE CRUST Place all ingredients in a food processor and combine until you get a crumbly mass that sticks together. Place on the bottom of an 8×8 inch pan with parchment paper on the bottom. FOR THE FILLING Combine all ingredients in a food processor or blender and blend until very smooth. The best way to test this is by taking some of the mixture in between your fingers. If it is still gritty, keep blending! Once smooth, add filling on top of the crust. Take raspberry liquid and place dots all over the cheesecake, then swirl using a knife. Let cheesecake set in the freezer for 4–6 hours. Serve from frozen or let defrost.
Step 95
FOR THE RASPBERRY TOPPING Place all ingredients in a small saucepan and bring to a simmer. Let cook for about 7 minutes until mixture begins to thicken. Remove from heat and strain out the seeds. Reserve liquid in the fridge until ready to use.
Step 96
FOR THE CRUST Place all ingredients in a food processor and combine until you get a crumbly mass that sticks together. Place on the bottom of an 8×8 inch pan with parchment paper on the bottom.
Step 97
FOR THE FILLING Combine all ingredients in a food processor or blender and blend until very smooth. The best way to test this is by taking some of the mixture in between your fingers. If it is still gritty, keep blending! Once smooth, add filling on top of the crust. Take raspberry liquid and place dots all over the cheesecake, then swirl using a knife. Let cheesecake set in the freezer for 4–6 hours. Serve from frozen or let defrost.
Step 98
FOR THE CAKE To roast the hazelnuts, just add them to a baking pan and bake in the oven at 375°F for 10 minutes. Check often to make sure they don’t burn. Preheat oven to 350°F and oil your 8" round cake pans (batter makes two cakes). In a small bowl, prepare your chia egg and let it sit. Meanwhile, in a large bowl, add in the milk and vinegar and mix to let it curdle. Then add in the baking soda and stir to create some bubbles. Now add in all the remaining ingredients except the flours and mix to combine. Add in the hazelnut, oat, and GF flour and whisk together. The batter should be semi‑thick and pourable, so add more flour or milk to adjust. Pour half the batter into each cake pan (or you can make 24 muffins if you prefer). Bake cake for 35–45 minutes or until a toothpick comes out clean from the center. Then let it cool completely. FOR THE FROSTING Combine and whisk together the hazelnut butter, vegan butter, and icing sugar. FOR THE CHOCOLATE FROSTING Heat the hazelnut milk for 1 minute in the microwave. Add in the chocolate chips and let it sit for 1 minute. Then stir to combine. TO ASSEMBLE YOUR CAKE To assemble the cake, pour half of the hazelnut frosting over the bottom cake and spread. Then add in the roasted hazelnuts. Place the top cake on top and cover with the hazelnut frosting. Drizzle the chocolate frosting over the edges. Let the cake sit for an hour or so to set the chocolate. Transfer the bottom layer of the cooled cake to a serving plate/dish. Spread a semi‑generous layer of frosting on the top of the bottom layer and top generously with hazelnuts. Press down with hands to settle them into the frosting. Carefully top with second layer and frost the top generously, then the sides. Using a butter knife yields a smooth surface. It should be the perfect amount of frosting – not too thick, not too thin. Add hazelnuts around the perimeter of the top of the cake. Slice and serve. Will keep well‑covered at room temperature for several days, though best when fresh. Refrigeration not necessary.
Step 99
FOR THE CAKE To roast the hazelnuts, just add them to a baking pan and bake in the oven at 375°F for 10 minutes. Check often to make sure they don’t burn. Preheat oven to 350°F and oil your 8" round cake pans (batter makes two cakes). In a small bowl, prepare your chia egg and let it sit. Meanwhile, in a large bowl, add in the milk and vinegar and mix to let it curdle. Then add in the baking soda and stir to create some bubbles. Now add in all the remaining ingredients except the flours and mix to combine. Add in the hazelnut, oat, and GF flour and whisk together. The batter should be semi‑thick and pourable, so add more flour or milk to adjust. Pour half the batter into each cake pan (or you can make 24 muffins if you prefer). Bake cake for 35–45 minutes or until a toothpick comes out clean from the center. Then let it cool completely.
Step 100
FOR THE FROSTING Combine and whisk together the hazelnut butter, vegan butter, and icing sugar.
Step 101
FOR THE CHOCOLATE FROSTING Heat the hazelnut milk for 1 minute in the microwave. Add in the chocolate chips and let it sit for 1 minute. Then stir to combine.
Step 102
TO ASSEMBLE YOUR CAKE To assemble the cake, pour half of the hazelnut frosting over the bottom cake and spread. Then add in the roasted hazelnuts. Place the top cake on top and cover with the hazelnut frosting. Drizzle the chocolate frosting over the edges. Let the cake sit for an hour or so to set the chocolate. Transfer the bottom layer of the cooled cake to a serving plate/dish. Spread a semi‑generous layer of frosting on the top of the bottom layer and top generously with hazelnuts. Press down with hands to settle them into the frosting. Carefully top with second layer and frost the top generously, then the sides. Using a butter knife yields a smooth surface. It should be the perfect amount of frosting – not too thick, not too thin. Add hazelnuts around the perimeter of the top of the cake. Slice and serve. Will keep well‑covered at room temperature for several days, though best when fresh. Refrigeration not necessary.
Step 103
FOR THE DONUTS Mix the dry ingredients in a bowl, the wet ingredients in a second separate bowl. Now mix the wet and dry ingredients. Knead by hand or electric kneading machine for 5 minutes. Form a ball, coat a big bowl with oil, and put the ball in it. Cover it with some plastic wrap, put it in a warm place, and let it rise for 1–2 hours until doubled in size. When the dough has risen, take it out, place it on a flat surface and gently punch it down. Now, roll it out, about ½ inches. Don’t roll it out for too long; otherwise, the donuts will take longer to rise in the hot oil. Cut out the Donuts. Use a regular big cup. Place the cut-out donuts on a baking tray that is covered with parchment paper that has been coated with flour. Cover them with plastic wrap, place them in a warm spot and let them rise for another hour.
Step 104
FOR THE DONUTS Mix the dry ingredients in a bowl, the wet ingredients in a second separate bowl. Now mix the wet and dry ingredients. Knead by hand or electric kneading machine for 5 minutes. Form a ball, coat a big bowl with oil, and put the ball in it. Cover it with some plastic wrap, put it in a warm place, and let it rise for 1–2 hours until doubled in size. When the dough has risen, take it out, place it on a flat surface and gently punch it down. Now, roll it out, about ½ inches. Don’t roll it out for too long; otherwise, the donuts will take longer to rise in the hot oil. Cut out the Donuts. Use a regular big cup. Place the cut-out donuts on a baking tray that is covered with parchment paper that has been coated with flour. Cover them with plastic wrap, place them in a warm spot and let them rise for another hour.
Step 105
FOR THE DONUTS Mix the dry ingredients in a bowl, the wet ingredients in a second separate bowl. Now mix the wet and dry ingredients. Knead by hand or electric kneading machine for 5 minutes. Form a ball, coat a big bowl with oil, and put the ball in it. Cover it with some plastic wrap, put it in a warm place, and let it rise for 1–2 hours until doubled in size. When the dough has risen, take it out, place it on a flat surface and gently punch it down. Now, roll it out, about ½ inches. Don’t roll it out for too long; otherwise, the donuts will take longer to rise in the hot oil. Cut out the Donuts. Use a regular big cup. Place the cut-out donuts on a baking tray that is covered with parchment paper that has been coated with flour. Cover them with plastic wrap, place them in a warm spot and let them rise for another hour. TO FRY THE DONUTS Pour oil into a medium heavy bottom pot and heat it. Use a candy thermometer to regulate the temperature. Bring to 345°F. Not higher, not lower. When the oil is hot enough, add two donuts at a time. Fry each side for about 30–40 seconds. When golden brown, take them out and put them on paper towels to absorb the excess oil. Let them cool down completely. TO PREPARE THE VANILLA CUSTARD In a medium pot on medium/high heat, combine all the ingredients for the custard. Constantly stir with a whisker. When it starts to boil, reduce heat to low and continue to stir until you have a pudding-like consistency. When done, take off the stove and set aside. Take some plastic wrap and place on the surface of the custard. This will prevent the custard from forming a skin. Let it cool down completely. When cooled down, take an electric hand blender and blend the custard to turn it into a smooth paste. Set aside for now. TO FILL THE DONUTS Take the end of a tablespoon and push it into one side of the donut. Fill a piping bag with the vanilla custard and fill each donut with as much custard as possible. They will probably spill the excess custard out; just clean it up with a knife. Carefully move the spoon around to form a hole inside the donut. Repeat with the remaining donuts. PREPARE THE CHOCOLATE GLAZE Take a small/medium pot and fill it with about 1 inch of water. Place a bowl in the water and add the chopped chocolate to it. Bring the water to a light boil. Stir from time to time until the chocolate has melted. Add the coconut oil and combine well. Take off the stove and let it cool down for about 5 minutes. Now, take the donuts and dunk the top of them in the chocolate. Place them on a cooling rack and put them in the fridge until the chocolate is firm. DONE! Store them in an airtight container in the fridge and eat within four days. Enjoy!
Step 106
FOR THE DONUTS Mix the dry ingredients in a bowl, the wet ingredients in a second separate bowl. Now mix the wet and dry ingredients. Knead by hand or electric kneading machine for 5 minutes. Form a ball, coat a big bowl with oil, and put the ball in it. Cover it with some plastic wrap, put it in a warm place, and let it rise for 1–2 hours until doubled in size. When the dough has risen, take it out, place it on a flat surface and gently punch it down. Now, roll it out, about ½ inches. Don’t roll it out for too long; otherwise, the donuts will take longer to rise in the hot oil. Cut out the Donuts. Use a regular big cup. Place the cut-out donuts on a baking tray that is covered with parchment paper that has been coated with flour. Cover them with plastic wrap, place them in a warm spot and let them rise for another hour.
Step 107
TO FRY THE DONUTS Pour oil into a medium heavy bottom pot and heat it. Use a candy thermometer to regulate the temperature. Bring to 345°F. Not higher, not lower. When the oil is hot enough, add two donuts at a time. Fry each side for about 30–40 seconds. When golden brown, take them out and put them on paper towels to absorb the excess oil. Let them cool down completely.
Step 108
TO PREPARE THE VANILLA CUSTARD In a medium pot on medium/high heat, combine all the ingredients for the custard. Constantly stir with a whisker. When it starts to boil, reduce heat to low and continue to stir until you have a pudding-like consistency. When done, take off the stove and set aside. Take some plastic wrap and place on the surface of the custard. This will prevent the custard from forming a skin. Let it cool down completely. When cooled down, take an electric hand blender and blend the custard to turn it into a smooth paste. Set aside for now.
Step 109
TO FILL THE DONUTS Take the end of a tablespoon and push it into one side of the donut. Fill a piping bag with the vanilla custard and fill each donut with as much custard as possible. They will probably spill the excess custard out; just clean it up with a knife. Carefully move the spoon around to form a hole inside the donut. Repeat with the remaining donuts.
Step 110
PREPARE THE CHOCOLATE GLAZE Take a small/medium pot and fill it with about 1 inch of water. Place a bowl in the water and add the chopped chocolate to it. Bring the water to a light boil. Stir from time to time until the chocolate has melted. Add the coconut oil and combine well. Take off the stove and let it cool down for about 5 minutes. Now, take the donuts and dunk the top of them in the chocolate. Place them on a cooling rack and put them in the fridge until the chocolate is firm. DONE! Store them in an airtight container in the fridge and eat within four days. Enjoy!
Step 111
Preheat the oven to 345°F. Mix milk and apple cider vinegar. Stir and set aside for 10 minutes. After 10 minutes, add the rest of the liquid ingredients to the milk and vinegar mixture. Then, mix with the rest of the ingredients. Combine well. Line your cake tins with some parchment paper and pour the batter into them. Distribute it evenly between the four tins. Transfer them to the oven and let them bake for about 45 minutes or until done. You can check if the cake is ready or not by sticking a toothpick into the cake when the toothpick comes out clean. The cake is ready. When the cakes are done, take them out of the oven, put them on a cooling rack, and wait till they are completely cooled (leave them in the tins). When the cakes have cooled, transfer them to a flat surface. Use a cake cutter or a knife to cut off the tops and the caramelized sides. Take a round cookie cutter and cut out the middle of 2 cake layers. FOR THE BUTTERCREAM Add the plant‑based butter to a large bowl.
Step 112
FOR THE BUTTERCREAM Add the plant‑based butter to a large bowl.
Step 113
Preheat the oven to 345°F. Mix milk and apple cider vinegar. Stir and set aside for 10 minutes. After 10 minutes, add the rest of the liquid ingredients to the milk and vinegar mixture. Then, mix with the rest of the ingredients. Combine well. Line your cake tins with some parchment paper and pour the batter into them. Distribute it evenly between the four tins. Transfer them to the oven and let them bake for about 45 minutes or until done. You can check if the cake is ready or not by sticking a toothpick into the cake when the toothpick comes out clean. The cake is ready. When the cakes are done, take them out of the oven, put them on a cooling rack, and wait till they are completely cooled (leave them in the tins). When the cakes have cooled, transfer them to a flat surface. Use a cake cutter or a knife to cut off the tops and the caramelized sides. Take a round cookie cutter and cut out the middle of 2 cake layers. FOR THE BUTTERCREAM Add the plant‑based butter to a large bowl. Take an electric mixer and whisk the butter until it’s fluffy. Add the rest of the ingredients to the butter and whisk some more until everything is well combined. LAYER THE CAKE Start layering the cake. Take a whole layer of cake and place it on your lazy susan or simply put it on a flat plate. Spread about ¼ cup of buttercream on top. Now, take a cake layer with a cutout and place it on top. Spread some buttercream on it as well and also coat the sides of the hole. Repeat the previous step with another cake layer with a cutout. Now add vegan red berry compote to it to fill the whole hole. Then take the whole last layer of cake and put it on top. Add a crumble coat to the cake by adding enough buttercream to the top and the sides to bond the crumbs to the cake. Transfer the cake to the fridge and let it cool for about 30 minutes. Then, add the rest of the buttercream to the cake. Use a Dough Scraper to even out the top, then the sides. Again, transfer the cake to the fridge and let it cool for about 30 minutes. FOR THE SHATTERED GLASS Add all the ingredients to a pan and stir until the sugar has dissolved. Set to high heat. When the mixture starts to boil, stop stirring. Bring the sugar water mixture to 300°F. DON’T STIR. Use a candy thermometer to check. As soon as the mixture hits 300°F, take off the stove and pour into the brownie tin. Let the mixture cool down completely. When the candy glass is firm, use a knife to shatter it. Simply stab the glass a couple of times until there are pieces for the shatter. DECORATE THE CAKE Take a few glass pieces and stick them into the cake, top, and sides. Distribute them evenly. Sprinkle some red berry compote on the spots where the glass sticks to make it look like the cake is bleeding at that spot. DONE! Keep the cake in the fridge and eat it within four days. Enjoy!
Step 114
FOR THE BUTTERCREAM Add the plant‑based butter to a large bowl. Take an electric mixer and whisk the butter until it’s fluffy. Add the rest of the ingredients to the butter and whisk some more until everything is well combined.
Step 115
LAYER THE CAKE Start layering the cake. Take a whole layer of cake and place it on your lazy susan or simply put it on a flat plate. Spread about ¼ cup of buttercream on top. Now, take a cake layer with a cutout and place it on top. Spread some buttercream on it as well and also coat the sides of the hole. Repeat the previous step with another cake layer with a cutout. Now add vegan red berry compote to it to fill the whole hole. Then take the whole last layer of cake and put it on top. Add a crumble coat to the cake by adding enough buttercream to the top and the sides to bond the crumbs to the cake. Transfer the cake to the fridge and let it cool for about 30 minutes. Then, add the rest of the buttercream to the cake. Use a Dough Scraper to even out the top, then the sides. Again, transfer the cake to the fridge and let it cool for about 30 minutes.
Step 116
FOR THE SHATTERED GLASS Add all the ingredients to a pan and stir until the sugar has dissolved. Set to high heat. When the mixture starts to boil, stop stirring. Bring the sugar water mixture to 300°F. DON’T STIR. Use a candy thermometer to check. As soon as the mixture hits 300°F, take off the stove and pour into the brownie tin. Let the mixture cool down completely. When the candy glass is firm, use a knife to shatter it. Simply stab the glass a couple of times until there are pieces for the shatter.
Step 117
DECORATE THE CAKE Take a few glass pieces and stick them into the cake, top, and sides. Distribute them evenly. Sprinkle some red berry compote on the spots where the glass sticks to make it look like the cake is bleeding at that spot. DONE! Keep the cake in the fridge and eat it within four days. Enjoy!
Step 118
Preheat oven to 350°F. Line an 8 x 8‑inch pan with aluminum foil. In a small bowl, combine water and flaxseed meal. Place in refrigerator to thicken, about 10 minutes. While the flaxseed meal is in the refrigerator, prepare the rest of the batter. In the bowl of electric fitted with the paddle attachment, or with a hand mixer, beat butter with sugars on medium‑low speed until pale and creamy, about 3–5 minutes. Add vanilla extract and thickened flaxseed meal. Beat until combined. Whisk together flour, oat flour, oats, baking powder, baking soda, salt, and cinnamon in a separate bowl in a separate bowl. Add to butter/sugar mixture and mix until well combined. Fold in chocolate, reserving a few pieces to sprinkle over the top. Pour batter into prepared pan and bake for 18–20 minutes. Remove from oven and let cool in pan for 10 minutes, before using aluminum foil to pull the bars out of the pan. Place on a wire rack to cool completely. Once bars are completely cool, sprinkle with flaked sea salt and cut into squares.
Step 119
Preheat oven to 350°F. Combine the dry ingredients in a bowl. In a different bowl, whisk together the wet ingredients. Combine the wet and dry mixtures. Spoon the batter into greased muffin tins until ²⁄³ the way full. Bake for 25 minutes.
Step 120
To make the poached pears, slice the bottoms of the pears and peel them, leaving the stems attached. In a medium pot over high heat, bring the water, maple syrup, ginger, and wine (if using) to a boil. Place the pears in the pot so that they stand upright and reduce the heat to medium‑low. Simmer for 6 to 7 minutes until the pears are just tender, then carefully remove them from the pot and set them aside. Preheat the oven to 350°F (175°C) and line a 9 x 5–inch (23 x 13–cm) loaf pan with parchment paper. To make the cake, make a flax egg by combining the flaxseed with the water in a small bowl. Set the mixture aside and let it thicken. In a large bowl, combine the milk with the vinegar and let the milk curdle for 5 minutes to create vegan buttermilk. Add the oil, date syrup, pumpkin puree, and flax egg and combine. In another large bowl, whisk together the flour, baking powder, coconut sugar, cinnamon, ginger, nutmeg, cloves, cardamom, and salt. Pour the buttermilk mixture into the flour mixture and beat with an electric mixer on low speed until just combined (don’t overmix). Pour the batter into the prepared loaf pan and gently place the pears inside so that they are standing upright, surrounded by the batter. Bake, covered, for 35 minutes. Uncover the loaf pan and bake for another 10 minutes. Let the bread cool slightly before transferring it to a wire rack to finish cooling. To make the orange glaze, combine the orange juice and powdered sugar in a small bowl and mix until smooth and pourable. (Add more or less orange juice depending on the desired consistency.) Drizzle the glaze on top of the bread and serve while it’s still warm.
Step 121
TO MAKE THE BASE Preheat the oven to 350°F. Add the walnuts and pistachios to a food processor. Pulse until it reaches coarse crumbs, then remove the blade of the food processor. Add the maple syrup, cinnamon, and rose water (if using) to the nuts and mix with a spoon. Set aside. Line a tart tin with baking paper. If your filo pastry is rectangular, cut it in half along the width. Place one layer of filo pastry in the tart tin allowing the ends of the pastry to pop over the tin. Brush the pastry with oil and repeat with half of the pastry to cover the entire tart tin. Scoop a few tablespoons of the baklava mixture on the base of the tart and spread it evenly. Layer and repeat with the remaining pastry. Bake the pastry in the oven for 10 to 15 minutes, or until the middle of the tart is golden. FOR THE CUSTARD Add the cornstarch to a medium‑size, deep saucepan with just enough soy milk to cover. Whisk until there are no more lumps of cornstarch. Add all the remaining custard ingredients to the saucepan and place it over high heat. Bring the custard to a boil for 3 minutes while whisking to make sure it doesn’t stick to the bottom of the pan. Reduce to low‑medium heat and whisk for around ten minutes, or until it reaches a thick custard consistency. If there are lumps in your custard, blend it with a stick blender until smooth. Set aside the saucepan to cool for about 15 minutes. TO ASSEMBLE THE DESSERT While the custard is warm (but not hot), slowly pour it into your tart crust. If needed, smooth the surface with the back of a spoon. Leave the tart at room temperature for about 30 minutes, then set aside in the fridge for at least 2 hours or overnight. When the custard has fully set, sprinkle with the remaining baklava topping and drizzle with additional maple syrup. Serve!
Step 122
TO MAKE THE BASE Preheat the oven to 350°F. Add the walnuts and pistachios to a food processor. Pulse until it reaches coarse crumbs, then remove the blade of the food processor. Add the maple syrup, cinnamon, and rose water (if using) to the nuts and mix with a spoon. Set aside. Line a tart tin with baking paper. If your filo pastry is rectangular, cut it in half along the width. Place one layer of filo pastry in the tart tin allowing the ends of the pastry to pop over the tin. Brush the pastry with oil and repeat with half of the pastry to cover the entire tart tin. Scoop a few tablespoons of the baklava mixture on the base of the tart and spread it evenly. Layer and repeat with the remaining pastry. Bake the pastry in the oven for 10 to 15 minutes, or until the middle of the tart is golden.
Step 123
FOR THE CUSTARD Add the cornstarch to a medium‑size, deep saucepan with just enough soy milk to cover. Whisk until there are no more lumps of cornstarch. Add all the remaining custard ingredients to the saucepan and place it over high heat. Bring the custard to a boil for 3 minutes while whisking to make sure it doesn’t stick to the bottom of the pan. Reduce to low‑medium heat and whisk for around ten minutes, or until it reaches a thick custard consistency. If there are lumps in your custard, blend it with a stick blender until smooth. Set aside the saucepan to cool for about 15 minutes.
Step 124
TO ASSEMBLE THE DESSERT While the custard is warm (but not hot), slowly pour it into your tart crust. If needed, smooth the surface with the back of a spoon. Leave the tart at room temperature for about 30 minutes, then set aside in the fridge for at least 2 hours or overnight. When the custard has fully set, sprinkle with the remaining baklava topping and drizzle with additional maple syrup. Serve!
Step 125
Line a baking sheet with parchment paper. Make sure it can fit in your freezer. Set aside. Beat together the coconut oil, vanilla, and coconut sugar until smooth. Add almond flour, tapioca flour, and sea salt. Beat until smooth. Stir in ¼ cup chocolate chips. Roll dough into 1–2 tablespoon-sized balls. Place on a baking sheet and put a stick into the middle of each. Freeze for 30 minutes. Once cookie dough pops are frozen, melt the remaining chocolate chips in the microwave in 30-second increments until melted and smooth. Dip each cake pop into the chocolate, and swirl to coat completely. Sprinkle with optional toppings and set back on the baking tray. Place pops back in the freezer for 20 minutes or until set. Keep in the refrigerator until ready to enjoy.
Step 126
Combine the dry ingredients in a large bowl. Mix in the wet ingredients and stir to form a dough. Roll into a ball and refrigerate for 1–2 hours or longer for best results. Preheat the oven to 325°F and form the dough into cookie balls. Place them on a parchment paper‑lined baking tray, leaving about 2 inches around each cookie. Bake for 12–13 minutes. They might look undercooked when you take them out, but they continue to cook and get harder on the outside as they cool. Let them cool down for about 10 minutes, and enjoy!
Step 127
Blend all of the ingredients for the white chocolate layer in a high-speed blender or food processor until smooth. Blend all of the ingredients for the mocha layer in a high-speed blender or food processor until smooth. Layer the white chocolate and the mocha layers in jars,, refrigerate them for a few hours or freeze for 30 to 40 minutes before serving.
Step 128
FOR THE CHOCOLATE SAUCE To begin, bring the water, salt, and ¼ cup vegetable oil to a low boil in a medium saucepan. Once boiling, remove the mixture from heat and pour into a mixing bowl with the flour. Stir until well‑combined, then let the dough cool for about 15 minutes. In the meantime, make the cinnamon sugar coating by combining the sugar and cinnamon in a shallow bowl or plate. Set aside. Once it has cooled, transfer the dough to a piping bag with a large star‑tip attachment. Then, bring 5–6 cups of vegetable oil (enough to submerge the churros fully) to 350°F–375°F in a deep pot. It’s ideal to use a thermometer when working with oil. If you don’t have one, test if the oil is ready by dropping a small piece of dough in. If it sizzles and floats to the top, then you should be good to go. Squeeze 2–3 pieces of dough out at a time over the pot of oil (around 4–6 inches long). Cut each piece with a pair of scissors or a knife. Don’t cook more than three at a time since the oil temperature will drop too much. Fry the churros until golden brown, about 2–4 minutes per batch. Using a slotted spoon, remove each one from the oil onto a paper towel‑lined plate. Leave them for about 30–60 seconds before rolling in the cinnamon-sugar mixture. FOR THE CHURROS To make the chocolate sauce, melt the chocolate, coconut milk, cinnamon, and vanilla together in a double boiler over low heat. Stir constantly until the chocolate has melted, then transfer to a serving dish. Alternatively, you can microwave the chocolate sauce ingredients in a heat‑safe bowl for 10–15 second increments. Be careful to stop and frequently stir as it’s easier to burn the chocolate in the microwave. Serve the churros while warm with a side of chocolate sauce for a crispy, Mexican‑style treat!
Step 129
FOR THE CHOCOLATE SAUCE To begin, bring the water, salt, and ¼ cup vegetable oil to a low boil in a medium saucepan. Once boiling, remove the mixture from heat and pour into a mixing bowl with the flour. Stir until well‑combined, then let the dough cool for about 15 minutes. In the meantime, make the cinnamon sugar coating by combining the sugar and cinnamon in a shallow bowl or plate. Set aside. Once it has cooled, transfer the dough to a piping bag with a large star‑tip attachment. Then, bring 5–6 cups of vegetable oil (enough to submerge the churros fully) to 350°F–375°F in a deep pot. It’s ideal to use a thermometer when working with oil. If you don’t have one, test if the oil is ready by dropping a small piece of dough in. If it sizzles and floats to the top, then you should be good to go. Squeeze 2–3 pieces of dough out at a time over the pot of oil (around 4–6 inches long). Cut each piece with a pair of scissors or a knife. Don’t cook more than three at a time since the oil temperature will drop too much. Fry the churros until golden brown, about 2–4 minutes per batch. Using a slotted spoon, remove each one from the oil onto a paper towel‑lined plate. Leave them for about 30–60 seconds before rolling in the cinnamon-sugar mixture.
Step 130
FOR THE CHURROS To make the chocolate sauce, melt the chocolate, coconut milk, cinnamon, and vanilla together in a double boiler over low heat. Stir constantly until the chocolate has melted, then transfer to a serving dish. Alternatively, you can microwave the chocolate sauce ingredients in a heat‑safe bowl for 10–15 second increments. Be careful to stop and frequently stir as it’s easier to burn the chocolate in the microwave. Serve the churros while warm with a side of chocolate sauce for a crispy, Mexican‑style treat!
Step 131
Soak the cashew nuts in cold water for at least 2 hours, but overnight is fine. Put the mango flesh in a blender or food processor along with the lime zest, juice, and passion fruit pulp. If you prefer to remove the seeds, press the passion fruit pulp through a sieve first—blitz to a purée. Have a taste and if the purée seems too sharp, then add a little sugar or agave to sweeten. It’s likely you won’t need any at all if the mangoes are naturally sweet enough. Remove half the fruit purée and keep to one side. Drain the soaked cashew nuts and add to the fruit purée in the blender. Blitz well until you have a smooth thick creamy consistency. Continue to blitz if it still seems grainy. Spoon the fruity cashew cream into glasses or dishes and spoon the remaining fruit purée on top, stirring gently to create a swirly, ripple effect. Put in the fridge to chill for at least an hour. Serve the fruit pots with additional passionfruit pulp and grated lime zest on top.
Step 132
Line a standard 12 cup muffin tin with paper cupcake liners. Or use silicone muffin cups. Melt half the chocolate in a double boiler. While the chocolate is melting, place the fresh or frozen cherries with the sugar in a pan and cook over medium heat. Once the sauce starts to thicken, add alcohol and the mixture of cornstarch and water and let it simmer for another 5 min, stirring continuously. The sauce should be slightly thick. If it is not thick enough, add one more teaspoon of cornstarch dissolved in 2 tablespoons of water. By this time, the chocolate should already be melted. Take out the prepared muffin tins or silicone muffin cups and pour ½ tbsp of melted chocolate to the bottom of each liner. Place the tin into the freezer for 10 minutes to allow the chocolate to harden. While they are in the freezer, melt the other half of the chocolate in the same way. Take the muffin tin or silicone muffin cups out of the freezer and pour about two tablespoons of the sauce in the middle of the cups. Then pour another ½ tbsp of melted chocolate over the sauce. Place the cups in the refrigerator for the chocolate to set. Store in the fridge for up to 10 days or the freezer for up to a month. If you store them in the freezer, allow the cups to thaw for 5 minutes before serving. Enjoy!
Step 133
In a large bowl, whisk together all the dough ingredients except for the vegan butter. Knead until smooth. Add vegan butter and continue kneading until the dough is very elastic – about 20 minutes in a machine. Shape into a ball and place in a bowl. Cover and let rise for 1 hour, or until doubled in volume. While the dough is rising, make the filling In a bowl, mash the beans into a smooth paste (or use a food processor). Add some sweetener to your desired level of sweetness, and add some water if the mixture is too dry. Divide the filling mixture into eight equal portions. Once the dough has risen, punch it down and divide it into eight pieces. Shape into balls and let rest for 10 minutes. Then, roll each piece out into a flat circle, and place a piece of the bean paste in the center. Pull all sides of the dough around the filling, then pinch the seams together. Gently roll each dough ball on a flat surface with the seams down, and place it on a lined baking tray. Let rest for 30 minutes. Preheat your oven to 375°F. For a ‘flatter’ shape, place a baking tray on top of the buns, then bake for 25 minutes or until golden brown on top. Let cool and enjoy!
Step 134
Line an 8x8 inch pan with parchment paper. Combine peanut butter and agave in a large bowl—heat for 1 minute. Remove from microwave, stir, and heat for another minute. Remove from heat and stir until the mixture is smooth. Next, stirNext, add in the vanilla and kosher salt. Stir in cereal until evenly coated. Pour mixture into prepared pan and spread evenly. Chill in the refrigerator for 1 hour. Cut into bars.
Step 135
Slice your vegan mozzarella block into ½‑inch thick strips. Try not to make the sticks too thick as they will take longer to melt once fried. Prepare a baking sheet lined with parchment. Set out three large shallow bowls in a row next to your baking sheet. Prepare a large platter covered in paper towels. In one of the shallow bowls, add your all‑purpose flour. In a cup or shallow bowl, combine your water and vegan egg powder removing any clumps. The mixture should be thick but not overly thick or too watery. Adjust as needed. In the last shallow bowl. Combine your panko breadcrumbs, sea salt, freshly ground pepper, garlic powder, onion powder, crushed red pepper flakes, and parsley flakes. I ground mine up a little bit to resemble more of the traditional breadcrumb texture. Place one of the slices of vegan mozzarella in the flour bowl and lightly coat. Dip the flour-coated cheese into the egg batter, coating the entire stick. Place the stick in the final breadcrumb mixture, and use your dry hand to coat fully. Place the coated stick onto the baking sheet. Continue the process with all of the vegan mozzarella sticks. Once the sticks are coated, place the entire sheet in the freezer for 1 hour. Try not to exceed this time as it will not cook all the way through. Fill a small pot with tall sides with 1½ inch of canola oil. Heat the pan on medium heat. Once the oil is fully heated, test by placing it in a piece of Panko. Carefully place 2–4 sticks in at a time. Let fry for about 1 minute, carefully turning until golden brown. Carefully remove the sticks and place them on the paper towel-covered platter. Season with sea salt and vegan parm and allow to cool. For the sauce, combine all of the ingredients in a small bowl. Serve immediately with your dip of choice.
Step 136
Place all of the ingredients in a food processor and puree until smooth, for about 5 minutes. Adjust seasoning with more salt, pepper, and cayenne as desired. To serve, place in a bowl and garnish the top with more za’atar, paprika, and parsley. Serve with sliced cucumber, carrots, or wrapped in a leaf.
Step 137
For the Peanut Sauce In a small mixing bowl, combine peanut butter, soy sauce, ginger powder, garlic, chili flakes, and lime juice.Mix in water one tbsp at a time until the sauce reaches your desired consistency. Transfer sauce to an airtight container in the fridge and let sit for at least 10 minutes - the flavors combine so well if you let it sit! Refrigerate leftovers for up to 10 days. For the Chickpeas Chop the onion into tiny chunks. In a large pan, heat oil over medium heat. Add onion, mix, saute for 5 minutes or until onion starts to brown. Mix in garlic and saute until garlic starts to brown. Mix in spinach and saute until it gets small and wilted. Drain and rinse the canned chickpeas, then add to the pan and mix. Add in paprika and cinnamon. Heat chickpeas for about 10 minutes. Pour in peanut sauce and stir until combined. Turn the heat down to low, and let cook for about 5 minutes or until everything is warm.
Step 138
For the Peanut Sauce In a small mixing bowl, combine peanut butter, soy sauce, ginger powder, garlic, chili flakes, and lime juice.Mix in water one tbsp at a time until the sauce reaches your desired consistency. Transfer sauce to an airtight container in the fridge and let sit for at least 10 minutes - the flavors combine so well if you let it sit! Refrigerate leftovers for up to 10 days.
Step 139
For the Chickpeas Chop the onion into tiny chunks. In a large pan, heat oil over medium heat. Add onion, mix, saute for 5 minutes or until onion starts to brown. Mix in garlic and saute until garlic starts to brown. Mix in spinach and saute until it gets small and wilted. Drain and rinse the canned chickpeas, then add to the pan and mix. Add in paprika and cinnamon. Heat chickpeas for about 10 minutes. Pour in peanut sauce and stir until combined. Turn the heat down to low, and let cook for about 5 minutes or until everything is warm.
Step 140
Heat the broiler to its highest setting. Use a fork to prick the eggplants all over and place them on a broiler rack. Broil for 20 minutes, turning the eggplants now and then until the outsides are charred and black and the insides are soft. Set aside to cool. Put the tahini into a large bowl, add the lemon juice, almond butter, maple syrup (if using), and a pinch of salt. Whisk until smooth. Mix the tomatoes and garlic in a separate bowl. Once the eggplants have cooled, cut them in half, then use a fork to pull the cooked flesh from the skins. Discard the skins. Place the eggplant flesh in the bowl of tahini dressing and add half of the tomato mixture. Toss everything together well. Place the eggplant mixture onto a serving plate and top with the rest of the tomato mixture. Scatter with the parsley, along with some pine nuts. Drizzle with olive oil before serving.
Step 141
Preheat the oven to 400°F. Cut the top of the garlic head off, so the cloves inside are exposed. Place the garlic cut‑side‑up on a square of foil, then drizzle the olive oil over the top. Wrap the foil up and around the garlic, forming a sealed packet. Place directly on the oven rack and roast for 45 to 60 minutes, until the cloves are golden brown and spreadable soft. In a medium bowl, whisk together the starter and water with a fork. Add the all‑purpose flour, bread flour, salt, and thyme leaves, and stir to form a shaggy dough, ensuring you catch the bits of flour on the sides of the bowl. Cover with a damp kitchen towel and rest at room temperature until the garlic is finished roasting. Once the garlic is cool enough to handle comfortably, squeeze the cloves out directly into the bowl, and knead briefly to incorporate the cloves into the dough. Cover the bowl with a damp kitchen towel and let rise at room temperature until doubled in size, about 8 to 10 hours at 70°F. Once the dough is fully risen, remove the towel, cover the bowl with plastic wrap, and refrigerate overnight. The next day, when ready to bake, line a baking sheet with parchment paper. Carefully transfer the cold dough to a lightly floured work surface and let rest for 10 minutes. Using a knife or bench scraper, divide the dough into ten equal strips, each one about 2 ounces. Hold the ends of one strip and gently stretch to tie a knot shape. Place on the prepared baking sheet, and repeat with the remaining dough strips. Brush the knots with olive oil. Cover the dough and rest until puffy, 1 hour or more, depending on the room’s temperature. Preheat the oven to 400°F. Uncover the knots, place the baking sheet on the center oven rack, and bake until light golden brown, 20 to 25 minutes. When finished, transfer the hot knots to a large bowl. Drizzle over the melted butter, then sprinkle with parsley and grated mozzarella to taste. Toss well to coat evenly, then serve warm, and enjoy!
Step 142
Trim the stems from the jalapeños. Slice them down the center from top to bottom and scrape out the seeds with a spoon. Dice the jalapeños and add them to a small saucepan. Add the sugar and water to the saucepan and cook over medium heat, stirring until the sugar has dissolved. Reduce the heat to low and simmer the jalapeños until the liquid has thickened and candied the jalapeños, about 10 minutes. Then, turn off the heat (the liquid will thicken more as it cools). Let the candied jalapeños cool completely. In a large bowl, stir together the cornmeal, flour, baking powder, salt, and cornstarch. Pour in the milk and stir to fully combine. If there is excess liquid in the saucepan containing the jalapeños, drain it. Fold the cooled candied jalapeños and scallions into the batter, making sure they are evenly distributed. In a large skillet, heat 1½ to 2 inches (3.75 to 5 cm) of oil to 350°F (177°C). There should be tiny bubbles in the oil. Drop large dollops of the batter into the hot oil, being sure not to overcrowd the skillet. Fry the hushpuppies on each side for about 2 minutes, or until they are golden brown. Place the hushpuppies on a paper towel when they are done, and repeat this process with the remaining batter. Just before serving the hushpuppies, whisk together the butter and agave syrup in a small bowl. Serve the hush puppies with sweet butter.
Step 143
Place all breading ingredients in a medium bowl and whisk until smooth. Using a paper towel, rub oil on the air fryer rack to prevent pickles from sticking. Pat pickle slices dry with a paper towel. Dip each pickle slice in the breading, so they are completely coated, letting the excess breading drip off. I use a fork or my fingers to do this. Place coated pickles on the air fryer rack, being careful that they do not touch. Air fry at 370°F for 12 minutes. Place all ranch dip ingredients in a food processor and process until smooth, stopping to scrape down sides as needed. Once cooked, remove pickles from the air fryer and enjoy immediately with ranch dip.
Step 144
Preheat oven to 400°F. Peel the potatoes, then cut them n half. Place them into a large pot, then cover with water. Bring to a boil over high heat, and cook until the potatoes can easily be pierced with a knife, about 20 minutes. In a medium bowl, mash the potatoes, vegan butter, cashew milk, and garlic. Place in fridge to cool, about 30 minutes. In a small bowl, mix the panko crumbs, nutritional yeast, and cayenne pepper. Next, use a spoon to scoop out a golf ball‑sized amount of mashed potatoes. Press one cube of cheese into the middle, then close the mashed potato around the cheese. Now, roll into a ball, then repeat for the remaining mashed potatoes and cheese. Then, roll the mashed potato balls in the panko crumbs mixture. Finally, place the coated mashed potato balls onto a lined/greased baking sheet or casserole dish. Cook for 40 minutes or until the outside gets browned and crispy.
Step 145
TO MAKE THE SHIITAKE BACON Wash and slice Shiitake, soak in the mixture for as long as you can (the longer, the better), and bake in the oven at 200°F for 30–40 minutes. Rotate midway for an even cook. Mushrooms should be soft yet crispy. You can do this in advance. TO MAKE THE ONIONS Place onions in a crockpot on low, add the butter, coconut sugar, season with salt, and cook for at least 3 hours until browned. Stir every 30–45 minutes (the slower, the better, it adds more flavor), or if you have less time, cook sliced onions over medium‑high heat for about 5 minutes. Reduce heat to medium and cook, stirring often, until onions turn a deep golden brown color, about 20 minutes. TO MAKE THE CHEESE DIP Preheat oven to 400°F. Place drained tofu in a food processor and blend until smooth. Add the rest of the ingredients, then blend again. Add the mixture to a greased skillet. Top with the shredded vegan cheese. Cook for 10–15 minutes, remove from heat, top with mushrooms and onions, and cook for an additional 5–7 minutes until slightly crisp. Remove from heat, top with additional thyme, and serve with toast points.
Step 146
TO MAKE THE SHIITAKE BACON Wash and slice Shiitake, soak in the mixture for as long as you can (the longer, the better), and bake in the oven at 200°F for 30–40 minutes. Rotate midway for an even cook. Mushrooms should be soft yet crispy. You can do this in advance.
Step 147
TO MAKE THE ONIONS Place onions in a crockpot on low, add the butter, coconut sugar, season with salt, and cook for at least 3 hours until browned. Stir every 30–45 minutes (the slower, the better, it adds more flavor), or if you have less time, cook sliced onions over medium‑high heat for about 5 minutes. Reduce heat to medium and cook, stirring often, until onions turn a deep golden brown color, about 20 minutes.
Step 148
TO MAKE THE CHEESE DIP Preheat oven to 400°F. Place drained tofu in a food processor and blend until smooth. Add the rest of the ingredients, then blend again. Add the mixture to a greased skillet. Top with the shredded vegan cheese. Cook for 10–15 minutes, remove from heat, top with mushrooms and onions, and cook for an additional 5–7 minutes until slightly crisp. Remove from heat, top with additional thyme, and serve with toast points.
Step 149
Get a large bowl and drain the chickpeas separating the aquafaba (liquid) and chickpeas. Get an electric powered whisk and whisk for 1 to 2 minutes until the mixture becomes white and thicker. Next, add the cacao powder, icing sugar, and cream of tartar (optional). Whisk for a few minutes. You want to be making stiff peaks out of the foam. Keep going until you get this. Add a tsp of extra icing sugar to thicken the mixture if needed. Pour your heated milk into your glass. Now the fun part. Get a spoon and start adding the foamy hot chocolate to the top of your glass. We then decorated with toasted marshmallows and grated dark chocolate.
Step 150
In a big bowl, toss together the chopped peanuts and the mixed nuts with the oil, kala namak, and pepper powder. Roast in a preheated oven at 340°F for 7–8 minutes. Remove the tray from the oven and mix in the pumpkin seeds. Return to the oven for 5–6 more minutes. Add the raisins and chat masala to the trail mix and toss. Adjust the seasoning. Let the trail mix cool completely before transferring it to an airtight container. Stays good for at least three weeks at room temperature.
Step 151
TO MAKE THE FISHLESS FINGERS Preheat your oven to 375°F and prepare a baking tray with parchment paper. Drain the tin of palm of hearts well and transfer them to a bowl. Using two forks, tear and rip apart the hearts into thin, stringy pieces. Ensure there are no long pieces or very chunky pieces remaining. Add sea salt, garlic powder, and two tablespoons of brown rice flour to the hearts of palm and stir in. In one shallow bowl, add the rest of the brown rice flour. In another, add non‑dairy milk and whisk in the cornflour. In another, add the coconut. One by one, take a heaped tablespoon of the hearts of palm mixture and roll into a sausage shape, and flatten slightly into a fish finger‑like shape. Coat in the brown rice flour, then dip into the milk mixture, then to the coconut. Place this onto your lined baking tray. Repeat until all the mixture has been used. Place in the oven for 25–30 minutes or until golden brown. TO MAKE THE DILL MAYO While the fish filets are cooking: Whisk together all the ingredients and transfer them to a small dipping bowl. Chill until you are ready to serve.
Step 152
TO MAKE THE FISHLESS FINGERS Preheat your oven to 375°F and prepare a baking tray with parchment paper. Drain the tin of palm of hearts well and transfer them to a bowl. Using two forks, tear and rip apart the hearts into thin, stringy pieces. Ensure there are no long pieces or very chunky pieces remaining. Add sea salt, garlic powder, and two tablespoons of brown rice flour to the hearts of palm and stir in. In one shallow bowl, add the rest of the brown rice flour. In another, add non‑dairy milk and whisk in the cornflour. In another, add the coconut. One by one, take a heaped tablespoon of the hearts of palm mixture and roll into a sausage shape, and flatten slightly into a fish finger‑like shape. Coat in the brown rice flour, then dip into the milk mixture, then to the coconut. Place this onto your lined baking tray. Repeat until all the mixture has been used. Place in the oven for 25–30 minutes or until golden brown.
Step 153
TO MAKE THE DILL MAYO While the fish filets are cooking: Whisk together all the ingredients and transfer them to a small dipping bowl. Chill until you are ready to serve.
Step 154
Place dates and warm water in a food processor and process until smooth. Scoop the creamed dates into a bowl and fold in the remaining ingredients, except for the extra coconut flakes, until mixed. If the mixture is soggy, slowly add more oats; alternatively, if the mixture is too dry, slowly add warm water. Shape balls between 3 to 4 centimeters in diameter, roll them in coconut, and place them on a tray. Place the tray in the freezer for 30 minutes to set and enjoy straight out of the freezer for a quick energy boost.
Top similar recipes
Curated for youYour folders

 316 views
Cover Up
lorealparisusa.com
Your folders
 53 views
Country Recipe Book
countryrecipebook.com
Your folders
 167 views
Country Recipe Book
countryrecipebook.com
Your folders
163 viewsCountry Recipe Book
countryrecipebook.com
Your folders
182 viewsCountry Recipe Book
countryrecipebook.com
Your folders
 158 views
Blonde Henna Hair Recipe To Cover G...
organic-beauty-recipes.com
4.3
(12)
Your folders
 118 views
Patterned DIY Litter Box Cover
sugarandcloth.com
Your folders
 279 views
Quilted Flower Patchwork Pillow Cov...
polkadotchair.com
Your folders
 67 views
Easy 10-Minute Envelope Pillow Cove...
thecraftingnook.com
Your folders
 217 views
Recipe Formatter - Beautify your re...
recipeformatter.com
Your folders
295 viewsRecipe Formatter - Beautify your re...
recipeformatter.com
Your folders
 678 views
Potsticker Dumplings Recipe | Cook ...
seriouseats.com
Your folders
 558 views
Indian Pickle Recipe | Cook the Boo...
seriouseats.com
3.0
(2)
Your folders
/__opt__aboutcom__coeus__resources__content_migration__serious_eats__seriouseats.com__recipes__images__20110531-154439-cheese-bourekas-fd4b85f2caca4701b9eabc6ad4c899a3.jpg) 357 views
357 viewsCheese Bourekas Recipe | Cook the B...
seriouseats.com
Your folders
55 viewsChitra's Food Book
chitrasfoodbook.com
60
Your folders
124 views130 Recipes Book
ayambrand.com.my
Your folders
 302 views
Halo book order
wottaread.com
5.0
(9)
Your folders
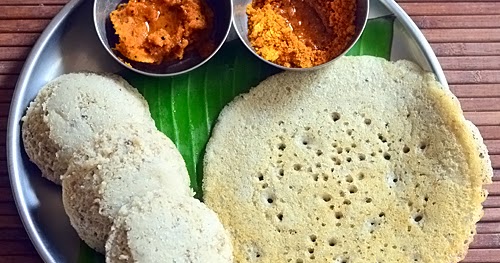 132 views
Chitra's Food Book
chitrasfoodbook.com
20
Your folders
 207 views
How to cover a cake with Ganache Bl...
veenaazmanov.com