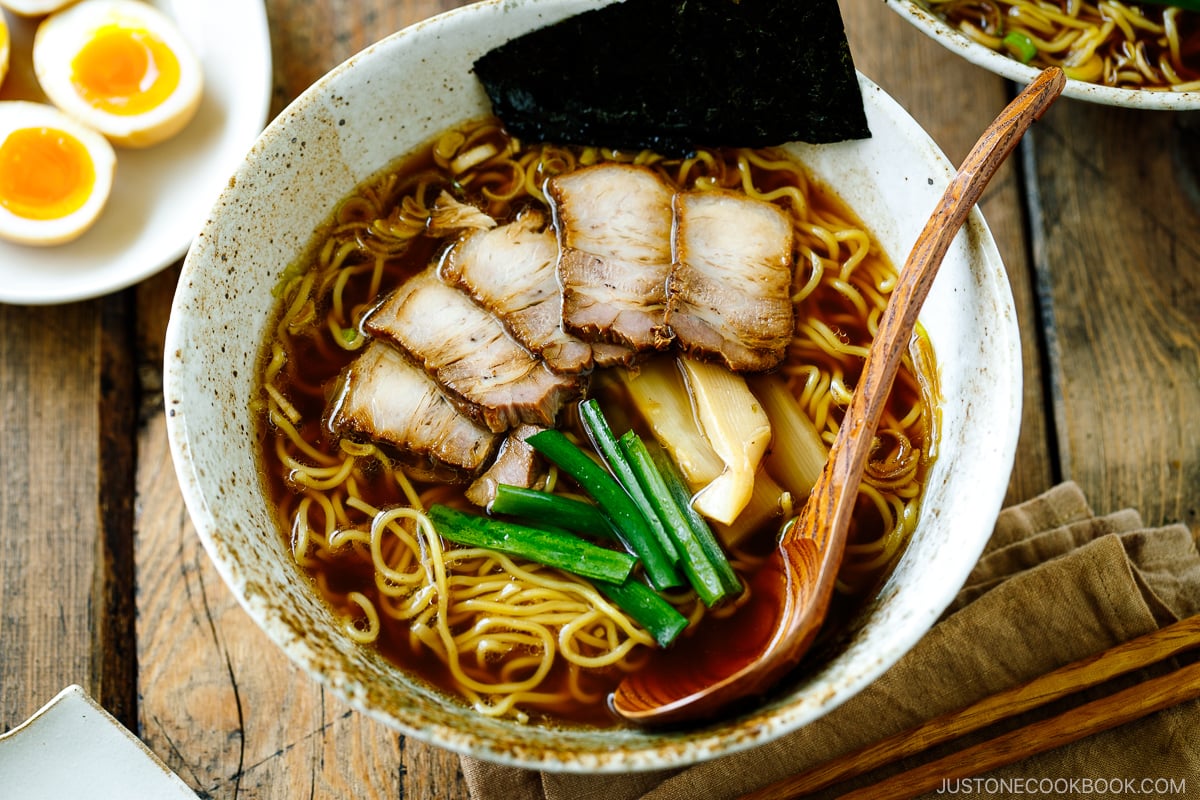
Shoyu Ramen (from Bizentei, Tokyo)
4.5
(45)
Your folders
Your folders
Prep Time: 30 minutes
Total: 390 minutes
Servings: 8
Ingredients
Export 15 ingredients for grocery delivery
Instructions
Step 1
Join our May/June JOC Cooking Challenge! Read the instructions and send two required pictures to contest@justonecookbook.com (What kind of pictures? Read the instructions carefully). You may be one of 3 lucky winners chosen at random to win a $100 Amazon gift card!
Step 2
日本語のレシピはこちら。
Step 3
Please note that the soup broth requires 6 hours of inactive cooking prior to serving. You can make the broth, chashu pork belly, and shoyu tare the same day you serve the ramen, or you can refrigerate overnight and serve the next day.
Step 4
Please note that this recipe makes 8 servings. If you want to prepare fewer servings, I still recommend making the full portion of soup broth, chashu, and shoyu tare in this recipe. Then, you can freeze any leftovers to enjoy a quick bowl of delicious Shoyu Ramen within a month (please see the To Store section for details).
Step 5
Gather all the ingredients.
Step 6
In a large stock pot (I use this 12-QT stockpot), add the water, pork knee bones, onion, garlic, and ginger (DO NOT ADD the pork belly, chicken fat, and Tokyo negi yet). Note: Here, since my pot size is 12 QT, I only added 10 QT or 10 L of water as I need some space for other ingredients. I’ll add the remaining 2 QT later on as soon as there is more space. If your pot is bigger than mine, you can add the full amount.
Step 7
Turn on the heat to high and bring it to a boil. It takes 20–30 minutes for my stock to boil. You do not need to cover the pot with a lid.
Step 8
Meanwhile, tie up the pork belly with butcher twine to prevent it from falling apart. Run some butcher twine under the far end of the pork belly and tie the twine tightly in a double knot to secure it. Next, start wrapping the twine around the belly back toward the other end. Space each wrap ½ inch (1.3 cm) apart.
Step 9
Make sure you wrap the pork belly as tightly as possible without squeezing or deforming it. Once you reach the endpoint, run the twine under some of the end wraps; this hooks the twine in place. Tie a double knot and cut the excess twine.
Step 10
When the water starts to boil, skim off the foam and scum using a fine-mesh skimmer. Tip: I dip my skimmer in a measuring cup filled with water to clean the fine mesh.
Step 11
Gently add the pork belly to the soup broth. Set the timer and cook, uncovered, for 2 HOURS on high heat (or medium-high heat at first, if the soup broth is close to overboiling).
Step 12
Foam and scum will keep appearing on the surface as you cook down the soup broth, so keep skimming every now and then. Skimming is very important to get a clean and clear soup broth, so don’t let the scum incorporate into the broth.
Step 13
Some of the liquid will evaporate after a bit of time, making enough space for the additional water that I couldn’t add at the beginning. Here, I’m adding 1 QT (1 L) of water. It’s a small enough amount that the stock will return to a boil quickly. Keep cooking, uncovered, on high heat.
Step 14
10 minutes before the 2-hour mark, reserve 2 cups (480 ml) of the soup stock for making the chashu sauce. Then, if you have more space in the pot, add the last 1 QT (1 L) of water and keep cooking.
Step 15
While the stock continues to cook, gather all the ingredients for the chashu sauce.
Step 16
In a large pot (I used a 4.5 QT Le Creuset), add the reserved soup broth, soy sauce, sake, mirin, and salt and stir all together. Bring it to a simmer over medium heat. Once simmering, turn off the heat and set aside.
Step 17
At the 2-hour mark, add the rendered chicken fat and green parts of the Tokyo negi (reserving the white parts to use later) to the stockpot. Now, set a new timer and cook, uncovered, for 1 HOUR on high heat.
Step 18
When the 1-hour timer goes off at the 3-hour mark, use a pair of tongs to carefully and gently remove the pork belly from the soup broth and transfer it to a tray (or plate, to support the pork belly’s weight). The pork belly is extremely tender after cooking for a total of 3 hours.
Step 19
Transfer the pork belly into the large pot with the chashu sauce.
Step 20
Place an otoshibuta (drop lid) on top of the chashu and bring it to a simmer. To learn why we use an otoshibuta in Japanese cooking and how to make a DIY Otoshibuta with aluminum foil, see my post. You do not need to cover the pot with the pot‘s lid. Once simmering, cook for 2 hours on low heat or simmer.
Step 21
After removing the pork belly, reduce the stockpot to low heat and continue to cook, uncovered. Set a new timer for 3 HOURS.
Step 22
Once in a while, spoon the sauce over the pork belly as it’s extremely tender and hard to flip over without breaking it.
Step 23
After 2 hours of cooking the chashu, carefully and gently remove it from the sauce and transfer it to a tray (or plate).
Step 24
With a pair of scissors, cut and remove the butcher twine from the chashu. Try not to handle the chashu too much because it is super tender and can easily fall apart. If some of the meat sticks to the twine, very gently remove it so you don‘t pull off the meat. Cover the tray or plate with plastic and let cool completely. Then, chill the chashu well: Place it in the freezer for up to 1 hour until cold (but not frozen) if you‘re serving it right after the soup broth is made, in the refrigerator if you‘re serving later the same day, or in the refrigerator overnight to serve the following day. Make sure the chashu is cold and firm so it stays together when you thinly slice it; otherwise, it will fall apart.
Step 25
Skim the sauce to remove the fat and meat pieces. Transfer the sauce to a smaller pot. This salty sauce is called shoyu tare (sauce) and is the base for the ramen soup broth. It’s now ready to use. Alternatively, let it cool completely and refrigerate overnight to serve the following day.
Step 26
When the 3-hour timer rings, turn off the heat. You’ve now cooked the soup broth for a total of 6 hours (2 hours + 1 hour + 3 hours). Using a large fine-mesh strainer, remove the spent bones and aromatics from the broth and discard.
Step 27
As you can see, this broth is not too fatty. Optional: I strain the soup broth one more time to yield a clean soup broth.
Step 28
The soup broth is now ready to use. Alternatively, you can let it cool completely and refrigerate overnight to serve the following day. If your stockpot doesn’t fit in the refrigerator, transfer the soup broth to a large pot before refrigerating.
Step 29
Bring a big pot of water to a boil to cook the noodles. Meanwhile, gather all the ingredients (I show you 2 servings here). Then, heat the soup broth on medium heat until it’s piping hot; if you refrigerated your soup broth, remove the pot from the refrigerator and reheat.
Step 30
While you reheat the broth, prepare the ramen ingredients. First, cut the green parts off from the green onions. Cut the green leafy parts in half lengthwise.
Step 31
Cut the reserved white parts of the Tokyo negi in half widthwise. Then cut them in half lengthwise.
Step 32
Now, thinly slice the white parts of the Tokyo negi crosswise.
Step 33
Take out the chashu from the freezer or refrigerator. It should be cold and firm with the fat solidified when you slice it. Otherwise, the chashu will fall apart completely.
Step 34
Hold the chashu steady with one hand (I use a paper towel) and thinly slice it with a sharp knife, about ⅛ inch (3 mm) thick. As you slice, the pork fat will stick to the knife and make slicing difficult. When this happens, dip the knife in the hot soup broth to melt the fat off the knife. This is how Master Ueda does it and it’s very helpful. Tip: Slicing the chashu very thinly is key. When the delicate slices hit the hot soup broth, the succulent meat practically melts in your mouth.
Step 35
Before cooking the fresh noodles, loosen them up with your hands.
Step 36
Once the water in the big pot is boiling, add the noodles and cook according to the package instructions (typically, 60–90 seconds). While cooking, stir and separate the noodles with chopsticks. Here, I cook the noodles inside a big noodle strainer (I got it in Japan) that I’ve set inside the pot. Tip: I usually undercook my ramen noodles a bit so they are firm and toothsome, to my liking.
Step 37
During this short period of time, prepare the ramen bowls. To each bowl, add 1–2 Tbsp of shoyu tare and 1 Tbsp chopped white part of the Tokyo negi. Note: The shoyu tare is extremely salty, so start with 1 Tbsp and see how you like it.
Step 38
Pour 1½ cups (360 ml) of the piping-hot soup broth into each bowl. When the noodles are done cooking, drain them well in a strainer, shaking it a few times to drain the water thoroughly (otherwise, it will dilute the soup broth). Note: If your ramen bowl is bigger, you may need to add more tare and soup broth.
Step 39
Then, transfer the noodles to the individual ramen bowls. Lift up the noodles with chopsticks a few times to coat them with the soup broth and straighten them. Then, fold the noodles from the edge of the bowl and place them over the noodles in the soup for an attractive presentation.
Step 40
Quickly arrange the chashu slices, menma, green onions, and nori on top of the noodles. Serve immediately.
Step 41
You can keep the soup broth, shoyu tare, and chashu in the refrigerator for 3 days or in the freezer for up to a month. I recommend freezing the broth in individual portions (use these food prep containers) and so you can defrost the amount you need. Cook the noodles right before serving.