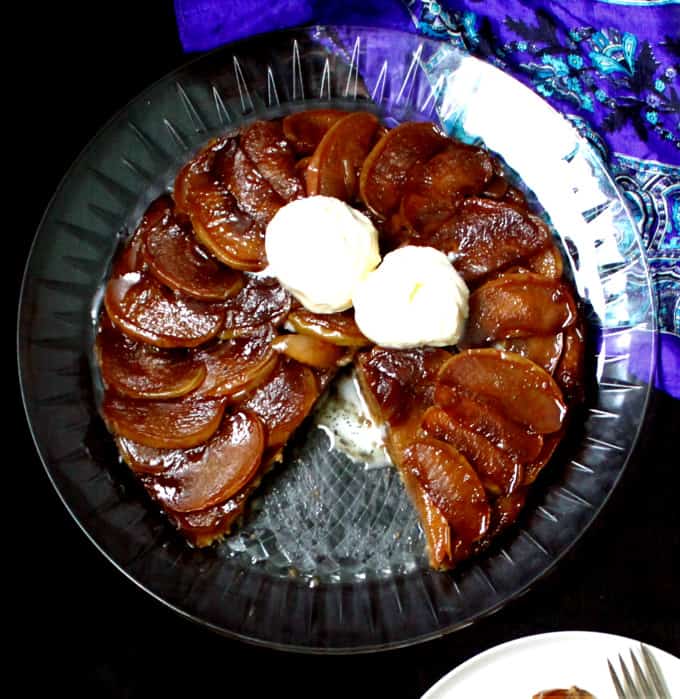
Vegan Tarte Tatin
5.0
(3)
Your folders
Your folders
Prep Time: 25 minutes
Cook Time: 35 minutes
Total: 300 minutes
Servings: 12
Author : Vaishali · Holy Cow! Vegan Recipes
Ingredients
Export 4 ingredients for grocery delivery
Instructions
Step 1
Place 1 1/4 cups of unbleached all purpose flour in a bowl. Mix in 1 tablespoon of sugar and 1/4 teaspoon of salt. Then cut in 8 tablespoons of very cold vegan butter into the flour.
Step 2
Once the butter’s been incorporated into the flour, drizzle in very cold, iced water into the bowl slowly, mixing with your fork at the same time, until the dough comes together into a ball.
Step 3
Lift it out of the bowl and into a sheet of cling wrap. Wrap it tight, and shape the dough into a disc by patting it with your fingers. Try not to handle the dough as much as possible because your body heat is not kind to a pie crust. You want those buttery pockets to stay intact, remember, so your crust gets flaky, not dense. Refrigerate the crust for at least 30 minutes.
Step 4
Form the dough into a disc and put it in the refrigerator while you get the rest of the ingredients ready.
Step 5
Melt the vegan butter in a skillet (if you plan to bake the entire tart in a skillet, a 10-inch cast-iron skillet works best).
Step 6
Once the butter’s melted, sprinkle one cup of sugar into the pan. Then add in five sliced apples. It may seem like a lot to begin with, but the apples will soften and settle down as they release their juices. At this stage I add in a small pinch of salt to help them do that.
Step 7
Stir the apples gently into the butter, trying not to break them. Continue to cook the apples over medium-high heat for about 10 minutes, turning them over gently every now and then, until the apples are softened and have released their juices. Turn off the heat.
Step 8
When I’m using a cake tin, I butter the tin and line the bottom with parchment paper for extra insurance. You don’t have to use the parchment because the tarte tatin does slide out quite easily when it’s still quite warm, but do butter the pan.
Step 9
Using tongs, lift out the apple slices and arrange them in circles around the pan, overlapping them slightly. You should have enough apples to make two layers. Pour the juice remaining in the saucepan evenly over the apples. If you’re going to continue baking in the skillet, you can just leave your apples free-form because arranging them into a pattern in a hot skillet will be tougher — you’ll have a more rustic-looking but still very pretty tart.
Step 10
Preheat the oven to 375 degrees.
Step 11
Flour the countertop and roll out the pastry dough into a circle slightly larger than the diameter of your cake pan or skillet. Make sure you keep moving your dough as you roll, flouring the surface more if needed, so the dough doesn’t stick to the countertop. Once your dough is rolled out, if you want a more finished look, try and cut any rough edges away with a knife. I have two cake tins of the same size, so I use the other as a guide.
Step 12
Gently lift your pastry dough (easiest way to do this is to fold it once, and then once more before lifting), and carefully place it on top of the apples. Unfold it and if it is slightly larger than the cake tin, just gently fold in the edges. If you’re doing this in your skillet be careful — the skillet’s hot and you don’t want to burn yourself!
Step 13
Place the cake pan or the skillet in the oven and bake 35 minutes. The puff pastry should be a light gold when you remove the tart from the oven.Let the pan or skillet cool on a rack for 30 minutes. Then run a knife along the sides of the pan to loosen the tart and place a dish on top of the pan. In a quick motion, invert the pan — the tart should drop quite easily into the plate.
Step 14
Remove the pan and the parchment, if it comes off with the tart. If any of the apple slices have gone askew, just rearrange them. Et voila.If you baked your tart in a skillet, be careful when you invert the tart because the skillet is still quite warm. Use oven mitts when doing this.
Step 15
Let the tart cool thoroughly before serving.
Top similar recipes
Curated for youYour folders
 235 views
Vegan tarte tatin
lazycatkitchen.com
4.7
(3)
55 minutes
Your folders

 174 views
Vegan Apple Tarte Tatin
lavenderandmacarons.com
5.0
(4)
50 minutes
Your folders
 512 views
Tarte Tatin
taste.com.au
4.5
(20)
55 minutes
Your folders
 482 views
Tarte tatin
marmiton.org
4.6
(524)
40 minutes
Your folders

 775 views
Tarte ...
academiedugout.fr
60
Your folders
 303 views
Tarte Tatin
foodnetwork.com
3.8
(4)
35 minutes
Your folders
 460 views
Tarte Tatin
foodandwine.com
Your folders
 518 views
Tarte tatin
elle-et-vire.com
50 minutes
Your folders

 675 views
Tarte tatin
bbcgoodfood.com
1 hours, 15 minutes
Your folders
 405 views
Tarte Tatin
epicurious.com
3.5
(61)
Your folders

 341 views
Tarte Tatin
meilleurduchef.com
4.7
(192)
Your folders
 311 views
Tarte Tatin
foodnetwork.com
4.9
(14)
55 minutes
Your folders
 339 views
Tarte Tatin
foodnetwork.com
3.9
(22)
15 minutes
Your folders

 303 views
Tarte Tatin
foodnetwork.com
3.7
(3)
35 minutes
Your folders
 348 views
Tarte Tatin
foodnetwork.com
4.4
(10)
25 minutes
Your folders

 76 views
Tarte Tatin
177milkstreet.com
Your folders

 154 views
Tarte Tatin
lifeinruralfrance.com
4.7
(6)
1 hours, 15 minutes
Your folders

 325 views
Pear tarte tatin
taste.com.au
30 minutes
Your folders

 1641 views
Foolproof Tarte Tatin
cooking.nytimes.com