Chocolates with Praline Filling
4.6
(25)
Your folders
Your folders
Total: 3 hours
Servings: 32
Author : Chef Philippe
Ingredients
Export 8 ingredients for grocery delivery
Instructions
Step 1
Before starting this Chocolates with Praline Filling recipe, organise the necessary ingredients for the tempering process.
Step 2
Melt the chocolate in the microwave, working in periods of 1 minute. Make sure you don't melt the chocolate for too long so it doesn't burn. Stir the chocolate during every interval until melted completely.
Step 3
Stir the melted chocolate with a rubber spatula. At this stage, the temperature should be between 40 and 45°C maximum. The use of a laser thermometer is recommended for this operation.
Step 4
Wait until the temperature goes down to 35°C. To speed things up, transfer the chocolate from one bowl to the other.
Step 5
The temperature is gradually cooling down (38.2°C in the picture).
Step 6
Combine well with a rubber spatula until cooled down to the desired temperature. Try to combine constantly.
Step 7
The temperature is now at 35.4°C.
Step 8
Add Mycryo cocoa butter (1% of the total weight of chocolate). We need 5 grams for this recipe. Sift the powder through a fine sieve.
Step 9
Combine the Mycryo cocoa butter carefully with a rubber spatula and incorporate to the warm chocolate.
Step 10
Continue stirring while monitoring the temperature. Milk chocolate needs to cool down to 28°C.
Step 11
You will notice the temperature is slowly cooling down...
Step 12
... 30.6°C...
Step 13
... 29.4°C...
Step 14
... 28,9°C...
Step 15
... and eventually the desired 28°C.The process and temperatures are exactly the same for white chocolate. The difference with dark chocolate is the final temperature (31°C instead of 28°C).
Step 16
Fill the cavities of the mould of your choice. For this recipe I used a chocolate mould with swirled round shapes. No matter what mould you use, make sure the cavities are deep.
Step 17
Fill the cavities up to the top, even overflowing a little. From now on, the chocolate should be maintained at a temperature of 28°C.
Step 18
Using the handle of a chocolate spatula, tap on the sides of the mould to remove air bubbles. This will prevent the formation of air bubbles on the surface of the chocolates.
Step 19
Flip the mould over the chocolate bowl to empty the cavities. Let the chocolate to drip off.
Step 20
Tap the side of the mould with the spatula to get rid of the excess.
Step 21
Place the mould on your workbench and scrape the surface with the spatula to remove any chocolate excess.
Step 22
Leave to crystallize for now.
Step 23
Flip the mould onto a sheet of greaseproof paper...
Step 24
... and leave to cool at room temperature.
Step 25
For the praline filling: Organise all the ingredients.
Step 26
In a bowl, place the Mycryo cocoa butter or cocoa butter mass. Both types can be used for this recipe. Add the dark and milk chocolate. Melt in the microwave.
Step 27
Combine the melted cocoa butter and chocolate together carefully with a rubber spatula.
Step 28
In a separate bowl, place the almond and hazelnut praline paste...
Step 29
... add the artisanal hazelnut paste...
Step 30
... and combine with the spatula.
Step 31
Add the chocolate and cocoa butter preparation...
Step 32
... and combine with the rubber spatula.
Step 33
The preparation should be around 25°C.
Step 34
Transfer the preparation in a piping bag...
Step 35
... close the bag...
Step 36
... and lay it flat on the worktop surface.
Step 37
At this stage, the chocolate is partially crystallized. You might notice some chocolate shells are already detached from the mould, thanks to the see-through material. This means the tempering process has been done correctly.
Step 38
Flip the mould on your workbench...
Step 39
... with the cavities facing up.
Step 40
Using the chocolate spatula, scrape the surface of the mould.
Step 41
Cut the tip of the bag containing the praline filling in order to obtain a diameter of 0.5 cm. Fill all cavities and leave a 3mm gap on top. This gap is important to close the shell.
Step 42
At this point, the chocolates should look like this. Place in the fridge for 10 to 15 minutes.
Step 43
Take the mould out of the fridge when the filling has set.
Step 44
Cover all the cavities with a layer of tempered chocolate...
Step 45
... using a piping bag for a more precise operation.
Step 46
Tap with the spatula handle to get rid of air bubbles.
Step 47
Scrape the surface again.
Step 48
Leave to crystallize in the fridge for 20 minutes.
Step 49
Take the mould out of the fridge and flip it on your workbench. Slightly twist the mould to release the chocolates. The chocolate should come away from the mould very easily.
Step 50
Collect all the chocolates...
Step 51
... and store them in the fridge.
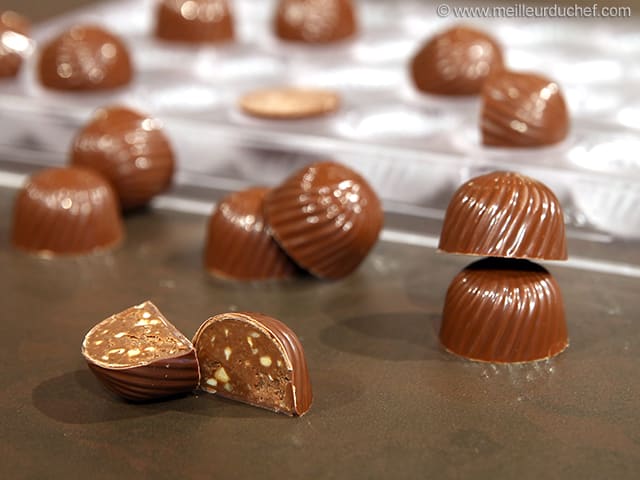
Step 52
Enjoy these delicious chocolates! They should have a glossy finish without any white marks.