How To Can Apple Pie Filling
Your folders
Your folders
Prep Time: 45 minutes
Cook Time: 25 minutes
Total: 70 minutes
Servings: 7
Cost: $2.75 /serving
Author : JB @ The Grateful Girl Cooks!
Ingredients
Export 6 ingredients for grocery delivery
Instructions
Step 1
Prepare quart (or pint) size canning jars, flat lids and screw bands, and water bath canner, according to the manufacturer instructions, and USDA safe canning guidelines.
Step 2
Peel, remove the core, and slice the apples. Treat the apples with lemon juice (not from the ingredient list), fruit fresh or another method, to keep the apples from darkening once exposed to air. Once they're peeled , sliced and treated, blanch the slices . Bring a large pot of water to a boil. Add 6 cups of sliced apples at a time to the boiling water. Cook for 1 minute, then remove and keep them warm while you finish blanching all the apples.
Step 3
To make the pie filling, measure granulated sugar, ClearJel, water, apple juice, cinnamon and nutmeg into a LARGE stainless steel saucepan. Bring this to a boil on medium-high heat. Stir constantly, and continue to cook until it bubbles and thickens. Add ½ cup lemon juice, and cook for 1 more minute, stirring constantly! Take off heat when done. Transfer warm (drained) apple slices into pie filling in large saucepan, and fold them into the mixture. Re-heat filling only until heated through, before placing the filling into hot, prepared jars.
Step 4
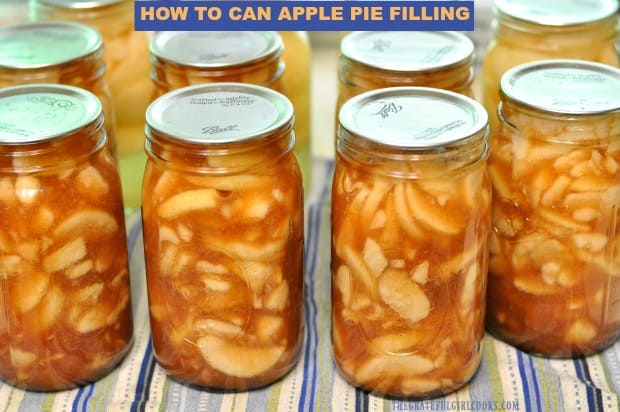
Ladle hot pie filling into prepared canning jars, leaving 1 inch of headspace in each jar. Use a long utensil inserted several times into jars, to remove the air bubbles, making adjustments to the headspace if necessary, by adding or removing filling. Wipe jar rims clean, to help ensure a good seal. Place flat lid on top, and add the jar ring. Screw the band on until it is fingertip tight. Place the hot jars onto an elevated rack and lower rack and jars into simmering water in canner. Make sure the water completely covers the tops of the jars (by about an inch). Place lid on canner.
Step 5
Bring the water to a gentle rolling boil, and process the jars for 25 minutes AFTER it begins boiling. When processing time is finished, turn off heat. Remove lid from pan. Wait 5-10 minutes, and then remove the VERY HOT jars from the pan, using canning tongs. Transfer jars to a dish towel on counter. IMPORTANT NOTE: Don't place hot jars directly onto your counter top, as temperature variances (boiling hot jars vs. cold counter top) might cause jars to crack. Let the jars of apple pie filling cool completely (overnight or 12 hours) without disturbing.
Step 6
Once completely cooled, check to make sure jars sealed. The jar lids should have NO GIVE in them if properly sealed. If you find one has not sealed properly, it is not safe to store. Refrigerate it, and use it within a couple weeks. Wipe the jars clean with a wet cloth, then label (with date canned), and place them in your pantry for long term storage. Enjoy!