Old-Time Chocolate Molasses Chews
Your folders
Your folders
Servings: 90
Author : The Hungry Mouse
Ingredients
Export 6 ingredients for grocery delivery
Instructions
Step 1
Generously butter an 8-inch x 8-inch glass baking pan. Set it aside.
Step 2
Put 3 Tablespoons of butter, the bittersweet chocolate, milk, molasses, and sugar in a medium-sized, heavy-bottomed pot.
Step 3
Set it on the stove over medium heat. Stir constantly until the ingredients melt together and are uniform.
Step 4
Clip on a candy thermometer (I like to do this once the ingredients are completely melted. Makes it easier to get all the bits as they melt.) Keep the heat on medium. And keep stirring.
Step 5
Eventually, the caramel will come to a rolling boil. Leave the heat on medium. (Resist the urge to crank it up! You risk scorching the caramel.) Continue to stir constantly, making sure to scrape at the bottom of the pot to prevent sticking.
Step 6
As it cooks, the mixture will get thicker. Continue to boil, stirring, until the mixture reaches 248 degrees.
Step 7
When it hits 248 degrees, yank the pot off the stove. The mixture will be very thick. Stir in the vanilla. (Be careful! Hot sugar is like napalm.)
Step 8
Pour the hot mixture into your buttered baking dish.
Step 9
Smooth the top down with a spatula. Let it sit on the counter to cool.
Step 10
When it's cool enough to touch comfortably, run a knife around the edge of the pan to loosen the caramel. It will wrinkle up a little. That's just fine. (You can smooth it out later.) Flip the pan over and remove the square of caramel. If it's sticking, nudge under one edge with a dinner knife to get it moving.
Step 11
With a buttered butcher knife (or kitchen scissors), cut the caramel into 3/4-inch wide strips.
Step 12
Then cut the strips into squares.
Step 13
If you're going to wait to dip them in chocolate (or skip that step altogether if you want to keep them plain), store them in an airtight container between sheets of wax or parchment paper.
Step 14
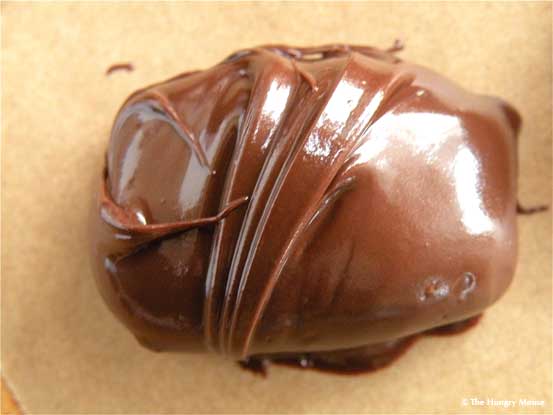
To dip them in chocolate: Line a sheet pan with parchment paper. Set aside. Melt about 2 cups of semi-sweet chocolate chips. Take one of the caramels. Put the caramel with the top facing down in the chocolate (that way, when you flip it over, you get a nice chocolate swirl on top of the candy). Press it down so it sinks in a little. With a kitchen fork, turn the caramel over to coat the bottom, and lift it out of the chocolate. Set it on your parchment-lined pan. If you don't like the swirl on top, just fix it with your finger.
Step 15
Repeat with the rest of the caramels.
Step 16
Let them sit overnight, uncovered, until the chocolate hardens.
Step 17
Store in a cool place between layers of wax paper in an airtight tin. They'll keep well for about a month. Enjoy!