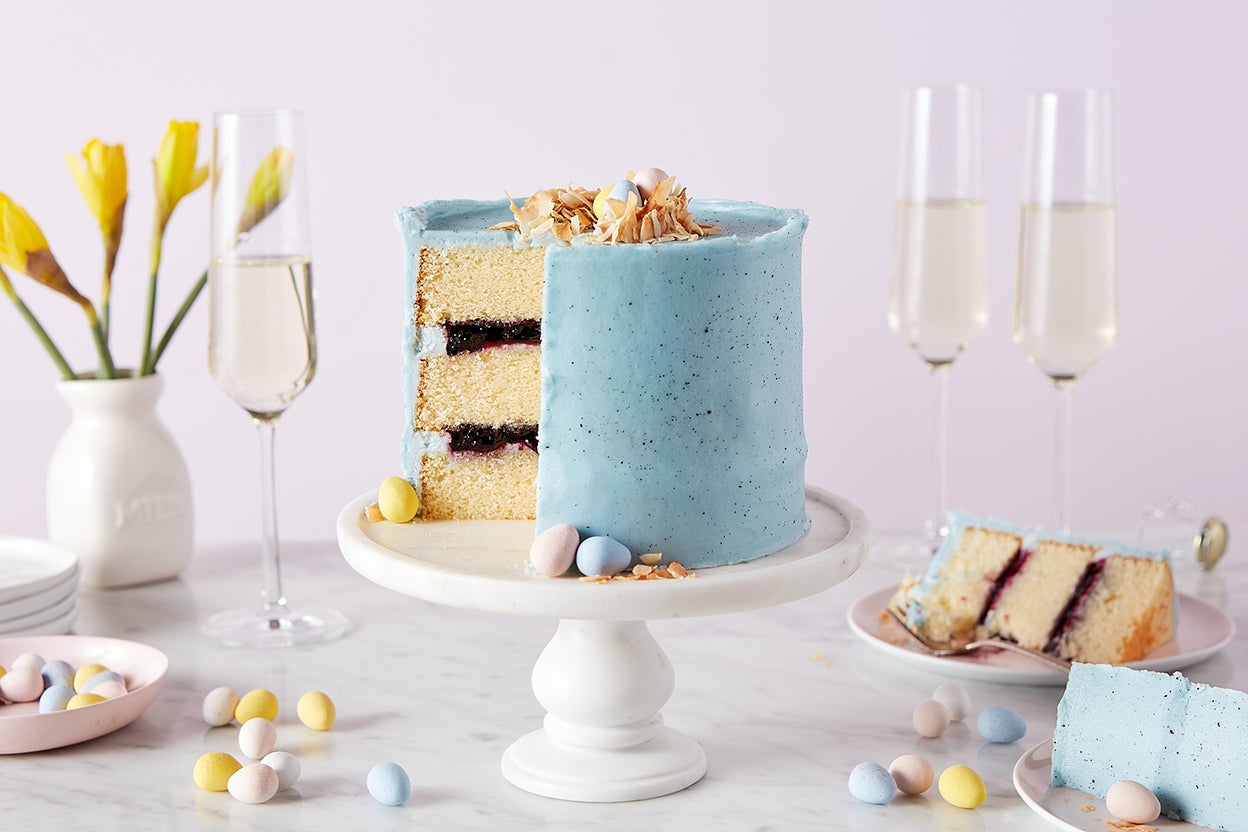
Robin Egg Cake
4.0
(8)
Your folders
Your folders
Prep Time: 35 minutes
Cook Time: 35 minutes
Total: 1 hours, 45 minutes
Servings: 16
Author : Lydia Fournier
Ingredients
Export 14 ingredients for grocery delivery
Instructions
Step 1
Preheat the oven to 350°F. Lightly grease three 6” round pans or two 8” or 9” round pans. For extra protection against sticking, dust the pans with flour or line the bottoms with parchment and grease the parchment. Note: Make sure your pans are at least 2” tall; if they’re shorter, see “tips,” below, for options.
Step 2
To make the cake: Using a stand mixer set on low speed, mix the dry ingredients until thoroughly combined. Add the soft butter and mix until evenly crumbly, like fine, damp sand.
Step 3
Beat in the egg whites one at a time. Then beat in the whole eggs one at a time, beating for about 30 seconds and scraping down the sides and bottom of the bowl after each addition. This process helps build the cake’s structure.
Step 4
In a small bowl or measuring cup, whisk the milk with the lemon paste or zest. Add this mixture, one-third at a time, to the batter. Beat for 30 seconds and scrape down the sides of the bowl after each addition. The batter may look a bit curdled; that’s OK.
Step 5
After you’ve scraped the bowl one final time, beat for an additional 30 seconds.
Step 6
Pour the batter into the prepared pans. Bake the 6” cakes for 20 to 25 minutes, or the 8” or 9” cakes for 30 to 35 minutes, until set and starting to pull away from the edges of the pans. A toothpick or paring knife inserted into the center of a cake will come out with a few moist crumbs sticking to it when it’s done.
Step 7
Remove the cakes from the oven and cool for 15 minutes in the pans. Transfer the cakes to a rack to cool completely before frosting.
Step 8
To make the frosting: In a large bowl, beat together the butter, shortening, and salt until fluffy.
Step 9
Add about half the confectioners' sugar, beating slowly until thoroughly combined.
Step 10
Add the vanilla and half the milk or cream and beat until fluffy.
Step 11
Add the remaining sugar, then the remaining milk. Beat until fully incorporated.
Step 12
Add a few drops of food coloring, if desired. Beat until the frosting is light, fluffy, and evenly colored.
Step 13
To assemble the cake: When the cake layers are completely cool, level them by cutting the dome off each layer (if necessary).
Step 14
Place a quarter-sized dollop of frosting in the center of your serving plate (this will keep the layer from sliding around), then put the first cake layer on the plate. Set the plate on top of a turntable or lazy Susan. Line the plate with a few strips of parchment to keep it clean while assembling the cake.
Step 15
For a 6” cake, spread about 3 tablespoons (46g) of buttercream over the top of one layer. For an 8” or 9” cake, use about 1/4 cup (65g) of frosting to cover the top thinly.
Step 16
Use a piping bag to pipe a 1/4"-tall circle of frosting (a dam) around the top inside edge of the cake. This will help keep the filling in place.
Step 17
Fill the inside circle of frosting with jam or curd until it’s just barely below the top of the frosting dam.
Step 18
Repeat this process with the second layer of cake, if making a 6” cake.
Step 19
For the final layer, place the cake on top of the filling cut-side down to help keep the top flat and crumb-free.
Step 20
Apply a thin layer of frosting to the top and sides of the cake (a crumb coat), then set it in the refrigerator to chill for 15 to 20 minutes. Cover and set aside the rest of the frosting.
Step 21
To frost the cake: Remove the cake from the refrigerator and stir the frosting to remove any air bubbles. Add an extra teaspoon or two of milk if the frosting has dried out.
Step 22
Using an offset spatula, cover the top and sides of the cake with a final layer of frosting. Use a straight-sided tool, like a bench knife, to smooth the sides by holding it at a straight angle against the cake and gently spinning the turntable. This will remove excess frosting and make a smooth finish.
Step 23
To add the chocolate splatter: In a small bowl, mix the cocoa powder with the water or vanilla until smooth.
Step 24
Cover any surfaces around the cake with a few pieces of parchment or newspaper, as this can get a little messy (and fun!).
Step 25
Using a dry pastry brush, gently dip the ends in the cocoa mixture and shake off any excess. While holding the brush with one hand, pull the bristles back, point at the cake, and slowly release to create the speckles. Add as much or little as you want on the sides and top of the cake. (Practicing this technique on some parchment first is helpful.)
Step 26
To finish the cake: To create the nest on top of the cake, use a round cookie cutter or glass to mark the frosting where the nest will go.
Step 27
With the piping bag you used to make the dam, pipe a couple of rings of frosting along the circle mark.
Step 28
Cover the frosting ring with toasted coconut flakes. Fill the nest with chocolate eggs or your candy of choice before serving.
Step 29
Storage information: Store leftover cake in the refrigerator, covered, for up to a week; or freeze, well wrapped, for up to a month.