The Ultimate Smoked Or Grilled Turkey Recipe
4.8
(444)
Your folders
Your folders
Prep Time: 60 minutes
Cook Time: 180 minutes
Servings: 12
Cost: $5.48 /serving
Author : Dave Joachim
Ingredients
Export 10 ingredients for grocery delivery
Instructions
Step 1
Approach One: Norman Rockwell BirdCooking a whole bird is the tradition, but it produces the least moist and least tasty bird of the three methods. If you must do it, do not stuff the bird or put anything in the cavity. When you stuff the bird it takes far longer for the heat to travel to the center of the stuffing and in the process the exterior gets way too hot and the meat gets overcooked. By leaving the cavity empty the heat and smoke flavors can enter the cavity, cooking the bird much faster and more evenly without overcooking. Treat the crowd to "muffings" by cooking the stuffing in muffin pans and serve everyone an individual muffin shaped stuffing serving, crunchy all over. Onions and oranges in the cavity do very little to enhance flavor and they just block airflow. To bring flavor to the cavity, sprinkle the meat with spices and herbs. More on this below.
Step 2
If you cook the bird the traditional way, whole, like the Normal Rockwell bird, do not truss or tie the bird. Let the entire surface brown, even the armpits and crotch, because nobody wants to eat rubbery skin. This will help the thighs and drumsticks cook faster because they need to be cooked to a higher temp than the breasts.
Step 3
Approach Two: Cut The Bird Into PartsStrongly consider cutting the bird into parts. You will be able to get it browned on all sides (brown is beautiful, brown is the flavorful Maillard reaction). When you cook a whole Norman Rockwell bird, the cavity never browns. When you cut it into parts it cooks faster so there is less moisture loss and it is more even temperature throughout, and you can remove each part at optimum temp (breasts 160°F (71.1°C), thighs and drums 170°F (76.7°C)). Here's a video.
Step 4
Video: Cooking the Ultimate Turkey on a GrillThe video describes the technique of using the Slow 'N' Sear to to cook a turkey on a Weber grill.
Step 5
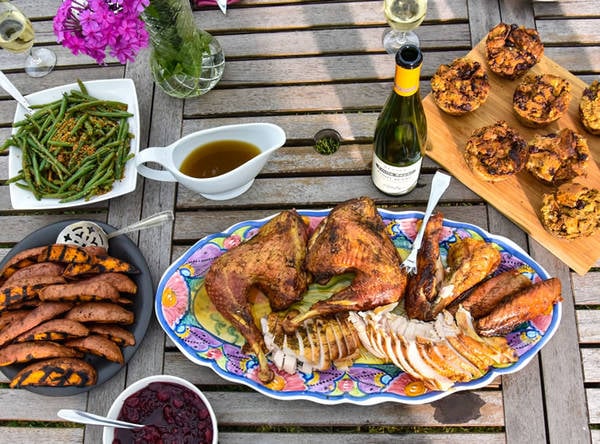
If you are using a grill in a 2-zone setup, you can start it in the indirect zone with some smoke, and then, when the meat hits about 150°F (65.6°C), flip it skin side down on the hot side to make it ultra crispy. In fact, this method is ideal for a grill, so if you don't have a smoker, give it serious consideration. You also get a whole carcass to add to the gravy, and that's more flavor.The only drawback is that a cut-up bird needs more cooking surface than a whole bird, and you don't have the drama of presenting a whole bird.In the picture of a lightly smoked bird above you can see on the left the wings, boneless breasts with the tenders removed and grilled separately, drums, and boneless thighs. Done this way it is easy to get really moist meat with each piece removed at optimum temp, and sliced across the grain.
Step 6
The approach is pretty much the same as carving a cooked turkey. Remove the wings. Cut the tips off the wings and throw them in the gravy. Cut off the thighs at the ball joint where they meet the body. Bend each drum and thigh away from each other so it is easy to find the knee joint and cut them apart. Now remove the breasts by running your knife along the sides of the breast bone and follow the bones with your knife along the rib cage until you have two big boneless breasts just like you would do carving a cooked bird. Underneath each breast you will find a muscle that is loosely attached called the tender. Remove it because there's a good chance it will fall off during the cook. I'll tell you a secret. I usually toss these in the fridge and grill them the next day. They're perfect for sandwiches. But first you want to remove the tough tendon in there as shown in the picture below.
Step 7
Then comes the only tricky part, removing the thigh bone. This makes it really easy to slice when cooked. With a sharp tipped knife, slice along both sides of the bone. Then slip the knife under the bone and scrape it along the bone until it comes out (below).
Step 8
Bust up the carcass and throw it all in the gravy/drip pan (click here for more on how to make the gravy). A 16 pound (7.3kg) bird will yield about 10 pounds (4.5kg) of meat (including the wing and drumstick bones). Dump any juices from the bag into the gravy too.
Step 9
Preheat the grill in a 2-zone setup and shoot for about 325°F (162.8°C) in the indirect zone or get your smoker settled in at that temp. Put a grate above the gravy pan. Start the thighs and breasts first on the indirect side. After 15 to 20 minutes, add the drums and wings. Watch their temps individually with an instant read thermometer. Remove the breasts and the thick part of the wings at 160°F (71.1°C) and the dark meat at 170°F (76.7°C). When the meat hits about 150°F (65.6°C), if the skins aren't crisp, move the meat over to the direct side. If you want, you can even go crazy and paint on a sauce or a glaze. Everything will be tender, juicy, and finished in about 1.5 to 2 hours because parts cook more quickly than a whole bird.
Step 10
Approach Three: Spatchcock The TurkeyStrongly consider butterflying (a.k.a. spatchcocking) the bird. I know this is radical and might give Aunt Matilda conniptions, but it guarantees a moister bird, more delicious brown surfaces, and cooks much faster (that's why it is moister). And it looks cool. Check out the video.
Step 11
Video: The Ultimate Turkey on the GrillYes, I know it is not Norman Rockwell turkey, but there are some significant advantages to butterflying it (also called spatchcocking). Click here to see pictures of a bird being spatchcocked with step by step instructions.
Step 12
By removing the spine and flattening the bird you can brown both sides. Brown is beautiful. It has more flavor than pale meat. It is a well-known process called the Maillard reaction. The cavity of a Norman Rockwell bird remains pale and unappetizing.It allows you to season both sides evenly.It cooks faster at the same temperature. Faster cooking means less moisture loss and when it comes to turkey breasts, moisture is critical. On a day when the air temp was 65°F (18.3°C) I have cooked a spatchcocked 18 pounder (8.2kg) in less than 90 minutes on a Weber Kettle at about 325°F (162.8°C). Your cooking time will depend a lot on the outdoor air temp, the thickness of the breasts, and the unique characteristics of your grill or smoker. Click here for estimated cooking timesBecause heat enters the meat from two sides the top side doesn't dry out as much.When breasts are done, thighs are too. This can be tricky on Norman Rockwell birds because you usually want the breasts about 10°F (5.6°C) lower temp than the thighs, and since the thighs are thinner, this happens naturally when the bird is butterflied.The meat is not tall and it fits better on a grill with a low lid. It is perfect for Weber Kettles.Carving is a lot easier. The thighs come off with one easy cut. No fumbling around looking for the joint. The breasts are easier to remove too.The back can go in the gravy making it tastier.It looks pretty cool!
Step 13
Approach Four: Sous-Vide-QueThe ultimate solution to dry breasts is cooking turkey sous vide, and then finishing it on the grill. I discuss this marvelous method, the recipe, and there's even video on this page. If you are unfamiliar with sous-vide-que cooking visit my page about sous vide cooking and the grill.
Step 14
The Meathead MethodHere is a summary of some tricks you should employ.If your turkey is not labeled "basted", "self-basted", "enhanced", or "kosher", help the proteins hold onto liquid with a dry brine. We will not waste money making a wet brine loaded with apple juice, sugar, and spices that can't penetrate muscle. But the proper amount of salt is a game changer. More on this below.Even if it has been injected with a saline solution at the factory, and chances are that it has, you can still amp up boring birds by injecting them with butter or oil. We will not go crazy and inject all manner of spices and other flavors that will only mask the flavor of the meat. All we want to do with the injection is keep the meat moist. More on this below.Because herbs and spices cannot penetrate skin or meat, we will use a rub of aromatic herbs both on top of and under the skin to add more flavor to the skin and the surface of the meat. More on this below.Add oil and herbs to the outside of the skin to help make it crispy and boost flavor. More on this below.Do not place the bird inside a roasting pan. Instead place it above a roasting pan so air can flow all around it, cooking and browning it properly on the underside. On a grill or smoker, putting the pan under the grate is perfect. More on this below.Roast the bird as close to 325°F (162.8°C) as your grill/pit/smoker/oven will let you. It will cook in a humid, aromatic, smoky atmosphere to hold in moisture and add flavor. It will be done faster than you think. More on this below.Prevent the wing and drumstick ends from burning by covering them with foil for part of the time. More on this below.Do not cook breast side down as has become popular. It just doesn't help, and in fact it harms. More on this below.Do not baste during cooking. Tests prove that it does not make the meat juicier. But it can slow cooking by cooling the meat and it can make the skin soft. You will still get a beautiful crisp brown skin without basting. More on this below.Use a digital thermometer to monitor the bird's temperature to make sure it is not overcooked, and not the plastic popup that is inaccurate an often set 20°F (11.1°C) too high, guaranteeing breast meat drier than week-old stuffing. More on this below.Remove the turkey from the heat when all parts are a minimum of 160°F instead of 170°F to 180°F (76.7 to 82.2°C) as most recipes recommend, and it still will be safe. Juicier too. The USDA revised its guidelines in 2006 so most cookbooks are out of date. More on this below. And yes, you can poke it many times and it will not dry out. It is 70% water, so a 20 pounder (9.1kg) is 14 pounds (6.4kg) of water. A few drops will not make your bird dry. Temp is far more important.
Step 15
Do not tent it with foil when it is finished cooking because the steam trapped under the foil softens the skin. Resting does not redistribute juices and any that spill will not be wasted. See all that steam? It is moisture that you want in the meat! Serve it hot and moist. Don't let it sit around cooling and drying out. More on this below.Do not slice the breasts while they are still on the bird. That is cutting with the grain and makes the meat stringy when you chew. Instead, remove each breast lobe and slice it across the grain, making it more tender and making sure each slice has a strip of skin on it. More on this below.Instead of a gloppy starchy sauce, make a succulent thin gravy the way you would make a soup stock, with giblets and trimmings from the bird, onions, carrots, celery, and more. We will put them in a pan under the bird to catch its sexy smoky drippings. Let the gravy remain thin and potent so it can infiltrate between the muscle fibers rather than sit on top like a lump. Hot thin gravy will also warm the meat if it has cooled off too much. You will make enough gravy so we can still use it to make that thick flour-based goo if the traditionalists insist, and it will be better than ever because the base is so much tastier than just plain drippings. And there will still be enough gravy for leftovers and the mashed potatoes. More on this below.
Step 16
Preparing The Wet Rub For TurkeyA dry rub is a mix of spices and herbs rubbed into meat, but for turkey, we're going to use a wet rub, a mix of herbs, spices, with oil or water. Turkey and herbs get along like peanut butter and jelly. Click here to read my article about Herbs and Spices.The wet rub goes under the skin so the herbs and spices can be in intimate contact with the muscle tissue. Then we'll put some rub on top of the skin to flavor everybody's favorite part and because oil helps crisp the skin. If you don't want to fuss with under the skin, you won't lose much if it all goes on top of the skin.I recommend you use my Simon & Garfunkel poultry rub blend. It's a mix of parsley, sage, rosemary, and thyme (sing it), with oregano, basil, bay leaf, black pepper, and sugar.If you want to use your own favorite rub, use something without salt if the bird has been salted at the factory or you have salted it with a dry brine or injection. My Simon & Garfunkel rub has no salt. Remember, you can always add salt, but you can't take it away. Click here for more about the science of rubs.Sometimes, if the sage in my garden hasn't frozen by Thanksgiving, I'll put olive oil or butter and several whole fresh sage leaves under the skin instead of a wet rub and use the wet rub on the outside of the skin only. You can see the sage leaves under the skin in the picture below. They taste great and look kewl. People will ask about the secret ingredient.
Step 17
Mix the herb blend with the oil.
Step 18
Take off your Superbowl ring, and gently push the rub under the skin covering the breasts. Spread it out and work it as far down to the thighs and legs as possible. Try to avoid leaving behind large clumps. In 2014 I got the Tweet below from Max Unger, All-Pro center and then a member of the world champion Seattle Seahawks, asking me about the instructions here.
Step 19
Spread the remaining rub on top of the skin. If you run out, rub the exterior with olive oil or vegetable oil and sprinkle it gently with a little black pepper, sage, and thyme. Then sprinkle salt on the skin to help it crisp.
Step 20
Do not tie the legs together. Most turkeys come with an armature holding the tops of the drums together. And most cookbooks tell you to tie them up if they didn't come that way. This just doesn't make sense. Here's why.Dark meat is best at about 170 to 175°F (76.7 to 79.4°C), but if you tie the drums together you pin the thighs tight against the body of the bird and they'll take longer to cook. So if you remove the bird when the breasts are 160°F (71.1°C), the thighs will also be about 160°F (71.1°C). But if you let their freak flag fly, heat will infiltrate them from all sides and, because they are thinner than the breasts, they will be at 170°F (76.7°C) when the breasts hit 160°F (71.1°C).Some chefs tell you to put a Wagnerian breast plate made of foil on the white meat in order to reflect heat so the thighs can get ahead of them. Now that is really goofy. A thin layer of foil is not going to reflect much heat nor is it going to be much of an insulator. All that will do is retard the browning and crisping of the skin.Some other chefs tell you to put ice bags on the breasts before cooking in order to chill them so that the thighs will have a head start. One New York Times expert whom I normally worship even use Ace bandages to hold the icebags in place so the poor turkey looks like was up all night drinking Wild Turkey. Just letting the thighs free so hot air can surround them will do the job just fine, thank you. And doing so has the added bonus of letting the crotch area brown.If there is any rub left, toss it in the gravy.
Step 21
Preparing The Turkey GravyWhatever you do, don't skip the gravy. I know this whole approach may sound a little goofy, but trust me: This nectar is a show stopper. First time out of the gate, follow my recipe closely until you get the concept. If you wish, you can do this a day in advance.This gravy is not the thick and pasty stuff made with flour that sits on top of the meat and forms pudding skin. This gravy is a jus, thin, flavorful broth that penetrates the meat, making it incredibly moist and tasty. And if Granny insists on the thick glop, or if you need traditional gravy for the mashed potatoes, there is more than enough of my gravy to mix with flour. I'll show you how further down the page.There is almost always leftover gravy that you can freeze. It makes a killer soup base or stock for cooking rice, risotto, couscous, or whenever a recipe calls for stock. I use it to make the gravy for turkey pot pies with the leftovers.
Step 22
After the bird has thawed, open the bag it came in and pour the juices into the pan in which it was sitting. Even if the bird was salted, save those the juices for the gravy. They will not be too salty.
Step 23
If there is a plastic pop-up thermometer, remove it and discard it. If you rely on it you will be eating balsa wood. If there is a gizmo holding the tops of the drumsticks together, remove it. By holding the thighs and drums tight to the body, it prevents them from cooking properly and keeps the skin in the bird's crotch from darkening and crisping. Yes, I know the books tell you to truss the drumsticks. They're wrong. I'll explain below.
Step 24
Pull the stuff out the cavities. Check both front and rear openings. Typically you'll find the neck and a bag of "giblets" in there. Put the neck in the pan. The bag usually contains the heart (looks like a heart), the gizzard (two marbles connected in the middle), and the liver (it is the floppy, shiny thing). Put everything except the liver in the gravy pan. The liver will not be used for the gravy. Freeze it in a zipper bag and save it along with other chicken and duck livers until you have enough to make a nice pate, or toss it in a pan with some oil, cook it, and feed it to the dog.
Step 25
Remove "the part that goes over the fence last", and trim excess skin and fat from around both cavities, front and rear, and put them in the pan along with the neck and the juices. Then whack off the wing tips at the first joint and toss them in the pool. There's a lot of flavor in them. Don't worry about the fat, you can skim it later. If you are spatchcocking, rinse the brown organ meat off the backbone and discard it (it is not tasty). Throw the backbone in the bath.
Step 26
Leave the skin on the onions, lop off the ends and cut the onion into quarters. Peel the carrots and cut them into 2 inch (5cm) lengths. Use the entire rib of celery, leaves and all, and cut it into 2 inch (5cm) lengths. Add these to the pan along with the rest of the gravy ingredients. Refrigerate the whole thing. We will use it when we cook the bird. Here's the pan before cooking.
Step 27
I discuss how to finish the gravy by placing it under the bird and straining it down below in the section on cooking the bird.
Step 28
Finally! Let's Cook That Bird!All the pregame activities are over. It's time to get down to business. You want to begin by preheating the oven about 5 hours before your guests are ready to sit down. Yes, your grill or smoker is really an oven. Get over it.
Step 29
Crank your oven/grill/pit up to 325°F (162.8°C) or as close as possible as measured at the level of the cooking grate by a digital thermometer. Do not measure the temp using the cheap thermometer in the lid unless you plan to eat the lid. There can be a great difference between the grate temp and the lid temp.
Step 30
When it is hot, clean the grate you will cook the bird on before you put the drip pan in. Week-old grease and gunk the cooking grates will not add the kind of complexity you want in your gravy. Now put the drip pan and all the gravy fixins onto the cooker at least 2 to 3" (5 to 7.6cm) below the bird if possible.
Step 31
If you have a leave-in digital thermometer with a probe on a wire, insert the probe into the breast so the tip is in the center of the thickest part of the breast, being careful not to touch the ribs. Digital thermometers have small sensors and they are very close to the tip, so they are by far the best. The sensitive areas of a dial thermometer are too big to be accurate.
Step 32
Now add your smoke wood. Turkey loves smoke, but too much can ruin it in a hurry, and there is is a fine line. The first time you try this recipe I beg you to go easy on the smoke wood. Overdo it and the bird will taste like an ashtray.I've had good luck with apple, alder, peach, cherry, and oak. Avoid mesquite, and hickory. They'll work, but I think they're a bit too strong for delicate lean meats like turkey.On a charcoal grill or smoker, you may not need to add wood at all. The charcoal will probably give you all the smoke flavor you need. If you do add wood, you can toss it right on the coals. 2 to 4 ounces (56.7 to 113.4g) by weight should be enough. Smoke adheres to wet surfaces, so add the wood at the start of the cook.On a gas grill you'll need 4 to 8 ounces (113.4 to 226.8g) of wood. You may decide after tasting it that you want more on your next cook, but don't ruin the first one with too much smoke.On my gas grill I usually place one golf-ball sized chunk of wood right on a burner in the flame. Chunks smolder slowly, but if you do not have chunks, you can use chips or pellets.To use chips or pellets, toss them in a disposable aluminum pan and put it as close to the flame as possible. Click here for more on The Science of Wood. There is no need to soak the wood. Wood does not absorb much water. That's why they make boats out of it. Let the wood catch on fire. Burning wood makes better tasting smoke than smoldering wood.
Step 33
Place the bird on the cooking rack, breast side up, close the lid and don't open it for an hour. That means no basting. Not if you want crispy skin. Remember, basting just makes the skin wet and soft.
Step 34
Check the progress and when the wing tips and drumstick tips look nice and brown, after 30 to 60 minutes, grab 4 pieces of aluminum foil, each about 8" (20.3cm) square, and coat one side with vegetable oil so it won't stick. Cover the tops of the wings and drumsticks with the foil. You did lop off the wing tips and toss them in the gravy, didn't you? The foil will keep these skinny parts from burning.If you don't have a thermometer on a wire already in the breast, spot check the temperature with a good digital instant read thermometer by inserting the probe into the deepest part of the breast. Push the tip past the center and pull it out slowly. The lowest temp is the one to watch for. You can do this occasionally as needed. You won't harm anything by peeking.If necessary, add a quart of boiling water to the gravy pan. Don't add cold water or you can cool off the cooking chamber. Make sure there are at least 2 inches (5cm) of liquid in the pan at all times. Do not let the onions and other solids in the pan burn! Let them get dark, but not black. While you're under the hood, if you are using charcoal add another 15 to 20 chunks every hour. Resist the temptation to reach for the wood chips.If you fear that the bird is progressing too slowly and you are having trouble keeping the temp up to 325°F (162.8°C), preheat your indoor oven to 325°F (162.8°C) and move the bird and the gravy inside. Finishing it this way is fine. You will not lose your pitmaster card. The smoke flavor is already in the bird so now your focus must be on making sure it is not overcooked.
Step 35
As the meat temp approaches 160°F (71.1°C), tilt the bird and drain the cavity into the gravy. Now check temps all over, especially the back which can be a bit soggy or even undercooked if it is very close to the water. If the back isn't 160°F (71.1°C), remove the gravy pan and put the bird over direct heat to firm it up. This should take no more than 20 minutes or so, but watch things, because without that buffer of water, you can burn the back in a hurry.Now it is time to move the bird to the cutting board or a platter. Pick a platter with a lip that contain the copious juices. A lot of books say you should put a foil tent on the bird and rest it. Don't do it. This just makes the skin soggy. It does nothing to improve juiciness. Serve your meat hot and crispy. It will get more than enough resting as you move it from the cooker and while you carve.If you are going over the river and through the woods with your bird, or if your bird finishes early, read about how to keep it hot with a faux Cambro.
Step 36
Carefully remove the gravy pan from the cooker. Pour it through a strainer into a large pot or saucepan. I use the OXO Fat Separator shown here. On the fat separator, when you remove the red plug, clear stock rises up the spout and when you pour, the fat gets left behind. If you don't have a fat separator, use a large spoon or basting bulb to remove most of the fat. You'll never get it all, so don't obsess. Discard the solids. They have given you their all. Let it sit for about 10 minutes. Now taste the juice under the fat. It should be rich and flavorful. If you find it too weak bring it to a boil and cook it down a bit. Taste again and add salt only at the last minute. If you add salt and then reduce it, it will be too salty.
Step 37
I pour the gravy into a coffee carafe to keep it warm especially when I have to go to someone else's house for dinner. The fat rises in the thermos, so I can just pour some off before serving, or shake it up to mix it in. When you are ready to serve the bird, you can transfer some of the gravy to a gravy boat or serving bowl if you don't like the looks of the carafe. I usually splash some on the carved meat just before I put the platter on the table.As proof of its goodness, when you chill the leftovers it will solidify into a jelly. That's what happens to melted collagens, they turn to gelatin, and collagens bring flavor and texture to the table. See my article on meat science for more on the subject.Try to resist the temptation to thicken this gravy with flour or cornstarch. If the idea is to moisten meat, starchy sauces just don't get the job done. Starches are large molecules and they can't penetrate the tiny openings in the meat. The gravy just floats on top like a life preserver after the ship has gone down. My thin gravy will soak into the meat and add much more flavor. After you taste my gravy, you won't do the thick high school cafeteria stuff again. But if there are hardened traditionalists in the house, I have included instructions on how to satisfy them above.